13
English
Please observe the points below for trouble-free
installation and commissioning.
3.1
Prerequisites
• At least two Wallboxes with local load
management.
• At least one Wallbox and an external control
system with external load management.
• Maximum of 16 Wallboxes
• One hybrid/electric vehicle per Wallbox.
• Energy supply at least 6 A per Wallbox (in case of
overloading, ongoing charging processes will be
completed first).
i
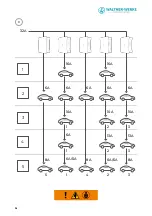
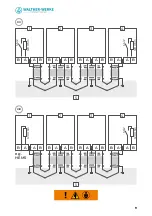
To avoid single-phase load peaks, connect the
devices with an alternating phase sequence.
• First Wallbox: L1, L2, L3.
• Second Wallbox: L2, L3, L1.
• Third Wallbox: L3, L1, L2.
• Fourth Wallbox: L1, L2, L3 again, etc.
3.2
Bus topology
Prerequisites:
• Bus system: RS485 fieldbus
• Protocol: Modbus RTU
• The leader distributes the total current in the
system.
• A charging current (default: 6 A) is configured for
each Wallbox. Set the required charging current.
• The follower Wallboxes revert to standby state
when not in use.
• Communication between the follower Wallbox
and leader Wallbox is required in order to start
the charging process.
Local load management:
• One Wallbox as the leader and at least one or
up to 15 Wallboxes as followers.
• The physical position of the Wallbox (leader)
is freely selectable.
External load management:
• External control system (e.g. HEMS) which is
configured as the leader and at least one or
up to 16 Wallboxes as followers.
3.3
Check-list for local load
management
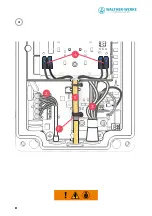
• Wire the power supply and the bus system
so as to avoid single-phase load peaks.
• Select the leader Wallbox.
• Set the number of follower Wallboxes in the
leader Wallbox.
• Set the maximum system current in the leader
Wallbox.
• Set the maximum and minimum individual
charging currents in each Wallbox.
• Set the bus ID in each follower Wallbox.
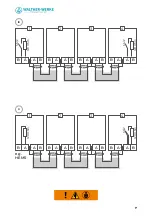
• Activate the bus terminating resistor in the first
and last Wallboxes.
• Configure the optional blocking function in the
leader Wallbox.
3.4
Check-list for external load
management
• Wire the power supply and the bus system so as
to avoid single-phase load peaks.
• Configure the external control system (following
the manufacturer’s instructions).
• Set each Wallbox as a follower Wallbox.
• Set the bus ID in each Wallbox.
• Set the maximum and minimum individual
charging currents in each Wallbox.
• Activate the bus terminating resistor in the
external control system and the last Wallbox.
4. Configuration of the Wallboxes
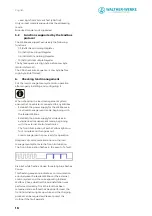
The individual Wallboxes must be pre-configured
using rotary switches and micro switches to operate
the integrated network of Wallboxes
. All
rotary switches and micro switches are initially set
to OFF. The configuration differs in some cases,
depending on the local or external load manage-
ment mode.
Mode-independent switch functions:
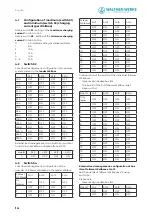
S1: rotary switch S1 is used to set the maximum
charging current of 6 A to 16 A per Wallbox
S3: configuration of minimum charging current
S6: bus terminating resistor On/Off
Switch functions in local load management mode:
S2: setting of maximum system current (only in
leader Wallbox)
S4: in leader Wallbox: setting of the number of
followers
S4: In follower Wallbox: setting of the respective bus ID
S5: setting of leader or follower, front illumination
and blocking
Switch functions in external load management mode:
S2: configuration of bus ID 16
S4: configuration of bus IDs 1 to 15
S5: setting of leader or follower, front illumination


