background image

WWW.

WAMBAM

FENCE.COM

7

ASSEMBLY


INSTRUCTIONS

BL19101

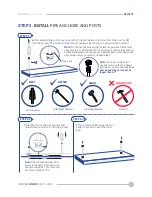
STEP 2

INSTALL

 PIPE ANCHORS AND POSTS


Note:

 Try to drive the pipe anchor as level as possible. Check level 

about every 12”. After about 18” the trajectory of the pipe anchor is 

usually established and you cannot manually pull it level (donut will 

not compensate for a severely crooked pipe). 

Note:

 If you are using a post 

pounder, remove the top donut 

and slide it up over the pipe. 

Your 

post pounder barrel cannot be 

longer than 24”.

BEST

BETTER

GOOD

DO NOT USE

F


After establishing your fence lines with string and stakes, drive your first Pipe Anchor 

(F)


into the ground. The bottom of the donut should sit just above the ground when finished. 

 Identify the location of your second 

pipe anchor and drive it into the ground. 

 If you removed the upper donut, 

slide it back down over the inner 

gear

.


Post Pounder

10lb Sledgehammer 

5lb Sledgehammer 

Hammer

STEP 2.2

STEP 2.3

Note:

 The distance between the 

inner plastic gears (not donuts) to 

the pipe should be 70⅜” (or center 

to center of pipe at 72”). 

72”

STEP 2.1

70⅜”

String line 

Summary of Contents for BL19101

Page 1: ...9101 BL19101 ASSEMBLY INSTRUCTIONS 60 MIN Approximate assembly time Want to see a video on how to assemble this product Scan the QR code NANTUCKET VINYL PICKET FENCE WITH POST AND NO DIG STEEL PIPE ANCHOR KIT 4 H X 6 W WWW WAMBAMFENCE COM VER 043021 ...

Page 2: ...mer service department parts nychbrands com hmmm wambamfence com 704 892 5222 877 778 5733 Customer service agents are available to take calls weekdays from 9am 5pm EST If you call outside of business hours please leave a voicemail To help you quickly and accurately please have reference item number BL19101 and the specific part name which can be found on page 6 It is helpful if you can provide th...

Page 3: ... adjust the top donuts to ensure each post is level to the connecting fence panel Figure B 6 Most yards are relatively level and will allow for a fairly simple installation If your yard is steeply pitched or is very uneven you may need to stair step your panels as illustrated below Post heights can be trimmed down as necessary Figure A View From Top Pipe Anchor String Line Ground Donut Inside Gear...

Page 4: ...u Local zoning laws and Home Owners Associations may regulate the height style and placement of your fence Some locations may even require a permit Ensure the installation of your fence is within your property line limits Your fence will become part of their yard too and you ll have an easier time building it if you can have access from both sides Besides you may get lucky if they decide to share ...

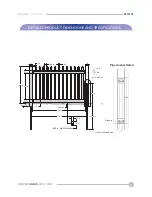
Page 5: ...AILED PRODUCT DIMENSIONS AND SPECIFICATIONS 090 in Wall Thickness Ground 3 5 in 1 5 in 72 in 68 in 3 to 4 in 2 in 3 5 in 33 in 3 5 in 48 in 1 in 3 46 in 1 5 in 26 in 32 5 in 3 5 in 1 5 in 4in x 4in Post 1 5 8in Galvanized Pipe Pipe Anchor Detail 26in Ground ...

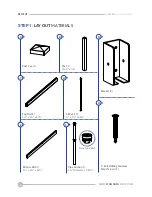
Page 6: ...S BL19101 STEP 1 LAY OUT MATERIALS A B C E F D G H Post Cap 1 Post 1 4 x 4 x 53 Bracket 4 1 Self Drilling Stainless Steel Screw 24 Top Rail 1 1 x 3 x 67 Bottom Rail 1 1 x 3 x 67 Pipe Anchor 1 1 Diameter x 58 L Picket 13 x 1 x 44 Donut and gear ...

Page 7: ... Your post pounder barrel cannot be longer than 24 BEST BETTER GOOD DO NOT USE F After establishing your fence lines with string and stakes drive your first Pipe Anchor F into the ground The bottom of the donut should sit just above the ground when finished Identify the location of your second pipe anchor and drive it into the ground If you removed the upper donut slide it back down over the inner...

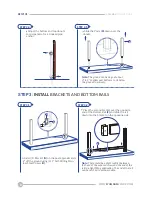
Page 8: ... on the post approximately 2 off the ground using 4 1 Self Drilling Stain less Steel Screws H Place the second bracket over the opposite end of the Bottom Rail E and slide the rail down into the bracket on the opposing side Note There could be a slight conflict between the head of the exposed screw and the end of the rail in a tight fitting application The end of the rail can be notched to accommo...

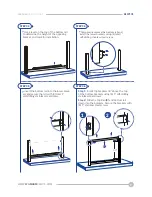
Page 9: ...ottom rail to determine the height of the opposing bracket and mark for installation Temporarily remove the bottom rail and install the lower brackets using 4 total 1 self drilling stainless steel screws Step 1 Install top brackets 33 above the top of the bottom brackets using 8 1 self drilling stainless steel screws Step 2 Slide the Top Rail C and bottom rail down into the brackets Secure the bra...

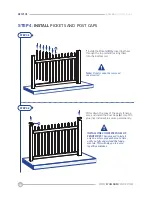
Page 10: ...posts if neces sary and install the Post Caps A Use PVC glue not included to secure permanently D A STEP 4 INSTALL PICKETS AND POST CAPS Note Pickets cannot be removed once inserted INSTALL ONE COMPLETE PANEL OF FENCE FIRST Then proceed to install only one or two pipe anchors at a time until you fully understand the funda mentals This will help you to avoid repetitive mistakes STEP 4 2 ...

Page 11: ...WWW WAMBAMFENCE COM 11 ASSEMBLY INSTRUCTIONS BL19101 WWW WAMBAMFENCE COM 704 892 5222 877 778 5733 hmmm wambamfence com 6935 Reames Rd Ste K Charlotte NC 28216 ...

Reviews: