background image

WWW.

WAMBAM

FENCE.COM

3

ASSEMBLY


INSTRUCTIONS

AG14005

1. Read over fence instructions first.

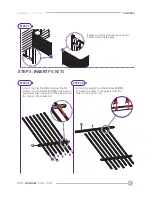
2. Pre-assemble the gate frame.

3. Install your gate posts before your fence posts.

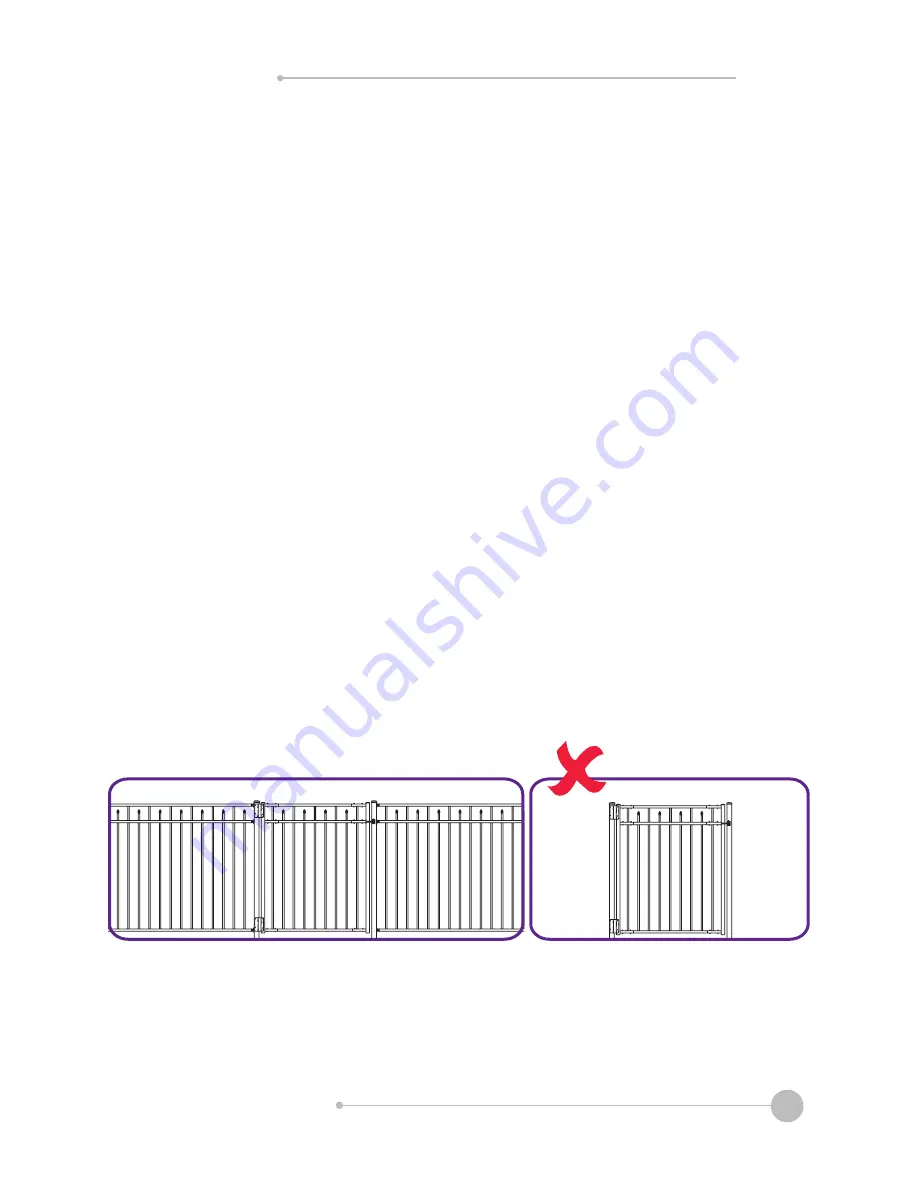
4. Do not hang your gate system off a single non-supported post.

Your gate and fence will work better together if you first take the time to read and 

understand your fence. 

Please do not screw the gate frame together until you have temporarily assembled the 

gate frame. In other words, do a dry run first. This will ensure:


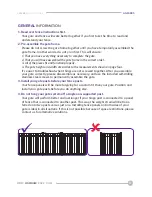
Your fence panels will be more forgiving for a custom fit than your gate. Position and 

install your gate posts before you do anything else. 

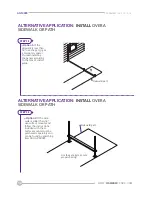
Your gate will perform better and last longer if your hinge post is connected to a panel 

of fence that is connected to another post. This way, the weight strain will be trans-

ferred onto two posts versus just one. Installing fence panels on both sides of your 

gate is ideal in all situations. If this is not possible because of space restrictions, please 

contact us for alternative solutions. 

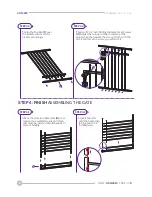
It’s easier to troubleshoot when things are not screwed together. After you assemble 

your gate correctly, please disassemble as necessary, and use the included self-drilling 

stainless steel screws to permanently assemble the gate.  

1. That you have everything necessary to complete the gate.

2. That you will have assembled the gate frame in the correct order.

3. All of the pieces fit and function properly.

4. The gate height and width are similar to the measurements shown on page four.

GENERAL


INFORMATION

Summary of Contents for HANDY ANDY

Page 1: ...1 ASSEMBLY INSTRUCTIONS AG14005 AG14005 ASSEMBLY INSTRUCTIONS 60 MIN Approximate assembly time Want to see a video on how to assemble this product Scan the QR code HANDY ANDY ALUMINUM GATE WWW WAMBAMF...

Page 2: ...omer care department parts nychbrands com hmmm wambamfence com 704 892 5222 877 778 5733 Customer service agents are available to take calls weekdays from 9am 5pm EST If you call outside of business h...

Page 3: ...and last longer if your hinge post is connected to a panel of fence that is connected to another post This way the weight strain will be trans ferred onto two posts versus just one Installing fence pa...

Page 4: ...LY INSTRUCTIONS AG14005 DETAILED PRODUCT DIMENSIONS AND SPECIFICATIONS Metal Post Stabilizer Gate Jig Vinyl Ground 50in 48in 42in 36in 58in 52in 2in 56in 3 94in 36in String Line Ground WamBam Ornament...

Page 5: ...Gate End Assembly 2 Picket Flat Top 3 5 8 x 5 8 x 531 2 Aluminum Gate Hinge 2 Latch Finger 1 Nut and Bolt 12 1 Self Drilling Stainless Steel Screw 32 Self Drilling Stainless Steel Screw 23 Gate Jig 1...

Page 6: ...and determine position Place the Gate Jig C over the metal post stabilizer Place the anchor positioners into the gate jig The pegs on the bottom of the anchor positioners will insert into both the gat...

Page 7: ...e STEP 3 INSERT PICKETS STEP 3 1 Insert the pickets into the Bottom Rail D and align the holes in the pickets with the holes in the bottom rail Insert the Flat Top H and Spear Top I Pickets into the M...

Page 8: ...rail If you force the screw you will strip it Align the Top Rail F over the pickets and insert the pickets accordingly F STEP 3 3 STEP 3 4 O STEP 4 FINISH ASSEMBLING THE GATE STEP 4 1 STEP 4 2 Face t...

Page 9: ...ate end assembly Insert the Bolts M fasten the nuts and tighten M STEP 5 ATTACH HINGES AND LATCH FINGER STEP 5 1 STEP 5 2 Attach the Aluminum Gate Hinges J to the gate post with 8 total 11 4 Self Dril...

Page 10: ...STEP 6 2 Use temporary spacers or blocks to rest the gate on during alignment and installation Fasten the hinges using 8 total 11 4 self drilling stainless steel screws Swing the gate open and drive 1...

Page 11: ...G14005 Align and fasten the Latch Catch L with 4 5 8 self drilling stainless steel screws Congratulations You did it Go grab a beverage of your choice admire your handiwork and show us what you got by...

Page 12: ...alling the panels according to the fence s install guide STEP 1 1 ALTERNATIVE APPLICATION INSTALL OVER A SIDEWALK OR PATH STEP 1 1 Sidewalk path Use the gate jig to ensure proper spacing Sidewalk path...

Page 13: ...WWW WAMBAMFENCE COM 13 ASSEMBLY INSTRUCTIONS AG14005 WWW WAMBAMFENCE COM 704 892 5222 877 778 5733 hmmm wambamfence com 6935 Reames Rd Ste K Charlotte NC 28216...

Reviews: