background image

For installation videos and more information, visit www.wambamfence.com

7

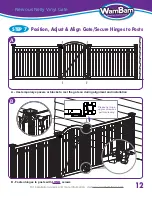
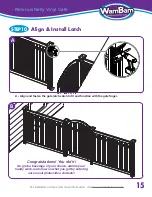
Completely assembled gate shown

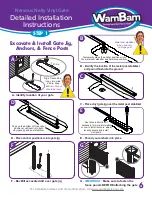
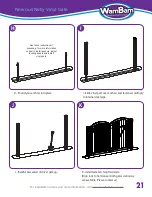
A - Run bead of vinyl weld continously around 

      the inside of the gate bracket

Nervous Nelly Vinyl Gate

Assemble the Gate Frame Bottom & Sides

STEP 2

GL

UE

Handle with care: vinyl weld

glue takes approximately 

five minutes to cure.

A

D - Insert vertical gate stiles. They will BOTTOM OUT 

         against bottom horizontal rail

C

D

B

Note that the bottom rail 

 is Ribbed internally.

GLUE

GLUE

 Did you do a dry run of assembly first? 

Please read page 1 of instructions.

C - Insert the bottom rail ALL THE WAY until it 

     BOTTOMS OUT INSIDE GATE BRACKET


B - Insert the bottom rail ALL THE WAY until it BOTTOMS OUT inside gate bracket


IMPORTANT!

Insert fully to this point.

Insert fully to this point.

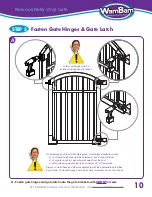
Fasten gate brackets to internal 

members though inside 

of frame using screws.

Summary of Contents for NERVOUS NELLY

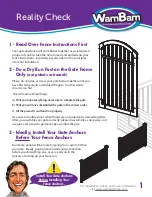
Page 1: ...REALLY Nervous Nelly Vinyl Gate Important stuff to know about installing your WamBam gate CLEVER JOE Your Installation Buddy 1 877 778 5733 www wambamfence com November 2014...

Page 2: ...first This will ensure three things a That you have everything necessary to complete the gate b That you will have assembled the gate in the correct order c All the pieces fit and function properly It...

Page 3: ...both sides of your gate is the ideal in all situations If this is not possible because of space restrictions please contact us for alternative solutions to overcome 5 Use Only Large Anchors for All Ga...

Page 4: ...plished 120 in 10 ft 1 5 8 in WOOD JIG Purchase separately 4x4 pressure treated wood and drill holes as illustrated Dispose vinyl jig included with gate kit Top View of Wood Jig For installation video...

Page 5: ...ch Brackets 2 Gate Latch 1 Middle Rail 1 Stainless Steel Screws 24 Gate Bottom Brackets 2 Gate Hinges 2 Bottom Rail 1 Gate Jig 1 Metal Post Stabilizer 1 Tek Screws 4 Sold Separately Posts WamBam Ancho...

Page 6: ...it www wambamfence com WamBam Anchor Large Only 7 75in 40 75in 3 5in 43 88in 66 05in 1 5in 3 5in 3 5in 1 5in 68in 61 5in 50in 54 5in Gate Installation Gate Assembly B A B C D 3 5in 1 5in 090in wall th...

Page 7: ...jig and post stabilizer See fence instructions if necessary for more information on how to install anchors adjust leveling donuts and install vinyl posts Bottom of trench should be level Excavate Ins...

Page 8: ...o cure A D Insert vertical gate stiles They will BOTTOM OUT against bottom horizontal rail C D B Note that the bottom rail is Ribbed internally GLUE GLUE Did you do a dry run of assembly first Please...

Page 9: ...tom rail and insert middle rail through pickets E Slide gate arch with brackets over the pickets and vertical gate stiles A E Nervous Nelly Vinyl Gate Insert Pickets Assemble the Gate Frame Top STEP 3...

Page 10: ...For installation videos and more information visit www wambamfence com 9 A A Screw into brackets as necessary Nervous Nelly Vinyl Gate Screw Gate Frame Brackets STEP 4...

Page 11: ...child safety gates most safety standards specify a Your fence height needs to be between 4 and 6 high minimum b Your gate needs to open outwards away from the pool c Latch releasing mechanism to be mi...

Page 12: ...ssemble Fasten Gate Brace STEP 6 Gate Brace Parts B Ensure that gate is square then screw bracing into place A B Top Bar Bottom Bar A Assemble gate brace by sliding the larger square tube over the sma...

Page 13: ...2 A A Use temporary spacers or blocks to rest the gate on during alignment and installation B Nervous Nelly Vinyl Gate Position Adjust Align Gate Secure Hinges to Posts STEP 7 B Fasten hinges to posts...

Page 14: ...vel fit and function to latching post C Hinges can be adjusted moderately to bring gate into level alignment with post C B Nervous Nelly Vinyl Gate Level Gate Adjust Hinges STEP 8 LEVEL D Latch is des...

Page 15: ...on E Insert small steel pin into one of the holes on hinge and rotate tensioner tool to release tension on the gate hinge to remove pin How to Set the Tension on Your Gate Hinge F E A How do I stop my...

Page 16: ...n and fasten the gate latch catch to fit and function with the gate finger B Nervous Nelly Vinyl Gate Align Install Latch STEP10 Congratulations You did it Go grab a beverage of your choice admire you...

Page 17: ...ath FROM PAGE 1 Side Walk Path A B C D E G F If sidewalk is less than 52 inches then use the gate jig as a temporary spacer H Trim bottom plate of anchor positioner if it interferes with sidewalk as n...

Page 18: ...yl gate jig to mark holes for drilling A Use a 1 5 8in concrete drill bit extension if needed and a concrete hammer drill B Drill both pre marked holes completely through concrete C D Trim Anchor Posi...

Page 19: ...ormation visit www wambamfence com 18 Nervous Nelly Vinyl Gate Side Walk Path A B C E D Use the gate jig to ensure proper spacing Sidewalk Path OPTION TWO If sidewalk is wider than 52 inches then use...

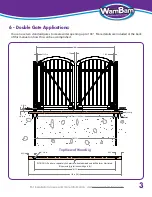
Page 20: ...B Double Gate Installation A Drill out 4x4x10 pressure treated lumber as per illustrated above 8 25 in 8 25 in 5 5 in 130 in 6 in C B Break off the three studs clean to the bottom of the base C Creat...

Page 21: ...locations of metal post stabilizers and pound flush into the ground E E Place wood jig over the metal post stabilizers The hole on the stabilizers should align with the holes on the wood jig F G G Al...

Page 22: ...xcavated dirt over gate jig K Install Gate Latching Hardware Drop rods to hold one or both gates stationary are available Please contact us I I Slide vinyl post over anchors and fasten accordingly to...

Reviews: