


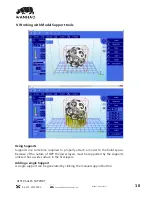


Moving Supports
After a manual or automatic support has been generated, individual supports can be moved
around the x:y plane the same way models can be moved. Select the support by double
clicking on it to select it, and hold down the ‘Shift’ key on your keyboard and move the
mouse. Supports will automatically scale vertically under the model they support.
Angled Supports
Supports can be angled inwards towards the objects they support. This can often resolve
clearance issues with vertical supports. You can turn a vertical support into an angled support
by selecting it, and holding the ‘Ctrl’ key and clicking on the model you want to support.
ōŘȖĶNŸŘʩ¶ȖNjǼÞŸŘ
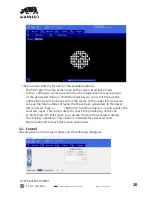
Under the Support Generation view, you can click ‘show downward facing polys’. This will
ÌÞ¶ÌĶÞ¶ÌǼĶĶƼŸĶɴ¶ŸŘǣÞŘǼÌsŎŸ_sĶǼÌǼNjsƼŸÞŘǼs__ŸɠŘɠNj_EɴǼÌsǣƼsOÞʩs__s¶NjssʳǻÌÞǣ
helps you manually place supports under un-supported downward facing areas of a model.
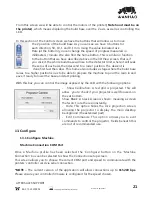
Auto Support on Grid
After a model is loaded into the scene and selected, you can automatically generate a ‘bed
of nails’ support for the model by selecting . You can specify the grid spacing and the size of
the generated supports. If you wish to only generate supports on downward facing polygons,
check the boxes under ‘support general’ and ‘generate only on downward’
Adaptive supports
You can add supports to areas in the model that are unsupported. There are 2 algorithms to
help you accomplish this.
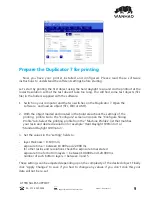
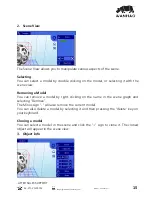
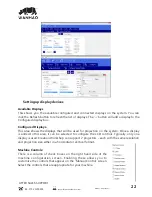
10. Saving a Scene
NĶÞOĨǼŸǣɚsǼÌsOȖNjNjsŘǼŸEĠsOǼǣʳǢǻĵŸNjʳNɟǢʩĶsʳǻÌsʳNɟǢ¯ŸNjŎǼ
allows you to prepare a scene to be printed repeatedly in the future,
together with supports and positioning.
After one or more models have been loaded and manipulated on the build platform, the
entire scene can be saved as an STL model for later use. Simply click on the ‘File->Save Scene
Ǣǻĵ˅ŎsŘȖÞǼsŎǼŸǣɚsǼÌsǣOsŘsŎŸ_sĶʳǻÌÞǣɠÞĶĶʪǼǼsŘĶĶŎŸ_sĶǣÞŘǣOsŘsÞŘǼŸǣÞضĶs
STL file. Scenes can also be saved to CWS files.. These scene files can be used to create a
scene with supports, slice the scene, and later load to print your scene without the need for
re-slicing.
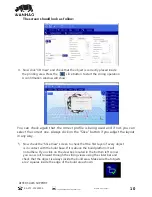
11. Slice View
In the Slice View screen we get the following information:
AFTER SALES SUPPORT
86-571-23290996
support@wanhao3dprinter.com
Model : Duplicator 7
19


