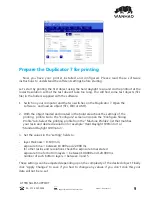


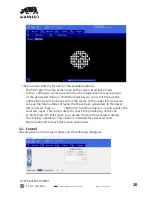


The ones shown in the screen show are the ones suggested to start working with the
LCD printer.
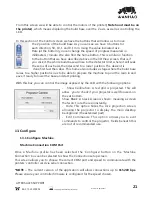
Saving your changes
After you have configured your machine profile, be sure to click the “Save Changes”
button to save and apply the changes.
ˠˢʳˡNŸŘʩ¶ȖNjsǢĶÞOÞضƻNjŸʩĶs
ÝŘŸNj_sNjǼŸǣĶÞOsŎŸ_sĶÞŘǼŸÞŎ¶sǣʰɴŸȖŎȖǣǼʩNjǣǼǣsǼȖƼǣĶÞOÞضƼNjŸʩĶsʳ_s¯ȖĶǼ
ƼNjŸʩĶsÌǣEssŘONjsǼs_ǼÌsʩNjǣǼǼÞŎsǼÌsƼƼĶÞOǼÞŸŘɠǣǣǼNjǼs_ʳɳŸȖOŘONjsǼsŘsɠ
slicing profiles and manage them in much the same way you can manage machine
profiles. The ‘Slice Profiles Config’ tab item will allow you to create, delete, or edit a
ǣĶÞOÞضŘ_EȖÞĶ_ÞضƼNjŸʩĶsʳ
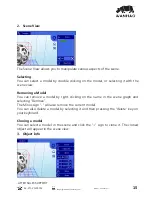
On the left side of the screen we can see the following:
ŸƻNjŸʩĶsÞŘȕǣsʲÝŘǼÌÞǣ_NjŸƼ_ŸɠŘEŸɮɠsOŘǣsĶsOǼǼÌsƼNjŸʩĶsɠsNjsOȖNjNjsŘǼĶɴ
ȖǣÞضʰɠÞǼÌÞŘĶÞǣǼŸ¯ƼNjsɚÞŸȖǣĶɴɚÞĶEĶsƼNjŸʩĶsǣʳǻÌsǣŸ¯ǼɠNjsOŸŎsƼNjsĶŸ_s_
ɠÞǼÌŘȖŎEsNjŸ¯ƼNjsǣsǼƼNjŸʩĶsǣEǣs_ŸŘŸȖNjNjsǣÞŘǣʳɟsNjsOŸŎŎsŘ_ȖǣÞض
ǼÌsɭɳNjsǣŸĶȖǼÞŸŘŸ¯ˠ˟˟ͼŎʳɟÞǼÌǼÌÞǣƼNjŸʩĶsɴŸȖOŘƼsNj¯ŸNjŎɴŸȖNjʩNjǣǼ
ƼNjÞŘǼŸȖǼǣɠÞǼÌǼÌsǼsǣǼʩ¶ȖNjsǣƼNjŸɚÞ_s_ʳ
ŸNŸŘʩ¶ȖNjs_ǢĶÞOÞضƻNjŸʩĶsǣʲÝŘǼÌÞǣ_ÞĶŸ¶ȖsɠsOŘǣssǼÌsĶÞǣǼŸ¯ĶĶƼNjŸʩĶsǣǼÌǼ
NjsɚÞĶEĶsʳǻÌsƼNjŸ¶NjŎOŸŎsǣƼNjsĶŸ_s_ɠÞǼÌǣsɚsNjĶƼNjŸʩĶsǣONjsǼs_Ǽ
different types of resolution (100 and 50 µμm) and for different resins. We will
ĨssƼȖƼ_ǼÞضǼÌsƼNjŸʩĶsǣŘ_ǣÌNjÞضǼÌsʩĶsǣŸŘĶÞŘsǼˆǣȖƼƼŸNjǼˇʳɟssɮƼsOǼ
ǼÌsǣsƼNjŸʩĶsǣǼŸEssŘŸȖ¶ÌǣǼÌsNjsŎɴEsƼNjÞŘǼǣǼÌǼɚNjɴÞŘOŸŎƼĶsɮÞǼɴŘ_
ĶɴsNjǼÌÞOĨŘsǣǣʳɳŸȖOŘĶǣŸONjsǼsŘsɠƼNjŸʩĶsȖǣÞضǼÌsEȖǼǼŸŘŸNj_sĶsǼsŸŘs
by pushing the button. If
AFTER SALES SUPPORT
86-571-23290996
support@wanhao3dprinter.com
Model : Duplicator 7
23


