background image

10

11

1

888

557

3848

Wards.com      

Assembly (cont’d)

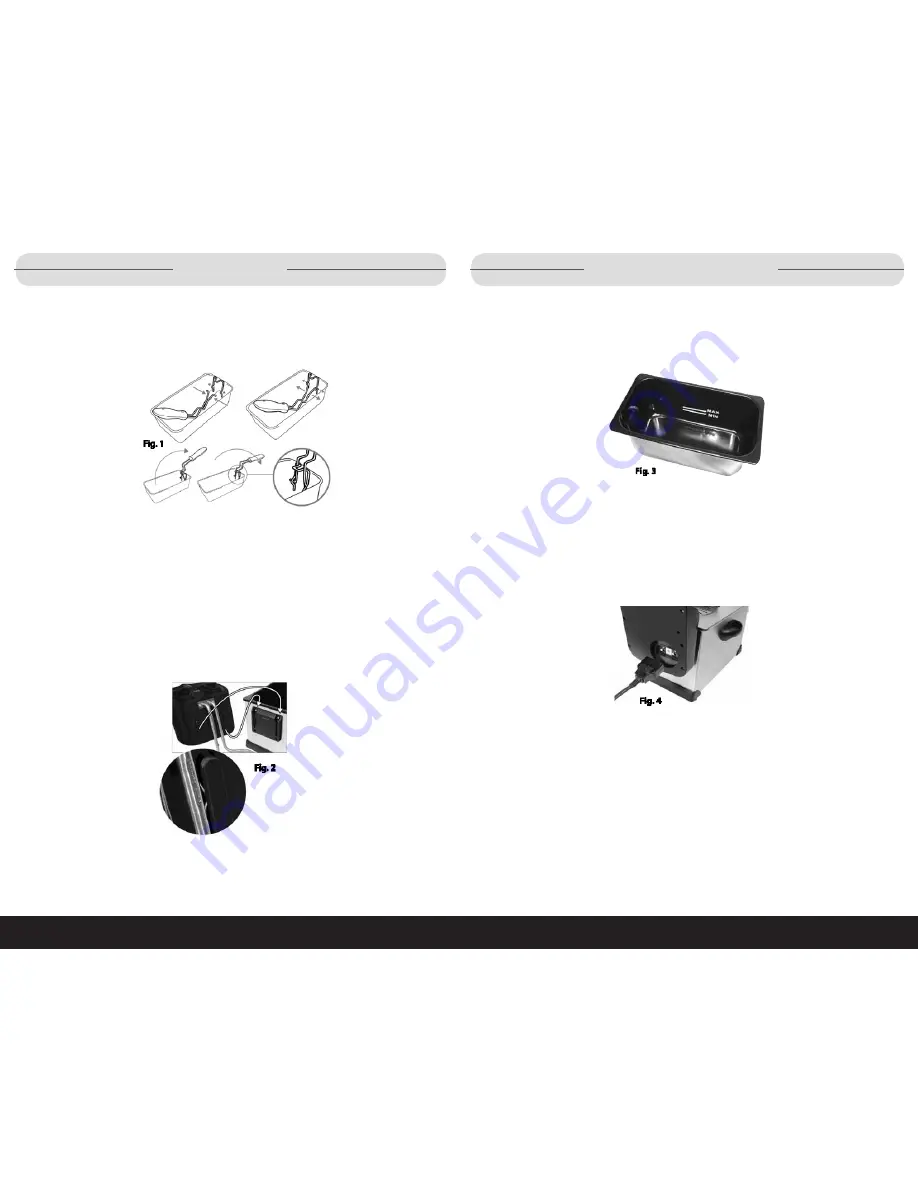
  4.  Fill oil in oil pot (4), making sure you do not fill past the maximum oil fill line (indi-

cated on the side of the oil pot as shown in Figure 3)
 Do NOT overfill oil pot (4) (capacity is 3.5 quarts)

  5.  Place lid (10) on oil pot (4).
  6.  Insert magnetic plug (11) into the back of the control panel, making sure it is 

fully engaged in socket (12). NOTE: Magnetic plug (11) will only fit in the socket 
(12) one way. Make sure to insert as indicated “This side up” (Figure 4).

Assembly 

  1.  Assemble frying basket (5) by pinching handle fork (6) into basket holding rings 

(7). Pull back handle (6) until locked into place correctly (Figure 1). 

CAUTION: 

Ensure deep frying basket (5) has been correctly attached before frying.

  2.  Insert oil pot (4) into exterior housing unit (9).
  3.  Attach temperature control panel (17) and heating element (18) by lining the 2 

sliding tabs (15) into holding rails (14) (located in the back of the unit) securely  
in place (Figure 2). NOTE: Power activating switch (13) is activated when  
temperature control panel (17) and heating element (18) are placed correctly 
into holding rails.

Summary of Contents for CDF-2060TSA

Page 1: ...A 120V 60Hz 1500W Wards com 1 888 557 3848 Montgomery Ward Customer Service 3650 Milwaukee Street Madison WI 53714 8 00 am to Midnight Monday through Friday Recipes and cooking tips inside by Wards co...

Page 2: ...AUTION Risk of fire electric shock burns or injury if deep fryer is not connected as instructed 2 Remove all packaging plastics and other materials from unit and wash all re movable accessories before...

Page 3: ...e Clean and cover the unit and store in a dry place if not being used for an extended period of time 23 Do NOT store any materials other than manufacturer s recommended accessories in this unit when n...

Page 4: ...ower cord or extension cord is used The marked electrical rating of the detachable power supply cord or exten sion cord should be at least as great as the electrical rating of the appliance If the app...

Page 5: ...emperature control panel 17 Let oil drip back in oil pot 4 and place heating element 18 on paper towel Carefully and gently clean off any oil residue from heating element 18 Do NOT immerse in or expos...

Page 6: ...e to insert as indicated This side up Figure 4 Assembly 1 Assemble frying basket 5 by pinching handle fork 6 into basket holding rings 7 Pull back handle 6 until locked into place correctly Figure 1 C...

Page 7: ...urns or scalding ALWAYS use oven mitts when handling frying basket or removing lid 5 Place lid 10 back on oil pot 4 6 ALWAYS monitor food when frying WARNING There is a risk of oil catching fire if ov...

Page 8: ...er the basket into the hot oil first and then gently and carefully place battered foods into the oil directly This will prevent the batter from catching and sticking to the wiring of the basket Never...

Page 9: ...p salt 1 tsp baking powder 1 2 tsp dried dill weed 3 4 cup beer 1 2 cup milk 2 eggs 2 lbs cod fillets 2 qts vegetable oil for frying In a large bowl mix together flour salt baking powder and dill Add...

Page 10: ...d serve with prepared dipping sauce Corn Dogs 1 2 cup yellow corn meal 1 2 cup flour 1 tsp honey 1 2 tsp salt 1 egg lightly beaten 6 skewers or sticks 6 8 hot dogs Frankfurters 1 Tbsp sugar 1 tsp baki...

Page 11: ...1 tsp vanilla extract 4 eggs at room temp In the deep fryer heat the oil to 350 F Combine the flour sugar and nutmeg and set aside In a medium saucepan heat water or milk over medium heat Add the butt...

Page 12: ...be free from defects in material and workmanship for one year from provable date of purchase Within this warranty period Montgomery Ward will repair or replace at its option defective parts of this Ch...

Reviews: