background image

6

  5.   Place a wide, shallow bowl or plate beneath the grinder tube to 

catch food.

  6.   Switch appliance to GRIND or SAUSAGE position. The 

appliance must always be in GRIND or SAUSAGE position 

before adding food.

  7.   Place food on the large die-cast hopper and use pusher to 

feed food through opening.

OPERATING INSTRUCTIONS

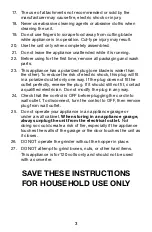
  1.   Attach grinder/feeder head to 

motor unit. Fit grinder/feeder 

head tightly into attachment 

opening. Tighten the locking 

knob by turning it clockwise.

  2.   Insert feed screw into the 

grinder/feeder head.  

NOTE: Make sure feed 

screw is fully inserted or 

cutting blade will not fit. 

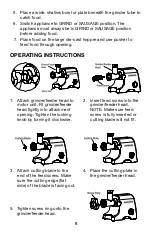
  4.   Place the cutting plate in 

the grinder/feeder head.

  3.   Attach cutting blade to the 

end of the feed screw. Make 

sure the cutting edge (flat 

side) of the blade is facing out.

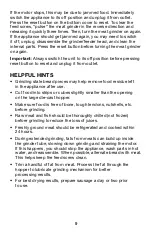
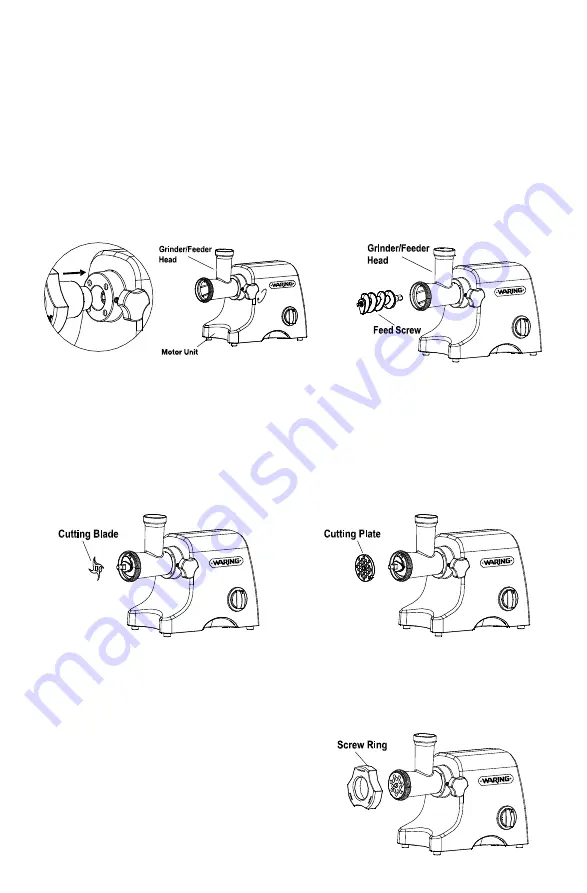
  5.   Tighten screw ring onto the 

grinder/feeder head.

Summary of Contents for MG1200

Page 1: ...MG1200 Professional MEAT GRINDER For your safety and continued enjoyment of this product always read the instruction book carefully before using...

Page 2: ...cord or plug or after the appliance malfunctions or is dropped or damaged in any manner Return to the nearest authorized service center for examination repair or adjustment 8 Never feed food by hand a...

Page 3: ...y If the plug does not fit the outlet perfectly reverse the plug If it should still not fit contact a qualified electrician Do not modify the plug in any way 24 Check that the control is OFF before pl...

Page 4: ...Grinder Feeder Head 8 Feed Screw NOTE Cutting plates sausage attachments and sausage making ring are stored in food pusher 9 Cutting Blade 10 Cutting Plate fine 11 Cutting Plate medium 12 Cutting Pla...

Page 5: ...it is set into motor housing 4 NOTE Position cutting blade onto feed screw shaft with the flat cutting surface facing out from the feed screw If it is not fitted properly meat will not be ground and...

Page 6: ...structions 1 Attach grinder feeder head to motor unit Fit grinder feeder head tightly into attachment opening Tighten the locking knob by turning it clockwise 2 Insert feed screw into the grinder feed...

Page 7: ...SAUSAGES The sausage attachments allow you to blend meat and spices for homemade sausages NOTE To avoid over stretching and splitting the casing do not make the sausage too thick Keep casings moist b...

Page 8: ...t at the end of the 2 casing overhang 5 Continue step 3 until all the meat has been used or the casing is approximately 2 from being completely full 6 Turn unit off remove the end of the casing from t...

Page 9: ...ieces may help remove food residue left in the appliance after use Cut food into strips or cubes slightly smaller than the opening on the large die cast hopper Make sure food is free of bone tough ten...

Page 10: ...parts with clear hot water then dry REMOVABLE PARTS ARE NOT DISHWASHER SAFE Wipe motor unit with a damp cloth Do not use harsh or abrasive cleaners Cutting blade and cutting plates should be coated w...

Page 11: ...11 Notes...

Page 12: ...of third parties used herein are the trademarks or service marks of their respective owners 2012 Waring Consumer Products 150 Milford Road East Windsor NJ 08520 www waringpro com Printed in China MG1...

Reviews: