background image

77

ASSEMBLy OF BATCH BOWL PARTS 

We will use the terms bowl, work bowl and batch bowl interchangeably throughout this instruction 

book. They mean the same thing.
•  Clean and sanitize the motor base, and wash, rinse, and sanitize the bowl, cover, food pusher, food 

pusher insert and processing tools prior to initial use.

•  Place the base on a counter or table near an outlet. Position it so you look at the front of the unit and 

can see the control levers. Be certain that the cord is unplugged and the OFF (

) lever has been 

pressed. Do not plug in the cord until the processor is completely assembled. 

• Pick up the transparent work bowl, holding it in both hands with the handle toward you.
•  Place the bowl on the base, fitting its central tube over the motor shaft on the base and placing its 

handle slightly to the left of front-center (at about a 7 o’clock position).

•  Press the bowl down so the lower rim fits around the circular platform. Turn the bowl counterclock-

wise as far as it will go. It will lock into position with the tabs on the sides of the platform.

Read this if assembling the batch bowl parts to use S-blade (cutter blade).
•  Pick up the metal blade, noting the diagram on the top of the plastic center. It matches the shape of 

the motor shaft.

•  Place the S-blade over the tip of the motor shaft, lining up the inside of the hub with the shaft. 

Press it down firmly, rotating the center hub until the blade assembly is fully seated. It should 

easily drop into place. Push firmly to lock and seal S-blade hub in place. Be sure it is pushed down  

as far as it will go. If it is not all the way down, it may become damaged and any liquid may leak. 

Push only on the center section (plastic part); never touch the cutting blade as it is extremely sharp. 

•  Check to be sure the blade is all the way down by turning it back and forth while lightly pushing it 

down. If properly installed and fully seated, the lower blade will be positioned just above the inside 

bottom of the bowl.

• If processing food with the S-blade, now is the time to add the food or liquid to the work bowl.
• Always process dry food first, then add wet food.
• Do not fill liquid past “Max liquid fill” level. If too much liquid is used, it will overflow. In this case, 

stop operation, remove liquid to below “Max liquid fill” line and continue.

Read this if assembling batch bowl parts to use accessory discs in batch bowl.
• Do not put any food in the bowl before placing the accessory disc onto the shaft.
•  Select the appropriate accessory disc: shredding disc or slicing disc.
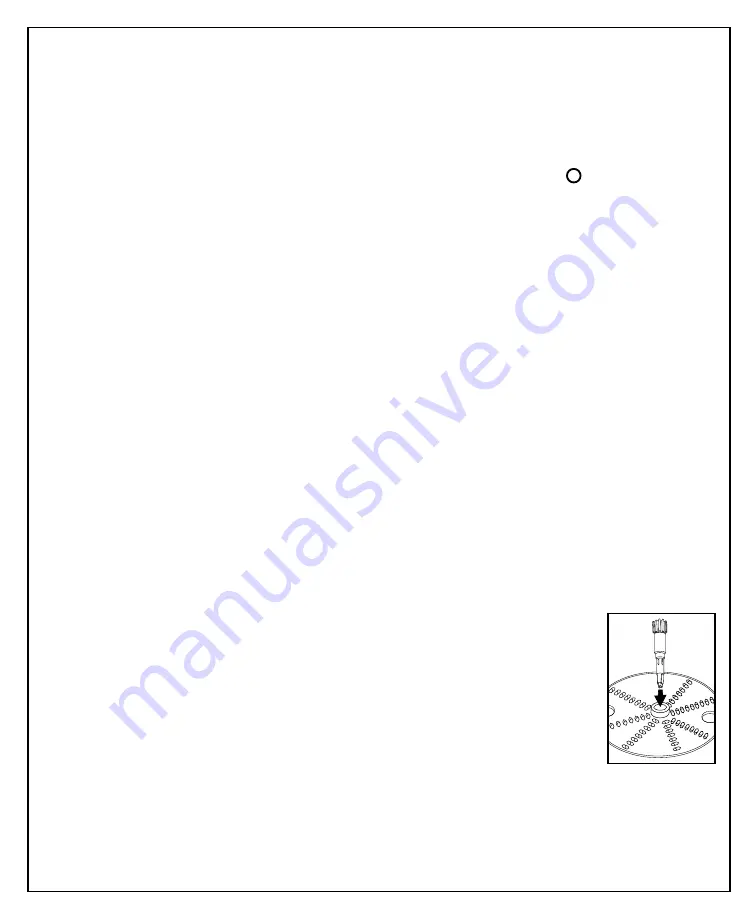
•  Hold the disc with the cutting side facing your hand. Be careful not to scrape your 

hand on the sharp edges. Notice the bottom of the disc has a plastic receptacle for 

the detachable stem. Push the disc stem into the receptacle, lining up the notches 

at the end. Refer to diagram.

•  Once the stem is installed in the proper disc, carefully guide the center disc hub 

over the metal shaft so the double flats on the shaft line up with the disc stem. Put 

the disc on top of the shaft and rotate until it drops down and into place.  

Be sure it is pushed down as far as it will go. Push on the outside rim only; never 

touch the cutting blades. It should easily drop into place, but if not, then gently 

rock it back and forth until you feel the disc drop into place. 

Note: Do not put any food in the bowl before placing the accessory disc onto the shaft.
        (batch 

bowl 

assembly 

continues)

Summary of Contents for WFP14SCE

Page 1: ...aring Zerkleinerer WFP14SCE WFP14SCKL Manuale d uso del robot da cucina WFP14SCE WFP14SCKL Waring Manuel d utilisation du robot de cuisine WFP14SCE WFP14SCKL Bedieningshandleiding voor de Waring WFP14...

Page 2: ...is not running 7 To protect against risk of electrical shock do not put base in water or other liquids 8 Avoid contact with moving parts Never feed food by hand when slicing or shredding Always use fo...

Page 3: ...s two round prongs and there are two grounding clips on the sides of the socket This plug is non polarized so the plug can be inserted in either direction into the socket Grounding is accomplished whe...

Page 4: ...ct Disposal of this product This marking indicates that this product should not be disposed with other household wastes throughout the EU To prevent possible harm to the environment or human health fr...

Page 5: ...urface b Large pusher with full size and reduced size feed options c Small pusher used within the large pusher for smaller vegetables pepperoni etc Note This combination pusher allows use of the entir...

Page 6: ...6 8 2a 2b 1 6 4 5 5a 5b 5c 7 2a 2b 1 13 11 12 5b 5c 10 9...

Page 7: ...t may become damaged and any liquid may leak Push only on the center section plastic part never touch the cutting blade as it is extremely sharp Check to be sure the blade is all the way down by turni...

Page 8: ...egetables The smaller pusher nests in the larger pusher and can be used for smaller vegetables guiding long thin vegetables for more precise cuts or for jobs like slicing pepperoni Large pusher Insert...

Page 9: ...e To remove the blade keep a slight downward pressure on the top of the center hub of the blade while removing the bowl from the motor base This will form a seal to prevent food particles from spillin...

Page 10: ...tem to disc After selecting the appropriate disc and attaching stem pick up the disc by holding the disc firmly between both hands Be careful not to grab the blades or scrape your hands on the shreddi...

Page 11: ...e food processor to operate This is an important safety feature Small pusher To use the small pusher lift it up and out of the large pusher When using the small pusher the large pusher becomes the fee...

Page 12: ...as long as you hold the lever down it stops when you release the lever You control pulsing You control the duration of each pulse by the amount of time you hold the lever down You control the frequenc...

Page 13: ...e is typically used when inserting vegetables vertically for smaller cuts It should be used when slicing foods such as carrots celery pepperoni etc when a consistent flat result is desired This pusher...

Page 14: ...f over processing Check the texture frequently by looking through the cover of the work bowl If you want a finer chop press and release the OFF PULSE lever until you achieve the desired texture Onions...

Page 15: ...peppers are an exception Remove the stem and cut the stem end flat Remove the core and scoop out the seeds Leave the end opposite the stem whole to keep the structure stiff This ensures round even sli...

Page 16: ...cold water to stop the cooking When they are cold to the touch drain and dry them Stack them in the feed tube horizontally to about 1 inch 2 5 cm from the top Use the slicing disc Be sure the small p...

Page 17: ...and large seeds Be sure the food will fit into the proper feed chute Select which feed tube to use Horizontal placement of foods such as carrots and zucchini will result in a longer shredded product...

Page 18: ...al Protection section page 13 Turn unit off and unplug Remove bowl attachment Remove food being processed from inside the bowl and discard Allow unit to cool for 5 minutes Reassemble unit and run firs...

Page 19: ...he bowl cover has a black seal around its outer rim that is easily removable for cleaning and should be cleaned periodically There are three small holes on the outer lip of the top of the cover for pu...

Page 20: ...per Cold 50 F 10 21 C Institutional gallon To clean and sanitize the motor base Clean and sanitize the motor base prior to initial use and after each use Unplug the unit then wipe down the exterior su...

Page 21: ...21...

Page 22: ...l bloque motor en agua u otro l quido 8 Evite el contacto con las piezas m viles Nunca introduzca la mano en la boca de llenado Siempre utilice el empujador 9 Espere hasta que el motor se haya detenid...

Page 23: ...ricas Hay un polo de puesta a tierra en ambos lados de la toma de corriente Este tipo de enchufe no est polarizado Por lo tanto encajar en la toma de corriente de cualquiera manera Se realiza la puest...

Page 24: ...cto no debe eliminarse junto con los desechos dom sticos en ning n pa s de la U E Para proteger el medio ambiente evitar perjuicios a la salud p blica resultantes de la eliminaci n de desechos no cont...

Page 25: ...do a Boca de llenado ovalada ancha para reducir el tiempo de preparaci n b Empujador grande ideal para los alimentos grandes c Empujador peque o ideal para los alimentos finos zanahorias apio salchich...

Page 26: ...26 8 2a 2b 1 6 4 5 5a 5b 5c 7 2a 2b 1 13 11 12 5b 5c 10 9...

Page 27: ...y l quido podr a derramarse Los filos de la cuchilla son muy afilados Nunca los toque Siempre sostenga la cuchilla por la parte de pl stico Aseg rese de que la cuchilla est bien asentada volte ndola...

Page 28: ...ujador peque o para cortar las verduras peque as o finas o para tareas precisas como cortar salchicha en rodajas Empujador grande Introduzca el empujador peque o en el centro del empujador grande Intr...

Page 29: ...nsejamos que retire el bol del bloque motor antes de sacar la cuchilla Apriete la cuchilla mientras alza el bol Esto impedir que los alimentos se derramen hacia el bloque motor IMPORTANTE VAC E EL BOL...

Page 30: ...isco al adaptador seg n se describi en la secci n Instalaci n de los discos Sostenga el disco que desea usar con ambas manos Tenga cuidado de no tocar los filos del disco Haga coincidir el eje del dis...

Page 31: ...aparato no se pondr en marcha a menos que el empujador est debidamente insertado Esta caracter stica de seguridad es muy importante Empujador peque o Para usar la boca de llenado peque a retire el emp...

Page 32: ...usar la funci n de pulso oprima repetidamente el bot n OFF PULSE El motor permanecer encendido hasta que suelte el bot n La funci n de pulso ofrece m s control pues permite controlar con precisi n la...

Page 33: ...Empujador peque o El empujador peque o sirve para empujar los alimentos introducidos verticalmente en el centro del empujador grande Permite obtener pedazos m s cortos Por lo general se usa para cort...

Page 34: ...alimentos Averig e la textura de los alimentos a menudo Siga oprimiendo repetidamente el bot n OFF PULSE hasta obtener la consistencia deseada Ciertos alimentos como las cebollas suelen licuarse muy...

Page 35: ...c tricos Tampoco es necesario pelarlos Para cortar pimientos en rodajas Quite el tallo y corte el lado del tallo recto Quite el coraz n y las semillas con una cuchara No corte el otro lado del pimient...

Page 36: ...as inmediatamente en agua helada para detener la cocci n Una vez fr as esc rralas y s quelas Disp ngalas horizontalmente en la boca de llenado llenando sta hasta 2 5 cm de la cumbre Utilice el disco r...

Page 37: ...ye un disco triturador rallador reversible con un lado que produce resultados finos y otro que produce resultados medios Lave todos los alimentos antes de procesarlos Pele las frutas verduras si fuera...

Page 38: ...ato Retire el bol del bloque motor Vac e el bol Permita que el aparato enfr e durante 5 minutos Vuelva a instalar el bol cierre la tapa y haga funcionar el aparato vac o durante unos segundos antes de...

Page 39: ...ebe limpiarse regularmente Notar tres peque os orificios en el borde de la tapa Para retirar el sello simplemente introduzca un objeto fino como un palillo o un clip en los orificios y empuje el sello...

Page 40: ...tor Limpie y sanee el bloque motor antes del primer uso y despu s de cada uso Desconecte el aparato y limpie la base con una esponja o un pa o ligeramente humedecido con detergente l quido Despu s enj...

Page 41: ...e liquide 8 viter tout contact avec les l ments en mouvement Ne jamais introduire la main ou les doigts dans l entonnoir alors que l appareil est en marche Utiliser le poussoir 9 Attendre que le moteu...

Page 42: ...ndriques Cette fiche n est pas polaris e si bien qu elle peut s ins rer dans la prise dans n importe quel sens La mise la terre se fait quand les bornes de la prise entrent en contact avec les ergots...

Page 43: ...ot Mise au rebut Le symbole ci contre indique que dans toute l U E ce produit ne doit pas tre mis au rebut avec le reste des ordures m nag res Afin de prot ger l environnement et la sant publique cont...

Page 44: ...r duire le temps de pr paration b Gros poussoir id al pour les gros aliments c Petit poussoir id al pour les aliments fins carottes c leri saucisse etc Remarque Le petit poussoir s embo te dans le gro...

Page 45: ...45 8 2a 2b 1 6 4 5 5a 5b 5c 7 2a 2b 1 13 11 12 5b 5c 10 9...

Page 46: ...tenir par la partie plastique V rifier que le couteau est bien engag en le faisant pivoter d avant en arri re La lame inf rieure du couteau devrait pratiquement toucher le fond du bol Si vous souhait...

Page 47: ...pour les gros l gumes Utiliser le petit poussoir pour les aliments requ rant une coupe plus pr cise comme par exemple les petits l gumes les l gumes fins ou les saucisses Gros poussoir Introduire le p...

Page 48: ...ur le maintenir en place Cela vitera que les aliments d goulinent sur le socle moteur ou votre plan de travail VIDER LE BOL AVANT DE RETIRER LE COUTEAU POUR VITER LES FUITES Vous pouvez maintenant ret...

Page 49: ...e sur l arbre du moteur Vous ne devriez pas rencontrer de r sistance En cas de difficult tourner le disque l g rement jusqu ce qu il s embo te V rifier qu il est bien enfonc Pousser sur les bords du d...

Page 50: ...tit poussoir du gros poussoir Introduire les aliments dans la goulotte au centre du gros poussoir et utiliser le petit poussoir pour les pousser D SASSEMBLAGE DU BOL D BIT CONTINU TOUJOURS D BRANCHER...

Page 51: ...continuera tourner aussi longtemps que vous appuierez sur le bouton et s arr tera lorsque vous le rel cherez La fonction pulse vous offre davantage de contr le car elle permet de contr ler le nombre e...

Page 52: ...e petit poussoir sert g n ralement pousser les aliments introduits la verticale dans la goulotte au centre du gros poussoir Il permet d obtenir des morceaux plus petits Il s utilise typiquement pour c...

Page 53: ...r les aliments V rifier la texture des aliments fr quemment au travers du couvercle Utiliser la fonction pulse jusqu obtention de la consistance voulue Certains aliments comme les oignons ont tendance...

Page 54: ...sir des fruits m rs mais fermes Toujours retirer les queues p pins et noyaux Il n est pas n cessaire de retirer les p pins des agrumes Il n est pas n cessaire non plus de les peler Poivrons Retirer la...

Page 55: ...e de fa on ce que chaque c t ait approximativement le m me diam tre Haricots verts la fran aise Couper les bouts des haricots de fa on ce qu ils rentrent horizontalement dans l entonnoir Les blanchir...

Page 56: ...pendant 1 heure ou plus avant de le trancher Ne pas essayer de trancher de la Mozzarella Cela pourrait endommager l appareil Utilisation du disque mincer Votre robot de cuisine Waring inclut un disque...

Page 57: ...rotection du moteur teindre et d brancher l appareil Retirer le bol du socle Vider le bol Laisser l appareil refroidir pendant 5 minutes Remettre le bol sur le socle moteur refermer le couvercle et fa...

Page 58: ...nt Tous les l ments sont lavables au lave vaisselle Le joint d tanch it du couvercle est amovible et devrait tre nettoy r guli rement Il y a trois petits trous sur le rebord du couvercle Pour retirer...

Page 59: ...10 C 50 F 4 L d eau Nettoyage du socle moteur Nettoyer et d sinfecter le socle moteur avant d utiliser l appareil pour la premi re fois et apr s chaque utilisation D brancher l appareil et essuyer le...

Page 60: ..._____________ _______________________________________________________________________________________ _______________________________________________________________________________________ __________...

Page 61: ..._____________ _______________________________________________________________________________________ _______________________________________________________________________________________ __________...

Page 62: ...iennent leurs propri taires respectifs Waring Commercial un marchio depositato di Conair Corporation Tutti gli altri marchi di fabbrica o di servizio riportati sono marchi di fabbrica o di servizio de...

Reviews: