background image

14 June 2016 

Due to continued product improvement, Warmington Ind LTD reserves the right to change product specifications without prior notification. 

All Dimension are in mm………….Copyright ©  

15 

GENERAL NOTES


NOTES: 


 

These installation and operating instructions should be kept in a safe place.  Should you require another 


copy, download from the 

Warmington

 website www.warmington.co.nz 

 

This appliance must be installed in accordance with the manufacturer’s written instructions to comply with 


 the 

Warmington

 warranty. 

 

The appliance and flue system must be installed in accordance with relevant standards and the  


appropriate building codes. 

 

This appliance must be serviced annually and any service operation must be carried out by a qualified  


service person. 


WARNINGS: 


 

WARNING;  ANY MODIFICATION OF THE APPLIANCE THAT HAS NOT  BEEN  


APPROVED IN WRITING BY THE TESTING AUTHORITY IS CONSIDERED A   

 BREACH OF NZ STANDARDS. 


 

WARNING; DO NOT USE OR STORE FLAMMABLE LIQUIDS OR AEROSOLS IN THE 

  VICINITY   OF THIS APPLIANCE WHILST IN OPERATION.


 

WARNING;  DO NOT PLACE FLAMMABLE MATERIALS ON OR AGAINST THIS 


APPLIANCE.


 

CAUTION

:  THIS APPLIANCE SHOULD BE MAINTAINED AND OPERATED AT ALL 

  TIMES IN ACCORDANCE WITH THESE INSTRUCTIONS.


 

CAUTION:  

ALL SERVICING MUST BE CARRIED OUT BY AN AUTHORISED SERVICE 

  TECHNICIAN. 


 

CAUTION:  

MAKE SURE THE USE OF CORRECT FUEL TYPE WITH THIS APPLIANCE. 

NOTE: Keep a copy of these instructions for operating and 

maintenance guidelines.  


Industries 1994 LTD 

PO Box 58652, Botany 2163, Auckland 

www.warmington.co.nz


Summary of Contents for SG EG Series

Page 1: ...ington installer or an approved NZHHA installation technician See www homeheat co nz members for a certified NZHHA SFAIT Installer in your area A licenced certified gas fitter and licenced electrician are required to run power and gas supplies as required to the unit and any commissioning as part of the installation process The heater must be installed according to these instructions and in compli...

Page 2: ...f this is not removed then break that panel out also STEP 2 FIT 3 SPEED FAN ASSEMBLY WIRING IN FIREBOX STEP 2 Fit 3 Speed Fan Assembly Before fitting the Fan Assembly you will need to disconnect it s lead from Circuit Board from it s packaging take note where the connection s inside the Circuit Board is located before disconnecting mark or memo rise its location Fit the Fan in place using self tap...

Page 3: ...rried out by Certified Tradesman Control Valve Cover Circuit Board Control Cover 3 Flame Igniter Main Burner Assembly Main Circuit Board Receiver Circuit Board EG 845 Control Valve Main Power Supply Wire 3 Speed Fan Wire Main Power Supply Wire 3 Speed Fan Wire STEP 4 FIT EG ELECTRONICS ETC INTO FIREBOX STEP 4 Fit EG Electronics etc in position through RH Side Breakout Panel Fit previously dis asse...

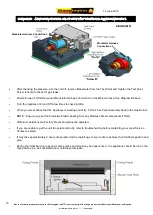
Page 4: ...RH Side Burner Plate using self tapping screws supplied STEP 6 RE ASSEMBLE EG COMPONENTS COVERS MAIN BURNER ASSEMBLY INTO FIREBOX STEP 6 Re assemble Covers etc into Firebox First screw down Control Valve Cover 2X Main Circuit Board Covers in place as shown above then fit Main Burner Assembly onto the RH Burner Side Plate previously fitted in step 5 take care to avoid damaging Gas Injector Jets on ...

Page 5: ...the Gas Type Specified on the Data Plate is correct for the available supply LPG or NG A Copper Gas supply capable of supplying the correct MJ h should be brought into the rear of the Installation Cavity through the hole provided A Flare Nut is pro vided on the Burner for Gas Connection to the Appliance TO THE INSTALLER GAS FITTER and ELECTRICIAN COMMISSIONING AND TESTING OF FIREPLACE SG BURNER ON...

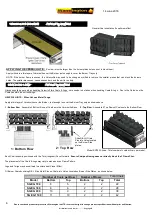
Page 6: ...ow Number of Rows 2 Top Row Slide R LH Grate Pins into Holes located on the Burner Side plates 1 Bottom Row Gloves should be worn when handling Ceramic Fibre Coals Logs care needs to be taken when handling Coals Logs Due to the Carbon on the Coals can stain the surroundings HELPFUL HINTS When Hot use Metal Tongs Apply a thin layer of Vermiculite over the Burner just enough to cover the Burner Tray...

Page 7: ...fitter prior to use To light Lower the control cover by pulling it outwards Depress the Ignition Switch and hold in the PILOT position for 3 5 seconds This may take some time for the Gas to come through to the Pilot 3 Flame Strike the Igniter by turning to the STAR position maintaining the Switch in a Depressed State repeat steps 2 3 if neces sary Once the Pilot Flame is lit hold this position for...

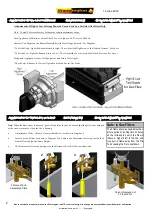
Page 8: ... Remove Front Plastic Cover on Igniter Pull Cover to Slide off Unscrew Test Nipple on the Burner Manifold fit the Test Gauge Securely See Diagram To Set the High Light the Burner turn to High Then Adjust the High Screw to the Desired Pressure See Spec s To Set the Low Light the Burner turn to Low Then Adjust the Low Screw to the Desired Pressure See Spec s Extinguish Appliance remove Test Equipmen...

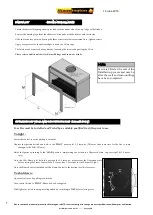
Page 9: ... the following precautions associ ated with any heating appliance or open fire Do not cover or restrict the fireplace upper or lower vents in any way as this may result in a build up of hazardous gases within the room The fire is not intended for the drying of clothing bedding etc Avoid installing this appliance in high traffic areas strong draughts or near drapes or furniture The use of an approv...

Page 10: ...s Flame and Fan set tings unless the Appliance was Switched Off due to Power Failure In the circumstance of a Power Failure the Remote Control System will return to the default settings which is a Low Flame and the Fan Turned Off If the Gas Fails to light the Appliance it will go into Lock Out Mode after trying to ignite for 1 minute approx In Lock Out Mode the Power LED will remain illuminated To...

Page 11: ...l the Fan is Turned Off Your Remote Control has all the features of the Control Receiver situated on the Front Panel of the Burner By pressing Timer Button the Power LED will start flashing and after 30 minutes the appliance will Shut Off Automatically By pressing the Timer Button again within the 30 minute period this will reset the Timer and the power LED will Stop Flashing Warranty Cover will b...

Page 12: ...TE If setting the Pressure is required it is to be carried out by a Certified Gas Fitter If adjustments are necessary remove the cap The Pressure Adjustment Screw and Nut are on the Front Side of the Gas Control Valve shown in Diagram B in this specification and are Factory set High Pressure Setting Set the modulator to Maximum Condition Screw in Nut A to Increase the Outlet Pressure then screw Nu...

Page 13: ...u are satisfied that the Appliance is working correctly fit the Front Panel Assembly back to the Gas Burner NOTE Ensure you peel the Protective Plastic Coating from any Stainless Steel components if fitted All Burner Aerations are Factory Preset and cannot be adjusted If you are unable to get the unit to operate correctly refer to troubleshooting before contacting your Local Service Contact as lis...

Page 14: ...d product improvement Warmington Ind LTD reserves the right to change product specifications without prior notification All Dimension are in mm Copyright 14 REMOTE IGNITION EG GAS FIRE WIRING DIAGRAM Modulator Harness Connections ...

Page 15: ...st be serviced annually and any service operation must be carried out by a qualified service person WARNINGS WARNING ANY MODIFICATION OF THE APPLIANCE THAT HAS NOT BEEN APPROVED IN WRITING BY THE TESTING AUTHORITY IS CONSIDERED A BREACH OF NZ STANDARDS WARNING DO NOT USE OR STORE FLAMMABLE LIQUIDS OR AEROSOLS IN THE VICINITY OF THIS APPLIANCE WHILST IN OPERATION WARNING DO NOT PLACE FLAMMABLE MATE...

Reviews: