19 August 2021
All dimensions are in mm
Copyright
4
Due to continued product improvement, Warmington Ind LTD reserves the right to change product specifications without prior notification.
INSTALLATION
Important Notes:
•
Install to manufacturer
’
s specifications
•
All new installations require a permit
•
Allow for gas supply to control box, ensuring control box is clear at least 0.5 metres from the heating appliance
•
Allow for electrical 5 core wiring to wall switch, also from switch to main control panel unit. Consult a certified electrician for
installation of wiring.
•
Control box, wiring and valve must be placed in a dry and moisture free environment because of the electronics.
•
Ensure when finishing that the control box is accessible for maintenance.
•
Ensure that wiring and burner head is installed in a moisture free environment and sheltered from the environment when not in use.
STAGE 1: INSTALLATION OF BURNER HEAD
•
Prepare firebox for fitment of the burner head. If the firebox has been specified including the log lighter, much of the firebox
preparation work will be done in the Warmington factory. If retrofitting into an existing fire, follow these instructions.
•
Even if the unit comes with the firebox the heatshield has to be prepared for the gas feed and spark/rectifier wires. It is important,
especially for the flare, that the cut is large enough so that there is no danger of damaging the wires or having the spark jump to
the heatshield edges.
•
Install the burner head according to the appropriate section of this document for fire type and log lighter type.
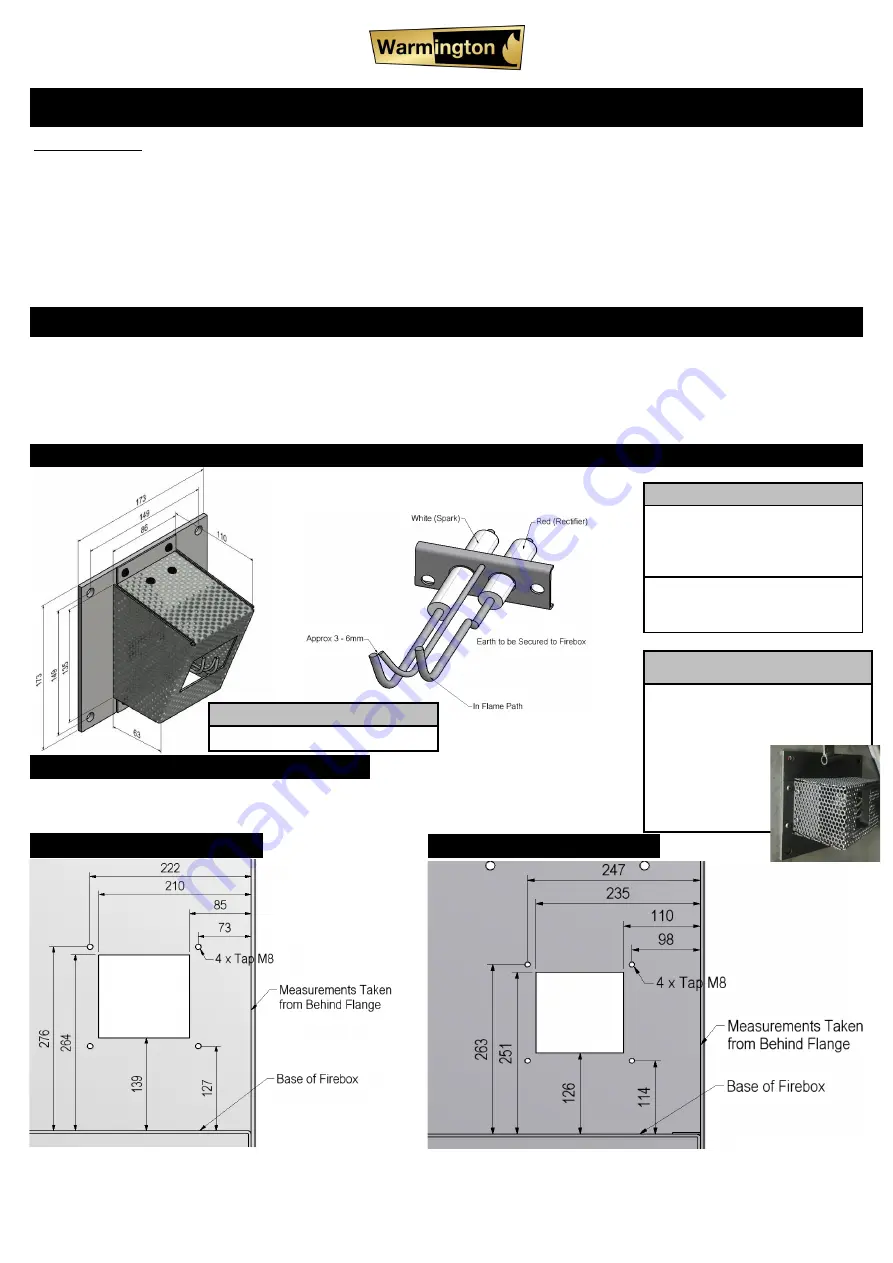
OPTION 1A: SI/SN FLARE
PREPARATION AND INSTALLATION
Notes:
There is a left hand and right hand
version of the SI/SN flare. Please
ensure the correct version is on site
before installing*.
If retrofitting, the firebox may need to be
removed from the cavity to achieve the
installation.
•
Bolt flare plate into firebox side using supplied M5 bolts to install
SN FIREBOX CUT PATTERN
SI FIREBOX CUT PATTERN
•
If retrofitting, cut holes in firebox side as per appropriate drawing. Otherwise holes will be pre
cut by Warmington factory.
Note:
DO NOT extend HT leads
Important Note:
* If installing in a SI 780 or smaller and
the flare is to be installed on the left side
a right hand (RH) have to be ordered. It
also has to be installed turned 90
degrees so the flare
flame faces in
-
wards
as shown in the photo:


