background image

Installing the mat

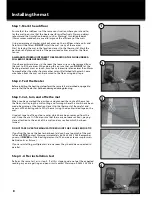
Step 1 - Mark the subfloor

Ensure that the subfloor is of the same construction where you intend to 

lay the mat to ensure that the heater performs effectively. Warmup always 

recommend that insulation boards, such as Warmup® Insulation Boards 

(10mm recommended), are used to improve the efficiency of the mats. 

Using a permanent marker, mark out areas on the subfloor where units and 

fixtures will be fitted. DO NOT install the mat in any of these areas. 

Start by laying the mat in the location closest to the thermostat. Mark the 

positions and planned route of the power lead cables as well as the floor 

sensor. 

ALL MANUFACTURED JOINTS NEED TO BE PLACED ON THE FLOOR UNDER A 

FULL BED OF ADHESIVE AND TILES. 

If you have awkward areas in the room the loose wire can be removed from 

the mat to fit these areas. When doing this ensure that you DO NOT let the 

heating element cross or touch. Ensure any loose wires are no closer than 50mm 

from each other, the wall or from any other wires still attached to the mesh. Loose 

wire taken from the mat can be secured to the floor using duct tape.

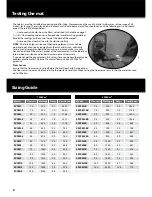
Step 2 - Test the Heater

Before installing the heating mat perform the same test as described on page 6 to 

ensure that the heater has not been damaged during planning.

Step 3 - Cut, turn and affix the mat

When you have marked the positions and planned the route of the mat on 

the floor, start laying the mat cutting and turning where the marks have been 

made, beginning at the location closest to the thermostat. Be careful and 

never cut the heating cable. Affix the mat using the double sided tape on the 

mat.

Use duct tape to affix any loose wires which have been removed from the 

mat. Once the mat is fitted, ensure that there are no loose sections, paying 

close attention to the ends of the mats and any section which has been 

turned. 

DO NOT TAPE OVER THE MANUFACTURED JOINTS OR FLOOR SENSOR TIP.

If you find that once the heater has been laid you have too much of the mat 

left over STOP, contact Warmup immediately on 0845 345 2288. Remember 

you must NEVER cut the heating element to fit an area or leave surplus mats 

behind units or fixtures.

If you are installing multiple mats in one room they should be connected in 

parallel. 

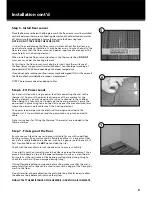
Step 4 - After installation test

Perform the same test as in step 2. If at this stage you do not get the expected 

reading or you are getting an open circuit contact Warmup on 0845 345 2288.

2

3

8

1

4

Summary of Contents for PVC

Page 1: ...0845 345 2288 IMPORTANT Read this manual before attempting to install the heater Incorrect installation could damage the heater and will invalidate your warranty Complete and submit your warranty form online at www warmup co uk The world s best selling floor heating brand ...

Page 2: ...e ensure that you have the correct heater s for the area you wish to heat Warmup plc the manufacturer of the Warmup Undertile Heating System accepts no liability expressed or implied for any loss or consequential damage suffered as a result of installations which in any way contravene the instructions that follow It is important that before during and after installation that all requirements are m...

Page 3: ...the mat Switch on the installed mat until 8 days after fitting to allow the tile adhesive to dry completely Install the mat in temperatures less than 5 C Bend the heating cable under 25mm radius Use the heating system to dry out levelling compound or adhesive Tape over the end cap or manufactured joint Attempt a DIY repair if you damage the heater Contact Warmup on 0845 345 2288 If you accidentall...

Page 4: ...e tiles As with all electrical projects all mains electrical connections must be undertaken by a certified electrician All work must conform to current IEE Wiring Regulations The Underfloor heating must be controlled via a floor sensor thermostat at all times Installing a Residual Current Device RCD The Heating Mats must be wired via an 30mA RCD You must install a dedicated RCD if one is not alrea...

Page 5: ...t 3 1999 Concrete Subfloors Ensure you use an extruded polystyrene building or tile backer board Warmup Insulation Board if installing your mat onto a cement based floor Fixing the board should be as per the manufacturer s instructions About the mat 1 Concrete Timber Subfloor 2 Flexible Adhesive 3 Wamup Insulation Board 4 Warmup Underfloor Heating Mat 5 Flexible Adhesive Tile NOTE Warmup thermosta...

Page 6: ... problem please contact Warmup s Technical Team on 0845 345 2288 for guidance Floor Sensor Ensure that the floor sensor is tested before the final floor finish has been laid The floor sensor values can be found in the thermostat instructions When testing the floor sensor ensure that the meter can read up to 20k ohms 6 150W m2 200W m2 Model Size m2 Wattage Amps Resistance Model Size m2 Wattage Amps...

Page 7: ...as the proper room dimensions and that you have the correct size and proper number of mats Mats should run backwards and forwards between walls and obstructions as shown in the examples Depending on insulation air flow overall heat loss within the room additional heating may be required Before Installation Test Perform the first test following the steps described above to ensure that the mat has n...

Page 8: ... the Heater Before installing the heating mat perform the same test as described on page 6 to ensure that the heater has not been damaged during planning Step 3 Cut turn and affix the mat When you have marked the positions and planned the route of the mat on the floor start laying the mat cutting and turning where the marks have been made beginning at the location closest to the thermostat Be care...

Page 9: ... the subfloor When doing this take care not to damage the heating element Secure the power lead in place using tape but do not tape over the manufactured joint where the power supply cable meets the heating element The power lead will go into the electrical trunking conduit up to the thermostat It is possible to extend the power lead using twin and earth cable Note Instructions for fitting the War...

Page 10: ...rten the heating element Ensure that the entire heating elements including the joints are installed under the tiles in the installation The Heating element must be used in conjunction with a 30mA RCD Heater Model Resistance Before Resistance After Insulation Resistance Pass Floor sensor resistance This form must be completed as part of the Warmup Guarantee Ensure that the values are as per the ins...

Page 11: ...receipt should state the exact model that has been purchased and 2 only if the heater has been earthed and protected by a Residual Current Device RCD at all times Thermostats are guaranteed for a period of 3 YEARS from the date of purchase except as provided below The guarantee for the Warmup 3Ie thermostat can be upgraded to lifetime Contact Warmup for details 0845 345 2288 Neither guarantee cont...

Page 12: ...associated logos are trade marks Warmup Plc 2014 Regd TM Nos 1257724 4409934 4409926 5265707 E OE Warmup plc 702 704 Tudor Estate Abbey Road London NW10 7UW Web www warmup co uk Email uk warmup com Tel 0845 345 2288 Fax 0845 345 2299 ...

Reviews: