background image

G O   P R E P A R E D

7

WARN INDUSTRIES • THE BASIC GUIDE TO WINCHING TECHNIQUES

G O   P R E P A R E D

6

WARN INDUSTRIES • THE BASIC GUIDE TO WINCHING TECHNIQUES

4

So, you have your Warn winch and

you’re ready to get out on the trails: climb
a few boulders, splash a little mud,
traverse the occasional stream. Basically,
you’re ready to explore the backcountry
and otherwise have a great time.

Well, if you’re smart enough to go

prepared with the best, you’re probably
smart enough to know that to keep
having a great time, you need to fully
understand your winch and the winching
operation.

That’s exactly what this guide intends

to do: provide you with a basic under-
standing of your winch and teach you the
basics of proper winching techniques.
But before we get started, we must

emphasize that the information in this
guide is general in nature. Because no
two situations are alike, it would be
nearly impossible to review them all. We
can, however, provide you with the
general principles and techniques. Then
it is up to you to take the time to analyze
the situation and apply the proper
technique.

Along with a little common sense, the

guidelines laid out in this book can help
you keep off-roading fun. Just remember
to think through each situation before you
act and TREAD LIGHTLY!

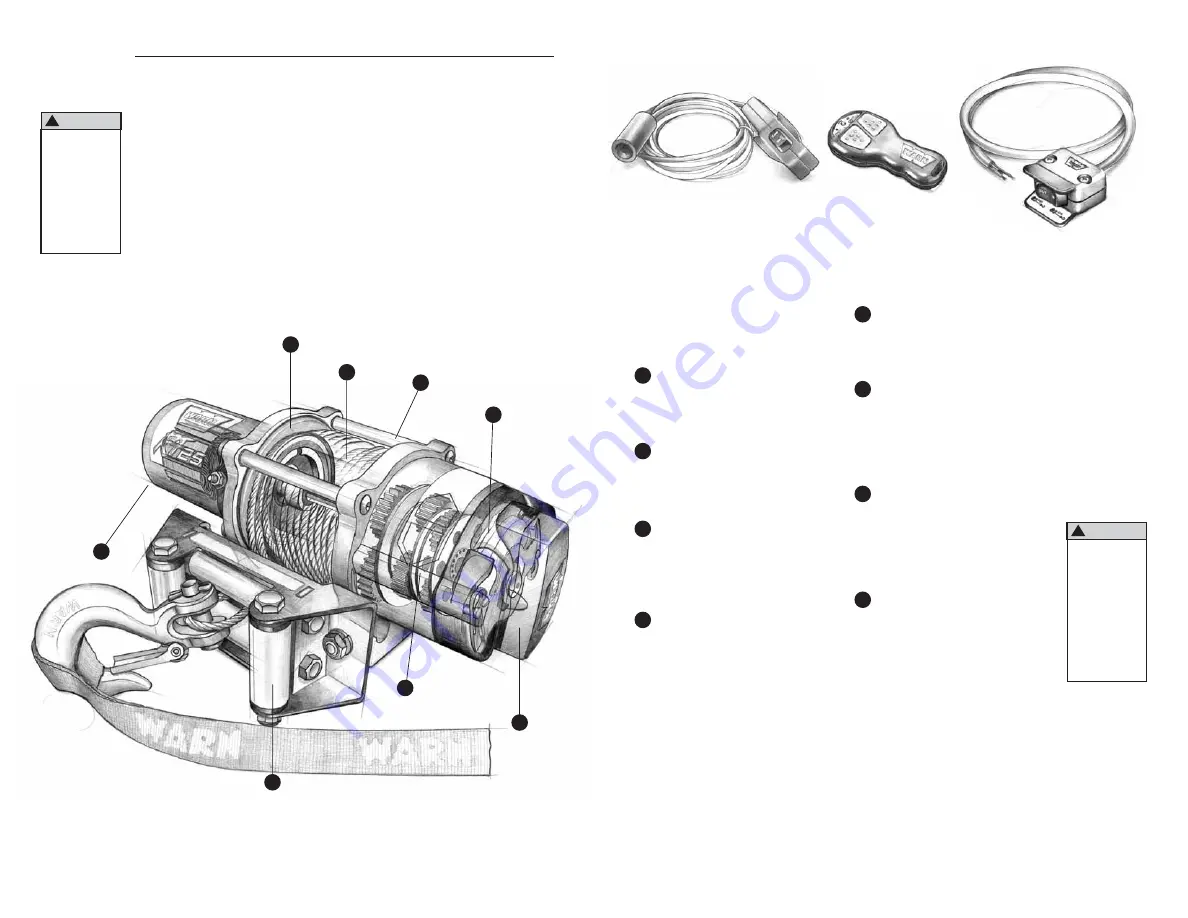
Structural
components of a
planetary gear
winch

1

5

2

6

3

7

8

Never operate
or install a
winch without
reading or
understanding
the operator’s
manual

!

WARNING

To start, you should familiarize

yourself with your Warn winch and each
of its components: Practice using your
winch before using it on the trail.

Motor

Typically the winch motor is

powered by the vehicle’s battery. The
motor provides power to the gear
mechanism, which turns the winch drum
and winds the  rope.

Winch Drum

The winch drum is the

cylinder onto which the  rope feeds. The
drum is driven by the motor and drive
train. Its direction can be changed using
the winch switch.

Wire / Synthetic Rope

The rope’s

diameter and length are determined by
the winch’s load capacity and design.
Wrapped around the winch drum and fed
through the fairlead, the rope is looped at
the end to accept the hook’s clevis pin.

Fairlead

When using the winch at

an angle, the fairlead (or wire lead) acts
to guide the rope onto the spooling drum.
It minimizes damage to the rope while it
goes through the winch mount or
bumper.   

Gear Train

The reduction gear

converts the winch motor power into a
large pulling force. The gear train design
makes it possible for the winch to be
lighter and more compact.

Braking System

Braking action is

automatically applied to the winch drum
when the winch motor is stopped and
there is load on the rope. The braking
action is applied by the motor or a
separate mechanical brake, depending
on the winch construction.

Clutch

The clutch allows the

operator to manually disengage the
spooling drum from the gear train,
enabling the drum to rotate freely (known
as “freespooling”). Engaging the clutch
“locks” the winch drum back onto the
gear train.

Tie Rods

Ties the end housings

together as a structural unit.

1

5

2

6

3

7

8

4

Winch controls
come in many
forms. All enable
the operator to
start, stop and
change the
direction of the
winch drum
rotation.

Remote Control Switch

Rocker Switch

Never engage
or disengage
the clutch if
winch is under
load,  rope is in
tension, or
rope drum is
moving.

!

CAUTION

ELECTRIC WINCH BASICS

Handheld Wireless Remote Control

Summary of Contents for VRX 25-S

Page 1: ...43 9276 International Sales Support Les Ventes internationales Soutiennent 1 503 722 3005 2012 Warn Industries Inc WARN the WARN logo are registered trade marks of Warn Industries Inc WARN et le logo...

Page 2: ...English 2 Fran ais 22 Espa ol 42...

Page 3: ...4 Pulling 15 17 Rigging techniques 18 Maintenance 19 The final analysis 19 Every winching situation has the potential for personal injury In order to minimize that risk it is important that you read t...

Page 4: ...ith less than 5 wraps of rope around the drum Rope could come loose from the drum as the rope attachment to the drum is not designed to hold a load MOVING PARTS ENTANGLEMENT HAZARD Failure to observe...

Page 5: ...l not slip Never engage or disengage clutch if winch is under load rope is in tension or drum is moving Always select an anchor point as far away as possible This will provide the winch with its great...

Page 6: ...y the winch motor is powered by the vehicle s battery The motor provides power to the gear mechanism which turns the winch drum and winds the rope Winch Drum The winch drum is the cylinder onto which...

Page 7: ...d its components we can begin reviewing how it works The major advantage of an electric powered winch is that it can provide reliable service for intermittent utility and recreational use even while t...

Page 8: ...ble anchor point and back the vehicle away from the anchor point until there is very little slack in the wire rope Before getting out of the vehicle set the parking brake place the vehicle in gear or...

Page 9: ...not designed to hold a load WARNING Never hook rope back onto itself This damages the rope CAUTION Single line pull Practice using your winch before you get stuck A real situation is no time to be le...

Page 10: ...min 50 12 500 2 0 min 32 10 1000 1 0 min 14 10 1500 25 sec 5 10 2000 15 sec 2 10 2500 10 sec 1 10 Duty cycles vary for each winch See specification sheet supplied with your winch Run Time Guidelines...

Page 11: ...ose to the tie rods or mounting plate To fix an uneven stack spool out that section of the rope and reposition it to the opposite end of the drum which will free up space for continued winching G O P...

Page 12: ...ng temperatures Place clutch in the freespool position and power out the rope for 2 3 m 6 10 ft to warm the winch Lifting and lowering a snowplow can damage rope Carefully inspect rope for wear broken...

Page 13: ...e 35 37 Techniques de c blage 38 Maintenance 39 En derni re analyse 39 Chaque situation de treuillage peut potentiellement occasionner des blessures Pour minimiser ce risque il est important que vous...

Page 14: ...de d roulement Toujours utiliser le cordon du crochet fourni pour enrouler ou d rouler le c ble durant l installation ou l utilisation Toujours garder l il sur le v hicule durant les op rations de tr...

Page 15: ...si distant que possible Cela assure au treuil une puissance de traction maximum Ne jamais toucher le c ble ou le crochet lorsque le c ble est tendu ou sous charge Ne jamais toucher le c ble ou le croc...

Page 16: ...nages Barres d accouplement Elles lient ensemble les bo tiers d extr mit pour constituer une m me unit structurelle 1 5 2 6 3 7 8 4 Les commandes de treuil sont tr s vari es Elles permettent toutes l...

Page 17: ...ique Maintenant que vous vous tes familiaris avec le treuil Warn et ses composants vous pouvez commencer tudier son fonctionnement L avantage principal d un treuil lectrique est qu il peut fournir un...

Page 18: ...ul es autour du tambour Une fois le c ble d roul mettre le levier d embrayage du treuil en position d embrayage 3 Attacher le crochet du c ble un point d ancrage ad quat et loigner le v hicule du poin...

Page 19: ...donn que l ancrage du c ble n est pas con u pour retenir une charge AVERTISSEMENT Traction avec un c ble C bler pour le treuillage Les tapes suivantes d crivent comment d panner le v hicule avec un tr...

Page 20: ...doit tre proprement enroul autour du tambour Le c ble peut tre ab m s il n est pas enroul correctement tape 12 Si vous le jugez n cessaire PLACEZ QUELQUE CHOSE SUR LE C BLE mi chemin entre le treuil...

Page 21: ...proximit du c ble ou de la moufle mobile Votre situation peut pr senter d autres zones interdites tape 14 COMMENCEZ LE TREUILLAGE Le moteur du v hicule du treuil tant en marche et le c ble d j l g rem...

Page 22: ...Faites attention et vous vous amuserez RANGEMENT FONCTIONNEMENT PAR MOINS DE Z RO Quand le treuil n est pas utilis laissez l embrayage du treuil en prise Ceci aide les pi ces internes du treuil r sist...

Page 23: ...cnicas de maniobrado 58 Mantenimiento 59 El an lisis final 59 En cada situaci n donde se utiliza un cabrestante existe el potencial de ocasionar da os personales Para reducir al m nimo este peligro es...

Page 24: ...do Use siempre la correa suministrada con el gancho cuando vaya a enrollar o desenrollar el cable durante la instalaci n y durante la operaci n Mantenga siempre el veh culo a la vista durante las oper...

Page 25: ...laje lo m s lejano posible De esta forma se proporciona al cabrestante su m xima capacidad de tracci n No toque nunca el cable ni el gancho mientras stos se encuentren en tensi n o con carga No toque...

Page 26: ...bloquea el tambor del cabrestante de nuevo en el tren de engranaje Varillas de conexi n Unen las cubiertas extremas para formar una unidad estructural 1 5 2 6 3 7 8 4 Los controles del cabrestante vie...

Page 27: ...se ha familiarizado con el cabrestante Warn y sus componentes podemos empezar a ver c mo funciona La mayor ventaja de un cabrestante el ctrico es que puede proporcionar un servicio fiable bien sea par...

Page 28: ...cabrestante en la posici n Engaged embragado 3 Acople el extremo del cable con gancho a un punto de anclaje apropiado y aleje el veh culo de tal punto hasta que quede muy poco cable suelto Antes de sa...

Page 29: ...EL PUNTO DE ANCLAJE Desenrolle suficiente cable para alcanzar el punto de anclaje Debe haber cierta tensi n en el cable El cable se puede da ar si se enreda o se enrolla m s de lo debido al aflojarlo...

Page 30: ...a en el tambor El cable se puede da ar si el enrollado no se hace correctamente Fase 12 PONGA ALGO SOBRE EL CABLE si cree que es necesario a la mitad entre el cabrestante y el punto de anclaje para ab...

Page 31: ...erios al cabrestante Por consiguiente haga las operaciones de tiro en l nea recta si es posible y pare el cabrestante si el cable se acerca a las varillas de conexi n o a la placa de montaje Para solu...

Page 32: ...tenci n y lo podr disfrutar ALMACENAMIENTO Cuando no se est usando el cabrestante deber dejarse con el embrague puesto Esto ayudar a las piezas internas del cabrestante a soportar los efectos de las i...

Reviews: