background image

©2019 Warn Industries, Inc.WARN® and the WARN logo are trademarks of Warn Industries Inc.

 4 

103507A0

I N S T A L L A T I O N   I N S T R U C T I O N S

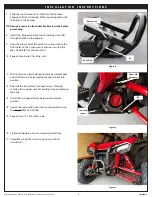
1.  Remove the bumper by removing the two torx head 

screws, two upper M8 hardware and one lower M8 

hardware from each side of vehicle. 

2.  Slide bumper forward while carefully leveraging the 

plastic out of the way.

3.  Install the fairlead to the winch mounting plate (A1) with 

hardware from your winch kit.

4.  Place your winch upside down (feet facing up).

5.  Set winch mounting plate on winch, lining up holes with 

winch feet.

6.  Secure winch mounting plate to the winch using the 

winch install instructions and mounting hardware 

supplied in your winch kit.

Torx head 

screws

Winch mounting

Fairlead

Lower M8 
hardware

Upper M8 
hardware

Figure 1

Figure 2

Figure 3

Summary of Contents for 102600

Page 1: ...icalterminals Alwaysinstallterminalbootsasdirectedininstallationinstructions Alwaysuseappropriateandadequatecareinliftingcomponentsintoplace Alwaysinsurecomponentswillremainsecureduringinstallationandoperation Alwaystightenallnutsandboltssecurely pertheinstallationinstructions Alwaysperformregularinspectionsandmaintenanceontheplowmechanism fasteners cableandrelatedhardware Alwaysreplaceallwornorda...

Page 2: ...ctions could lead to minor or moderate injury AlwaystaketimetofullyreadandunderstandtheinstallationandOperationsGuideincludedwiththisproduct Neveroperatethisproductifyouareunder16yearsofage Neveroperatethisproductwhenundertheinfluenceofdrugs alcoholormedications Read installation and operating instructions thoroughly N O T E S B E F O R E Y O U B E G I N T A B L E O F C O N T E N T S Tools Require...

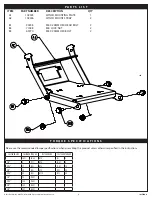
Page 3: ... unless otherwise specified in the instructions FASTENERSIZE FASTENERTORQUE FASTENERSIZE FASTENERTORQUE lb ft N m M4 2 3 1 4 8 11 M5 4 5 6 5 16 17 23 M6 7 5 10 3 8 30 40 M8 18 25 7 16 48 66 M10 37 50 1 2 74 100 9 16 106 144 5 8 148 200 3 4 269 364 ITEM PART NUMBER DESCRIPTION QTY A1 102595 WINCH MOUNTING PLATE 1 A2 102596 WINCH MOUNT STRAP 2 B1 99248 M8 X 20MM HEX HEAD BOLT 2 B2 71588 M8 LOCK NUT ...

Page 4: ...ward while carefully leveraging the plastic out of the way 3 Install the fairlead to the winch mounting plate A1 with hardware from your winch kit 4 Place your winch upside down feet facing up 5 Set winch mounting plate on winch lining up holes with winch feet 6 Secure winch mounting plate to the winch using the winch install instructions and mounting hardware supplied in your winch kit Torx head ...

Page 5: ...and secure using the M8 x 20 bolt B1 and lock nut B2 10 Repeat steps 8 and 9 for other side 11 With assistance slide the bumper winch assembly back over the frame while leveraging the plastic back into position 12 Reinstall the two factory torx head screws through vehicle plastic upper winch mounting strap and bumper tab hole 13 Install the two upper factory hardware to original position 14 Secure...

Page 6: ...N C E C A R E 1 Inspect all parts on the winch winch mount and related hardware prior to each use Replace all hardware that appears rusted or deformed 2 Inspect all nuts and bolts on the winch winch mount and related hardware prior to each use Tighten all nuts that appear to be loose Stripped fractured or bent bolts or nuts need to be replaced 3 Check all cables prior to use Replace cables that lo...

Reviews: