©2018 Warn Industries, Inc.WARN® and the WARN logo are trademarks of Warn Industries Inc.
4
64673A2
I N S T A L L A T I O N I N S T R U C T I O N S
10. The following steps describe the method for raising the plow
with a winch. If you are using an electric actuator or manual
lift, please following the instructions included in those kits..
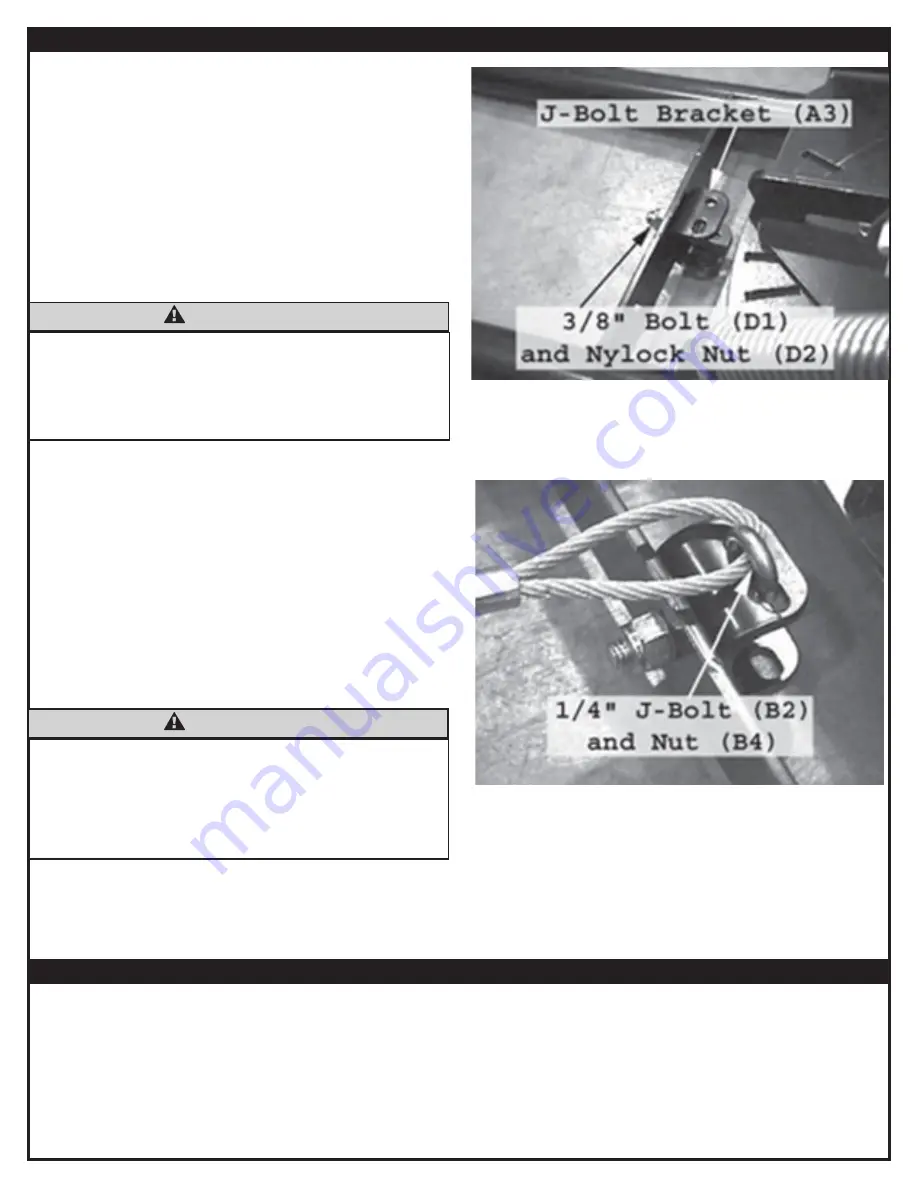
11. Attach the J-Bolt Bracket to the plow crossmember using a
3/8” dia-1” long Bolt, and 3/8” Nylock Nut as shown in
Figure 4. The bracket should be installed on the plow blade
side of the crossmember. Attach the 3/8” bolt such that the
head of the bolt is inside the bracket and the threaded end
points toward the ATV.
12. Run the winch cable down over the roller fairlead and to the
J-Bolt Bracket. Slide the loop end of the winch cable over the
hook of the J-bolt. If a winch hook is attached to the loop
end of the cable, position it out of the way or remove it.
13. Slide a J-Bolt down through the round hole in the J-Bolt
Bracket and terminate with 1/4” washer and 1/4” nylock nut
as shown in Figure 5. The end of the hook should be sitting
in the slotted hole in the bracket.
Figure 4
W A R N I N G
• BE SURE THERE ARE NO BYSTANDERS WHEN YOU RAISE AND LOWER THE PLOW.
• DO NOT RAISE THE TOP OF THE PLOW ABOVE THE HEADLIGHTS OF THE ATV AS IT IS NOT ONLY
UNNECESSARY, BUT POTENTIALLY DAMAGING TO THE VEHICLE AND PLOW.
• IF YOU NOTICE DEFORMATION OF THE J-BOLT, OR THE J-BOLT IS BROKEN, REPLACE IMMEDIATELY
WITH THE SPARE J-BOLT INCLUDED IN THE KIT.
W A R N I N G
• DRIVE SLOWLY OVER BUMPY AND ROUGH TERRAIN. DRIVING AT SPEEDS THAT CAUSE THE PLOW
TO BOUNCE WHILE IN THE UP POSITION CAN CAUSE THE WINCH TO BACK-DRIVE CAUSING THE
PLOW TO WORK ITS WAY DOWN. THIS MAY RESULT IN THE PLOW IMPACTING A STATIONARY
OBJECT AND CAUSE DAMAGE TO THE VEHICLE AND OPERATO R INJURY OR DEATH.
• DRIVE AT SPEEDS SUCH THAT THE PLOW DOES NOT BOUNCE AND BE AWARE OF THE PLOW
POSITION WHILE DRIVING AT ALL TIMES.
M A I N T E N A N C E / C A R E
1. Inspect all parts on the winch, winch mount, and related hardware prior to each use. Replace all hardware that appears rusted or
deformed.
2. Inspect all nuts and bolts on the winch, winch mount,, and related hardware prior to each use. Tighten all nuts that appear to be
loose. Stripped, fractured, or bent bolts or nuts need to be replaced.
3. Check all cables prior to use. Replace cables that look worn or frayed.
4. Check all moving or rotating parts. Remove debris that may inhibit the part from moving freely.
Figure 5


