background image

©2021 Warn Industries, Inc.WARN® and the WARN logo are trademarks of  Warn Industries Inc.

 5 

107945A0

I N S T A L L A T I O N   I N S T R U C T I O N S

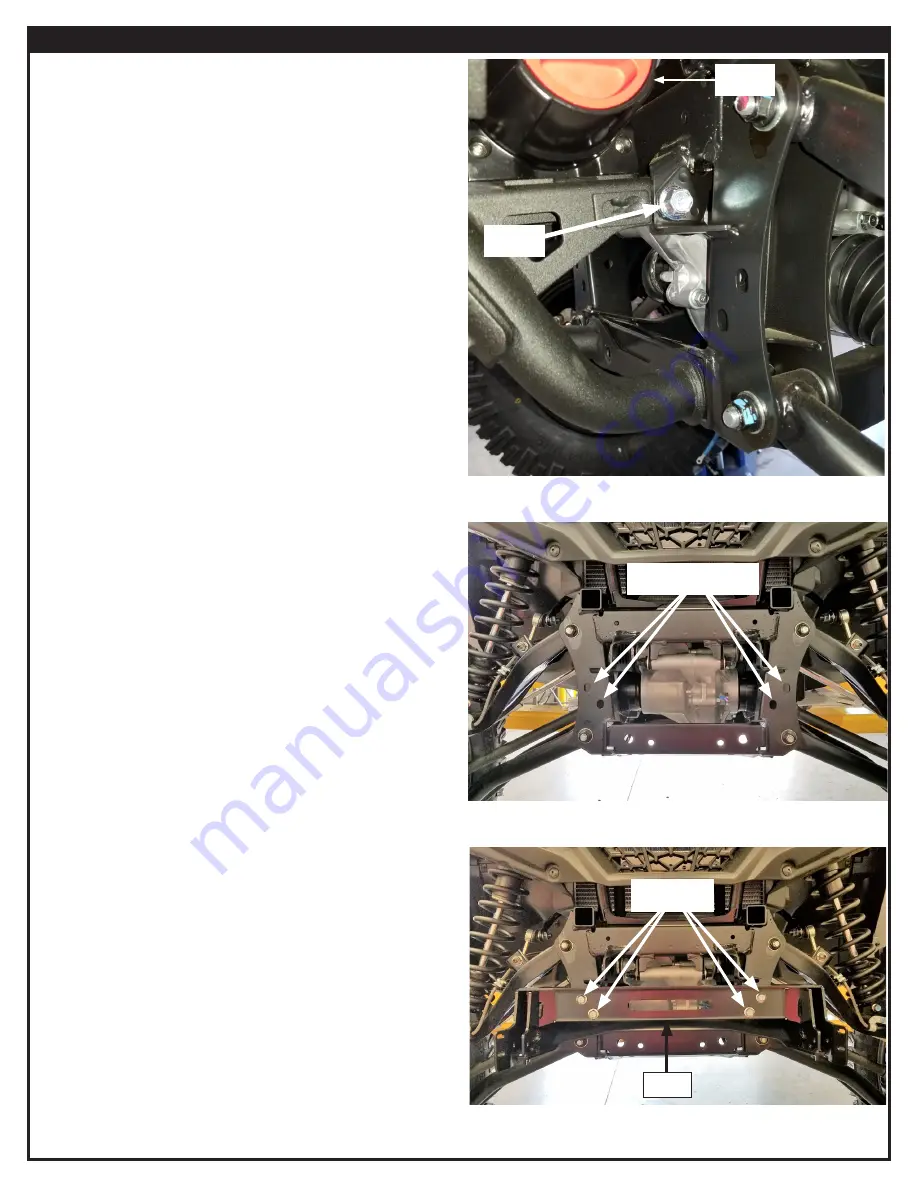
4.  Remove the upper hex head bolts from each side of 

bumper.  

Save hardware for reinstallation.

5.  Remove the power cables from the winch motor.

6.    Turn the winch clutch knob to the freespool and pull 

winch rope out and away from vehicle  - enough to be 

able to rest winch hook on ground  and out of the way.

7.  Remove fairlead hardware and slide fairlead down to 

rest on the winch rope hook.  

You will not be reusing 

fairlead hardware.

8.  Carefully remove bumper and set aside.  You can now 

access the mounting holes for the new plow mount.

9.  Install the plow mount (A1) with four M10x30mm hex 

bolts (B1) and flange head nuts (B2).  Tighten to torque 

specifications on page 3.

Winch

Remove

Plow moutning holes

B1 and B2

A1

Figure 4

Figure 5

Figure 6

Summary of Contents for 107914

Page 1: ...lingthiskit Adrillingoperationwillcauseflyingmetalchips Flyingchipscancauseeyeinjury Alwaysuseextremecautionwhencuttingandtrimmingduringfitting Alwaysremovejewelryandweareyeprotection Neverleanoverbatterywhilemakingconnections Neverrouteelectricalcables o Acrossanysharpedges o Throughornearmovingparts o Nearpartsthatbecomehot Alwaysinsulateandprotectallexposedwiringandelectricalterminals Alwaysins...

Page 2: ...allation and operating instructions thoroughly MOVING PARTS ENTANGLEMENT HAZARD Failure to observe these instructions could lead to minor or moderate injury AlwaystaketimetofullyreadandunderstandtheinstallationandOperationsGuideincludedwiththisproduct Neveroperatethisproductifyouareunder16yearsofage Neveroperatethisproductwhenundertheinfluenceofdrugs alcoholormedications Read installation and oper...

Page 3: ... use the recommended torque specifications when assembling this product unless otherwise specified in the instructions FASTENERSIZE FASTENERTORQUE lb ft N m 1 4 8 11 5 16 17 23 3 8 30 40 7 16 48 66 1 2 74 100 9 16 106 144 5 8 148 200 3 4 269 364 FASTENERSIZE FASTENERTORQUE lb ft N m M4 2 3 M5 4 5 6 M6 7 5 10 M8 18 25 M10 37 50 ITEM PN DESCRIPTION QTY B1 99257 M10 X 30MM HEX BOLT 4 B2 99267 M10 HEX...

Page 4: ...S T R U C T I O N S 1 Remove the two front center allen socket head screws Save hardware for reinstallation 2 From under vehicle remove the four 10mm hex heads screws Save hardware for reinstallation 3 Remove the two lower bumper hex head bolts Save hardware for reinstallation Remove Remove Remove Figure 1 Figure 2 Figure 3 ...

Page 5: ... pull winch rope out and away from vehicle enough to be able to rest winch hook on ground and out of the way 7 Remove fairlead hardware and slide fairlead down to rest on the winch rope hook You will not be reusing fairlead hardware 8 Carefully remove bumper and set aside You can now access the mounting holes for the new plow mount 9 Install the plow mount A1 with four M10x30mm hex bolts B1 and fl...

Page 6: ...and hardware 12 Position termination bracket A3 over fairlead opening aligning holes in bracket with fairlead mounting holes While holding termination bracket in place secure the fairlead and bracket using two M10x25mm socket head bolts B3 13 Install termination strap A4 to termination bracket as shown 14 Install plow flange A2 to plow mount using included retaining pins B4 A4 Figure 7 Figure 8 Fi...

Page 7: ...place all hardware that appears rusted or deformed 2 Inspect all nuts and bolts on the winch winch mount and related hardware prior to each use Tighten all nuts that appear to be loose Stripped fractured or bent bolts or nuts need to be replaced 3 Check all cables prior to use Replace cables that look worn or frayed 4 Check all moving or rotating parts Remove debris that may inhibit the part from ...

Reviews: