OPERATING INSTRUCTIONS
7
CLUTCH OPERATION
When the clutch is engaged the gear train is coupled
to the rope drum and power may be transferred
from the winch motor. When the clutch is in free
spool the gear train and rope drum are uncoupled
allowing the drum to rotate freely. The clutch knob,
located on the winch housing opposite the motor,
controls the clutch position. To prevent damage,
always fully engage or fully disengage the clutch
knob.
REMOTE CONTROL SWITCH
Do not leave the remote plugged into the winch
when not in use. Leaving the remote plugged in, may
result in a dangerous condition and/or battery drain.
ENGAGED
DISENGAGED
WA R N I N G
Never leave clutch disengaged when not
freespooling rope. The automatic brake
will not operate when clutch lever is in
freespool.
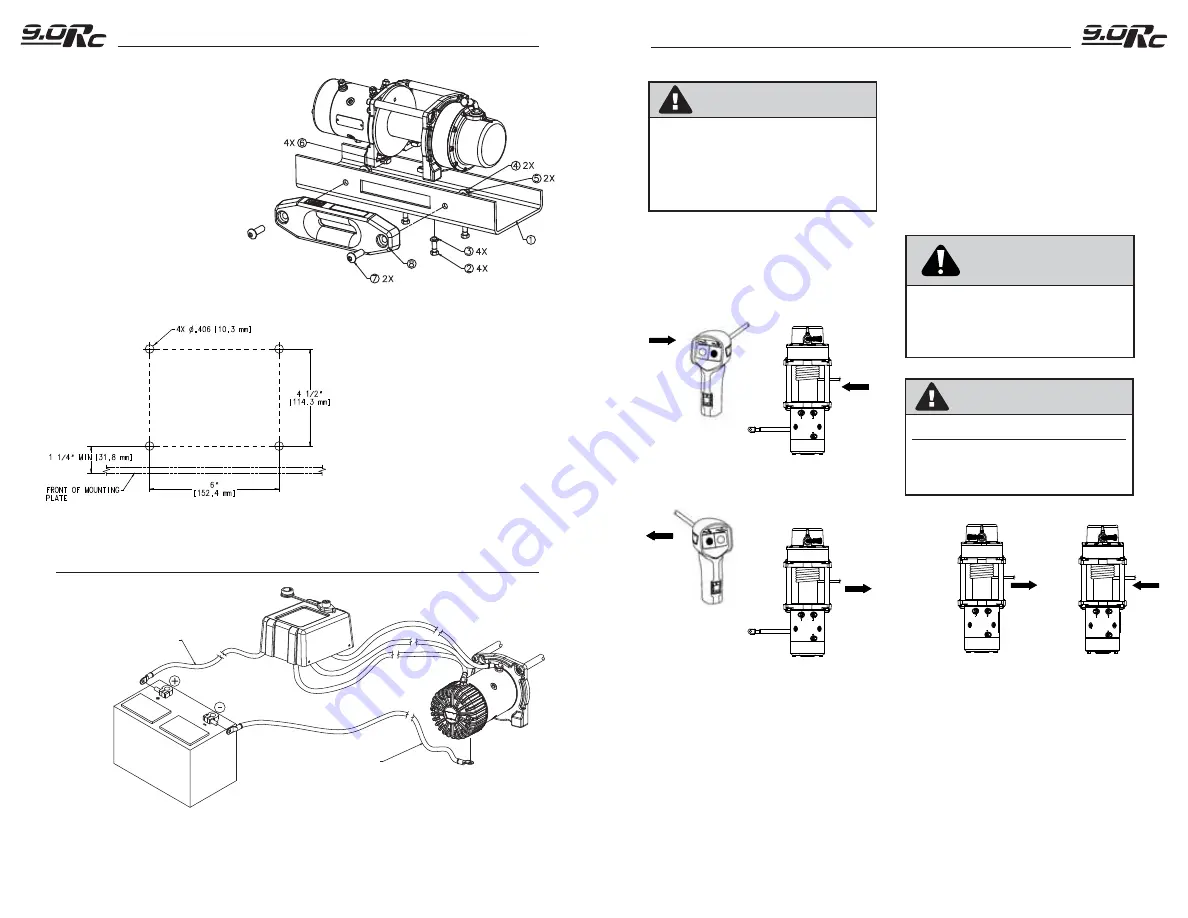
Mounting requirement & hardware:
(1)
Smooth and flat, thickness = 1/4" (6.35 mm)
(2)
3/8" (9.5 mm) lockwasher X 4
(3)
3/8-16 X 1 1/4" long grade 5 bolt X 4,
torque 30-35 ft. lbs. (41-47 Nm)
(4)
1/2-13 Locknut
(5)
1/2 Flat washer
(6)
3/8-16 Sq nut
(7)
1/2-13x2" button head bolt
(8)
Aluminum Fairlead
INSTALLATION INSTRUCTIONS
6
ELECTRICAL CONNECTIONS
RED CABLE (183 cm)
BLACK CABLE (72”)
BATTERY
Mounting bolt pattern:
6.0" x 4.5", 152.4mm x 114.3mm
OVERLOADING/OVERHEATING
This winch is rated for intermittent duty. When the
motor approaches stall speed, very rapid heat
buildup occurs which may cause motor damage.
Double-line rigging (see Basic Guide to Winching
Techniques) will reduce the amperage draw, and
reduce heat buildup in the motor. This allows longer
continual use.
LINE
IN
REMOTE
CONTROL
SWITCH
REMOTE
CONTROL
SWITCH
LINE
OUT
ALWAYS KNOW YOUR WINCH: Take time
to fully read and understand the included
Installation and Operations Guide, and
Basic Guide to Winching Techniques, in
order to understand your winch and the
winching operation.
• Never engage or disengage clutch if
winch is under load, wire rope is in
tension or wire rope drum is moving.
To avoid minor or moderate injury:
C A U T I O N
C A U T I O N


