background image

©2020  Warn Industries, Inc.WARN® and the WARN logo are trademarks of Warn Industries Inc.

 6 

107333A0

I N S T A L L A T I O N   I N S T R U C T I O N S

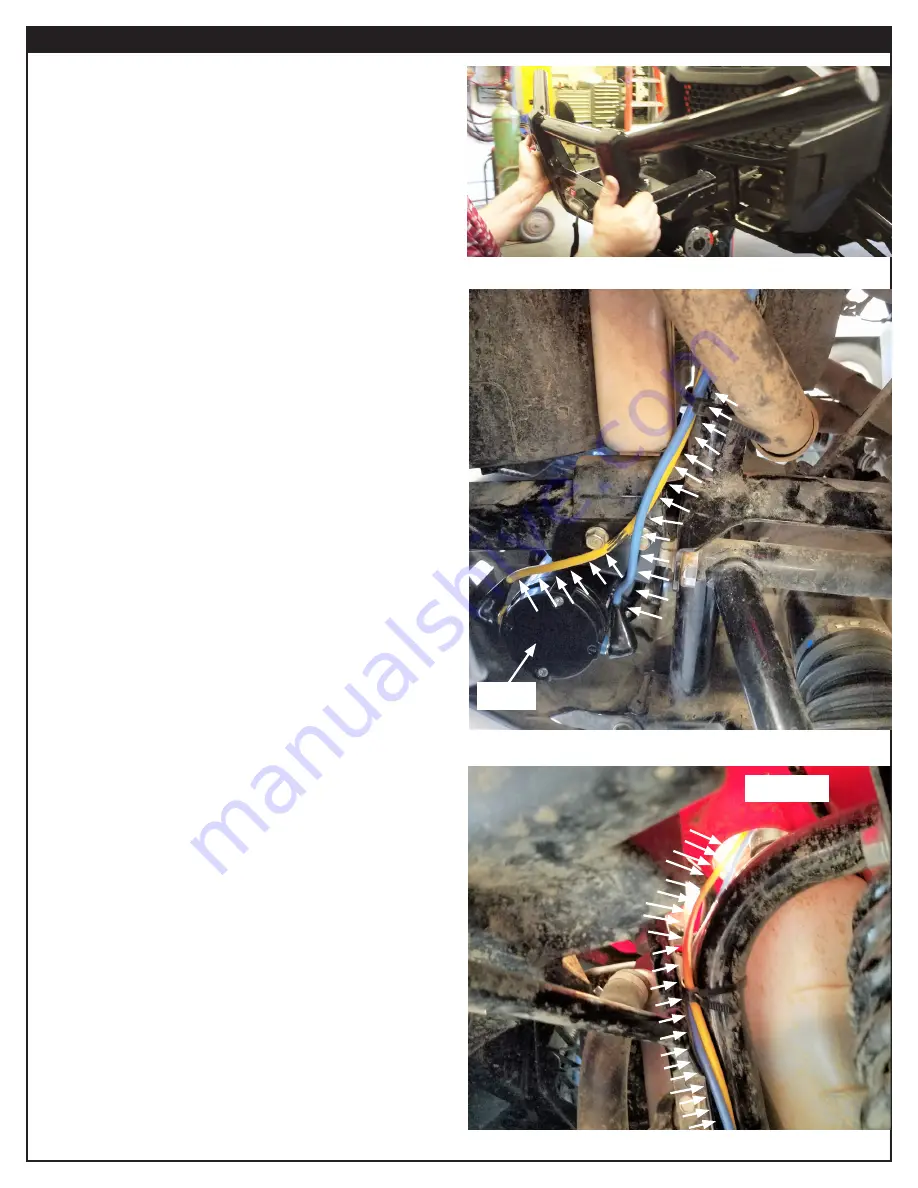
11.  Install brush guard/winch assembly to vehicle using 

factory hardware.

12.  Choose a location to mount the winch contactor. 

Be sure 

the blue and yellow ends are able to reach contactor easily.

13.  Mount contactor per winch installation instructions.  

14.  Route blue and yellow winch power cables along frame 

upright tube, towards contactor.  Use zip ties to secure  

cables to the frame along the way.  

15.  Route wires through top plastic continuing to use cable 

ties to secure wires.

Winch

Top Plastic

Figure 7

Figure 8

Figure 9

Summary of Contents for 93790

Page 1: ...icalterminals Alwaysinstallterminalbootsasdirectedininstallationinstructions Alwaysuseappropriateandadequatecareinliftingcomponentsintoplace Alwaysinsurecomponentswillremainsecureduringinstallationand...

Page 2: ...observe these instructions could lead to minor or moderate injury AlwaystaketimetofullyreadandunderstandtheinstallationandOperationsGuideincludedwiththisproduct Neveroperatethisproductifyouareunder16...

Page 3: ...cified in the instructions FASTENERSIZE FASTENERTORQUE FASTENERSIZE FASTENERTORQUE lb ft N m M4 2 3 1 4 8 11 M5 4 5 6 5 16 17 23 M6 7 5 10 3 8 30 40 M8 18 25 7 16 48 66 M10 37 50 1 2 74 100 9 16 106 1...

Page 4: ...ofWarn Industries Inc 4 107333A0 I N S T A L L A T I O N I N S T R U C T I O N S 1 Remove front brush guard by first removing the three mounting bolts and one hex socket bolt each side 2 Remove brush...

Page 5: ...age clutch feed winch rope through brush guard s fairlead opening the fairlead adapter bracket if needed see NOTE and fairlead NOTE The fairlead adapter bracket will be used only with 2500 and 3500 wi...

Page 6: ...ocation to mount the winch contactor Be sure the blue and yellow ends are able to reach contactor easily 13 Mount contactor per winch installation instructions 14 Route blue and yellow winch power cab...

Page 7: ...nuts and bolts on the winch winch mount and related hardware prior to each use Tighten all nuts that appear to be loose Stripped fractured or bent bolts or nuts need to be replaced 3 Check all cables...

Reviews: