background image


4.2


Uninstalling the Device Driver


For the Windows XP, Windows Vista, or Windows 7 operating 

system:


1.


Exit all applications that use the Dock n’ Charge. 

2.


Click 

Start 

➙ 

Control Panel 

➙ 

Programs and Features 

➙ 

Uninstall 

DisplayLink Graphics.


3.


Follow the instructions on the screen to uninstall the device driver. 

4.


Restart your computer if necessary. 


For the Windows 8 operating system:


1.


Exit all applications that use the Dock n’ Charge. 

2.


Go to Control Panel by doing one of the following: 

From the desktop, move the pointer to the top-right or bottom-right corner 

of  the  screen  to  display  the  charms,  and  then  click 

Settings 

➙ 

Control 

Panel.


From the Start screen, do the following: 

a)


Move the pointer to the top-right or bottom-right corner of the screen 

to display the charms. 

b)


Click Search 

c)


On the Apps screen, scroll to the right side, and click Control Panel  in 

the Windows System section. 

3.


Depending on your Control Panel mode, do one of the following: 

a)


Click the 

Uninstall a program 

option under the 

Programs 

menu 

b)


Click 

Programs and Features.


4.


Select the DisplayLink Graphics software and then right-click your mouse. The 

Uninstall option is displayed. 

5.


Click 

Uninstall.


6.


Follow the instructions on the screen to uninstall the device driver. 

7.


Restart your computer if necessary.


6


Summary of Contents for Dock n' Charge SWP240A

Page 1: ...1 Dock n Charge Product Guide P N SWP240A...

Page 2: ...the device driver 5 4 2 Uninstalling the device driver 6 4 3 Connecting the Dock n Charge to your computer 7 5 Using the Dock n Charge 8 6 Working with the Dock n Charge 10 6 1 Understanding the vide...

Page 3: ...or 3 0 Port Supports Windows XP Vista 7 8 Does not support Windows RT Tablets Processor 1 33 GHz Intel dual core ATOM Baytrail or higher 2 0 GHz Intel Core2 or higher 2 2 GHz Dual core AMD Athlon 64...

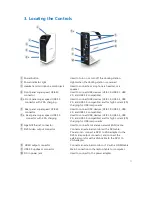
Page 4: ...d to connect USB devices USB 1 0 USB 1 1 USB connector 2 0 and USB 3 0 compatible b Rear panel super speed USB 3 0 Used to connect USB devices USB 1 0 USB 1 1 USB connector with 2 0A charging 2 0 and...

Page 5: ...ndows 8 or Windows 8 1 operating system open File Explorer and click Computer or This PC then double click the CD DVD drive icon Follow the instructions on the screen to install the device driver Rest...

Page 6: ...tom right corner of the screen to display the charms and then click Settings Control Panel From the Start screen do the following a Move the pointer to the top right or bottom right corner of the scre...

Page 7: ...nect the USB B plug of the USB 3 0 cable to the USB 3 0 upstream connector on the docking station 4 Connect the USB A plug of the USB 3 0 cable to an available USB connector on the notebook computer A...

Page 8: ...ct the docking station to a standard 10 Mbps 100 Mbps or 1000 Mbps network and wait until the docking station is fully configured by the Windows operating system Using the USB connectors To use the US...

Page 9: ...lays to the docking station using the two video outputs You do not have to disconnect the docking station from your computer each time when you connect the external displays To use the video outputs c...

Page 10: ...ons of the Display These are the only modes offered through the DisplayLink GUI or Windows Display Properties window The software will use the monitor s preferred mode by default If the Display does n...

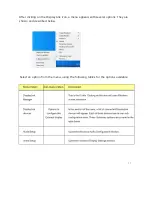
Page 11: ...After clicking on the DisplayLink icon a menu appears with several options They are shown and described below Select an option from the menu using the following tables for the options available 11...

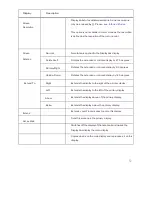
Page 12: ...extended or mirrored display by 90 degrees Upside Down Rotates the extended or mirrored display by 180 degrees Extend To Right Extends the display tothe right of the primary display Left Extends the...

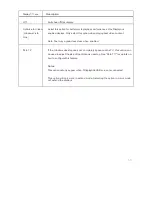
Page 13: ...deo content Note Text may appear less clear when enabled Fit to TV If the Windows desktop does not completely appear on the TV this option can be used to adjust the size of the Windows desktop See Fit...

Page 14: ...omes the primary display and the external monitor s become the secondary display s and the external monitor display s are on the right side of the notebook computer monitor display by default Extend T...

Page 15: ...enables you to show your desktop on only one screen There are two options when you are using single display mode Laptop Tablet Monitor Off When you select this option the display of your computer mon...

Page 16: ...n option for you If you can do so then you will not need to use the Fit to TV function of the DisplayLink UI This is the best way to correct this issue Fit to TV can be used to reduce the size of the...

Page 17: ...the and controls on the Fit to TV GUI to change the size of the red border until it fits on the TV screen Note Finer configuration of the size of the border can be achieved by holding down the CTRL k...

Page 18: ...0 60 4 768 x 576 50 60 5 800 x 480 60 6 800 x 600 56 60 72 75 85 7 832 x 624 75 8 848 x 480 60 9 1024 x 600 60 10 1024 x 768 60 70 75 85 11 1152 x 864 75 12 1152 x 870 75 13 1280 x 720 50 60 14 1280 x...

Page 19: ...he preferred resolution of the monitor cannot be supported However we add lower resolutions of the same aspect ratio to be tried with the monitor Modes in square brackets imply that these are modes no...

Page 20: ...hen you are using this feature Manually enabling the headset and microphone jack s To manually enable the headset and microphone jack on the docking station depending on the operating system you are u...

Page 21: ...ens 2 Select DisplayLink Screen Rotation and then select one of the following Normal The external monitor display remains the same as your computer monitor display Rotated Left The external monitor di...

Page 22: ...ndows notification area A pop up menu opens 2 Select DisplayLink Screen Resolution and then select the desired screen resolution option for the external monitor For example 2048 x 1152 means that the...

Page 23: ...supply for operation because it does not take power from the USB connector attached to your notebook computer b Ensure that the device driver of the docking station is well installed if not install t...

Page 24: ...COPP and you will not be able to play back the protected videos on the external monitors connected to the docking station The Corel WinDVD 10 program also has limitations on playing back videos in the...

Page 25: ...creen mode when you right click the screen to open the setting menus 5 The images on the external monitor s are not in correct colors To solve the problem do the following a Ensure that the external m...

Page 26: ...Windows 8 1 operating systems 1 Right click the volume icon in the Windows notification area 2 Select Sounds and the Sound window is displayed 3 Click the Playback Devices tab to select a different bu...

Page 27: ...27 Error Messages The DisplayLink software occasionally displays user messages in a bubble in the notification area The table below lists the user messages and their description...

Page 28: ...ns Contact the software company s technical support department for assistance Consult the Warpia technical support website at http support warpia com This is an excellent resource for current informat...

Reviews: