background image

CAUTION 

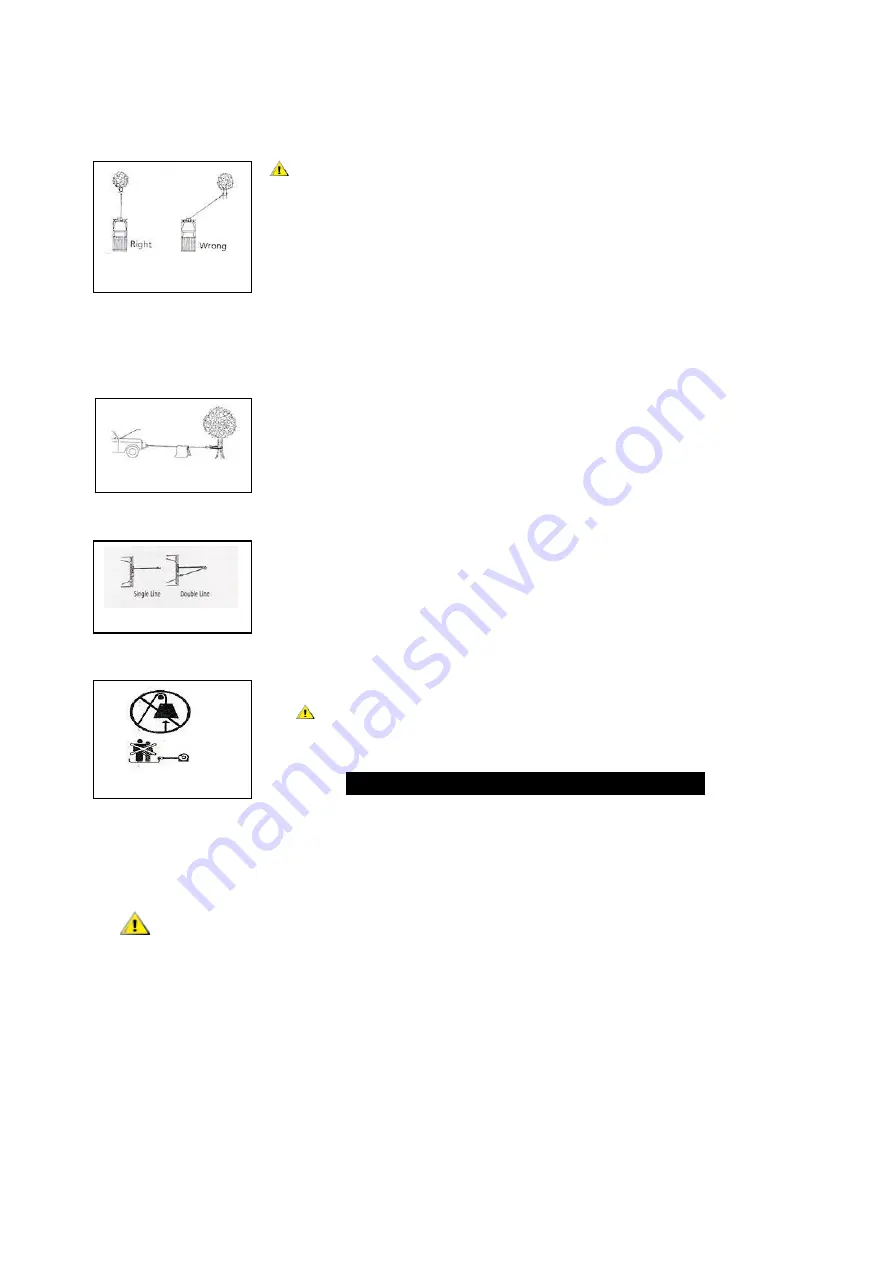
Do  not  winch  from  an  acute  angle  as  the  wire  rope 

will  pile  up  on  one  side  of  the  drum  causing  damage  to  wire  rope 

and the winch. Fig 3.2 

Short  pulls  from  an angle can  be used to straighten the vehicle. 

Long  pulls  should  be  done  with  the  wire  rope  at  a  90°  angle  to  the 

winch/vehicle. 

When pulling a heavy  load,  place  a blanket  or  jacket  over  the  wire 

rope five or six feet from the hook.  In the event of a broken cable it 

will dampen the snap back. 

For additional protection open the 

hood of the vehicle as shown in Fig 3.3 

For pulls over 70% rated line pull, we recommend the use of the 

snatch block/pulley block to double line the wire rope. Fig 3.4 

This reduces the load on the winch and the strain on the rope by up 

to 50% depending on the included angle 

WARNING - 

Never use your winch for overhead hoisting  or 

for lifting people or moving people. 

WINCH WORKING DEMONSTRATION


1. 

Disengage the clutch by turning the clutch to the “CLUTCH OUT”  position. 

2.  Grab the cable assembly (Part# 060EN1000) and pull the cable to the desired 

length, then attach to item being pulled. 

Caution: 

Always leave at least  five turns of  cable on the drum; Review winch 

safety warnings and precautions on page 2

3 before continuing. 

3.  Reengage  the  clutch  by  turn  the  clutch  assembly  (Part#  060EN0700)  to  the 

“CLUTCH IN” position, if the clutch is not engaged, the winch drum must be turned 

by hand, until the clutch is totally engaged. 

Insert the switch assembly connector onto the control box. 

Test-run winch in two directions, each direction for one or two seconds

.


10 

4. 

5. 


Fig 3.5 


Fig 3.4 


Fig 3.3 


Fig 3.2 


Summary of Contents for 6000EN

Page 1: ...ELECTRICAL WINCH 6000EN Assembly Operating Instructions...

Page 2: ...ATION 5 WINCHING TECHNIQUES A Z 6 WINCH ASSEMBLY AND MOUNTING 7 MOUNTING DRAWING 9 WINCH ACCESSORIES YOU WILL NEED 9 RIGGING TECHNIQUES 9 WINCH WORKING DEMONSTRATION 1 0 REPLACING THE WIRE ROPE 1 1 MA...

Page 3: ...y or improperly could result in property damage serious injury or death Throughout this manual you will find the following symbols for caution warning and danger Pay particular attention to the notes...

Page 4: ...drum in the under wind position through the roller fairlead and is looped at the end to accept the clevis hook pin Roller Fairlead When using the winch at an angle the roller fairlead acts to guide th...

Page 5: ...line and snatch block for pulling over 70 of the rated line pull SAFETY PRECAUTIONS WARNING WARNING Do not exceed rated capacity shown in this table WARNING Intermittent use only Allow winch to cool...

Page 6: ...remote button to draw in the cable Walk toward the winch not allowing the cable to slide through your hands Do not let your hands get within 12 of the winch while re spooling Turn off the winch and r...

Page 7: ...reduce the load on the wire rope by as much as 50 When doubling the line back to the vehicle attach to the frame or other load bearing part The vehicle engine should be kept running during operation...

Page 8: ...ake time to asses your situation and plan your pull b Put on gloves to protect your hands c Disengage the clutch to allow free spooling and to save energy d Attach the hand saver hook to the clevis ho...

Page 9: ...round and is able to drive under its own power s Secure the vehicle Be sure to set the brakes and place the vehicle in park t Release the tension on the wire rope The winch is not meant to hold the ve...

Page 10: ...knob to the CLUTCH OUT position free spooling Pull out a few inches of cable from the drum and feed the wire loop through the opening in the front of the mounting channel and roller fairlead Now using...

Page 11: ...epeat and check rotation MOUNTING DRAWING 6000EN WINCH ACCESSORIES YOU WILL NEED NOT INCLUDED WITH YOUR WINCH Gloves For handling the wire rope and hook strap Anchor Strap Chain Tree saver anchor stra...

Page 12: ...winch and the strain on the rope by up to 50 depending on the included angle WARNING Never use your winch for overhead hoisting or for lifting people or moving people WINCH WORKING DEMONSTRATION 1 Dis...

Page 13: ...cted to the drum Insert the end of the new rope and secure the screw M8x10 Part 060EN0007 4 Ensure that the new cable wraps in the same rotation direction as the old one The cable should leave the dru...

Page 14: ...without load until completely dry Motor runs but cable drum does not turn Clutch not engaged Turn clutch to the In position If problem persists a qualified technician needs to check and repair Motor r...

Page 15: ...WINCH ASSEMBLY DRAWING 6000EN 13...

Page 16: ...sembly Input 22 060EN0016 1 Gear Input Sun 23 060EN0017 1 Shaft Sleeve 24 060EN0018 1 Trust Washer 25 060EN0700 1 Clutch Assembly 26 060EN0019 1 Gear Housing 27 060EN0020 8 Screw M12 55 28 060EN0021 8...

Page 17: ...V DC 0 18 0 5 5 19 4 5 9 90 40 4409 2000 8 9 2 7 9 2 2 8 200 90 8818 4000 6 2 1 9 6 9 2 1 295 150 13228 6000 4 6 1 4 5 2 1 6 400 210 Rated line pull 6000KGS Motor series wound 12V Input 4 9kW 7 0hp Ou...

Page 18: ...operating instructions before use Failure to comply with these instructions or any improper use of the equipment will terminate the warranty Please ensure you record the information below In the unlik...

Reviews: