background image

CAUTION 

– 

Batteries  contain  gases  which  are  flammable  and    explosive. 

Wear  eye  protection  during  installation  and  remove  all  jewelry.  Do  not  lean  over 

battery while making connections. 

Assemble the clevis hook to the cable. Take off the pin from the clevis hook, 

connect the clevis hook to the cable and mount the pin back to the clevis hook. 

Always use the hand saver when free-spooling and re-spooling the wire rope. 

Using the hand saver keeps your hands and fingers away from the rotating 

drum. 

Check  for  proper  drum  rotation.  Pull  an

d  turn  the  clutch  knob  to  the  “CLUTCH 

OUT”  position.  Pull  out  some  cable  from  the  drum,  and  then  turn    the  clutch  

knob  to  the  “CLUTCH  IN”  position  to  engage  the  gears.  Press  the  cable  out 

button  on  the  power  switch.  If  the  drum  is  turning  and  releasing    more  cable  

then your connections are accurate.  If  the drum  is turning and collecting more 

cable then reverse the leads on the motor. Repeat and check rotation. 

5. 

6. 

7. 

MOUNTING DRAWING


Summary of Contents for 5250EN

Page 1: ...ELECTRICAL WINCH 5250EN Assembly Operating Instructions...

Page 2: ...ATION 5 WINCHING TECHNIQUES A Z 6 WINCH ASSEMBLY AND MOUNTING 7 MOUNTING DRAWING 9 WINCH ACCESSORIES YOU WILL NEED 9 RIGGING TECHNIQUES 9 WINCH WORKING DEMONSTRATION 1 0 REPLACING THE WIRE ROPE 1 1 MA...

Page 3: ...y or improperly could result in property damage serious injury or death Throughout this manual you will find the following symbols for caution warning and danger Pay particular attention to the notes...

Page 4: ...in the under wind position through the roller fairlead and is looped at the end to accept the clevis hook pin Roller Fairlead When using the winch at an angle the roller fairlead acts to guide the wir...

Page 5: ...he wire rope may break before the motor stalls For heavy loads at or near rated capacity use a pulley block snatch block to reduce the load on the wire rope WARNING Never step over a cable or go near...

Page 6: ...Use gloves to protect hands when handling the cable Never let the cable slide through your hands WARNING Never connect the cable back to itself Apply blocks to the wheels of the vehicle when on an in...

Page 7: ...quipment before each use A frayed or damaged rope must be replaced immediately Use only the manufacturer s identical replacement rope with the exact specifications Inspect the winch installation and b...

Page 8: ...blanket or jacket over the wire rope approximately 5 to 6 feet from the hook Open the hood of the vehicle for added protection n Clear the area Make sure all spectators are back and that no one is dir...

Page 9: ...is mounted on a flat surface so that the three major sections motor drum and gear housing are properly aligned Proper alignment of the winch will allow even distribution of the full rated load If you...

Page 10: ...ing and re spooling the wire rope Using the hand saver keeps your hands and fingers away from the rotating drum Check for proper drum rotation Pull and turn the clutch knob to the CLUTCH OUT position...

Page 11: ...k RIGGING TECHNIQUES Self Recovery Locate a suitable anchor such as a strong tree trunk or boulder Always use a sling as an anchor point CAUTION Do not attach the clevis hook back onto the cable as th...

Page 12: ...the desired length then attach to item being pulled Caution Always leave at least five turns of cable on the drum Review winch safety warnings and precautions on page 2 3 before continuing 3 Reengage...

Page 13: ...um under a load of at least 10 rated line pull WARNING Only replace the wire rope with the identical replacement part recommended by the manufacturer MAINTENANCE 1 Periodically check the tightness of...

Page 14: ...ower Insufficient current or voltage Battery weak recharge Run winch with vehicle motor running Loose or corroded battery cable connections Clean tighten or replace Motor overheating Winch running tim...

Page 15: ...WINCH ASSEMBLY DRAWING 5250EN 13...

Page 16: ...Assembly Intermediate 21 N1750015 1 Gear Ring Intermediate 22 N1750600 1 Gear Carrier Assembly Input 23 N1750016 1 Gear Input Sun 24 N1750017 1 Shaft Sleeve 25 N1750018 1 Trust Washer 26 N1750700 1 Cl...

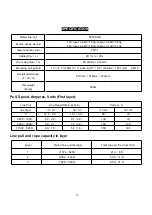
Page 17: ...12V DC 24V DC 0 14 4 4 4 13 1 4 0 80 70 2205 1000 8 5 2 6 9 1 2 8 130 78 4409 2000 6 9 2 1 7 2 2 2 180 108 11574 5250 4 9 1 5 5 2 1 6 350 180 Rated line pull 5250KGS Motor series wound 12V Input 4 9kW...

Reviews: