background image


ELECTRICAL WINCH 

80ENS24 

80ENA24 


Assembly & Operating Instructions 

Summary of Contents for 80ENA24

Page 1: ...ELECTRICAL WINCH 80ENS24 80ENA24 Assembly Operating Instructions...

Page 2: ...ATION 4 WINCHING TECHNIQUES A Z 5 WINCH ASSEMBLY AND MOUNTING 7 MOUNTING DRAWING 9 WINCH ACCESSORIES YOU WILL NEED 9 RIGGING TECHNIQUES 9 WINCH WORKING DEMONSTRATION 1 0 REPLACING THE WIRE ROPE 1 1 MA...

Page 3: ...r your safety Ultimately safe operation of this device rests with you the operator This indicates a potentially hazardous situation which if not avoided may result in minor or moderate injury This not...

Page 4: ...is stopped and there is a load on the wire rope A separate mechanical brake applies the braking action 8 Free Spooling Clutch The clutch allows the operator to manually disengage CLUTCH OUT the spool...

Page 5: ...fore the motor stalls For heavy loads at or near rated capacity use a pulley block snatch block to reduce the load on the wire rope WARNING Never step over a cable or go near a cable under load WARNIN...

Page 6: ...ion of winching pulls should be kept as short as possible If the motor becomes uncomfortably hot to the touch stop winching immediately and let it cool down for a few minutes Do not pull for more than...

Page 7: ...cifications Inspect the winch installation and bolts to ensure that all bolts are tight before each operation Never connect the cable back to itself This will cause cable damage Always use a snatch bl...

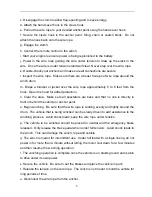
Page 8: ...Make sure all spectators are back and that no one is directly in front or behind the vehicle or anchor point o Begin winching Be sure that the wire rope is winding evenly and tightly around the drum...

Page 9: ...drum and gear housing are properly aligned Proper alignment of the winch will allow even distribution of the full rated load 2 Start by connecting the roller fairlead to the mounting channel using 2 e...

Page 10: ...hen free spooling and re spooling the wire rope Using the hand saver keeps your hands and fingers away from the rotating drum 8 Check for proper drum rotation Pull and turn the clutch knob to the CLUT...

Page 11: ...ING TECHNIQUES Self Recovery Locate a suitable anchor such as a strong tree trunk or boulder Always use a sling as an anchor point CAUTION Do not attach the clevis hook back onto the cable as this cou...

Page 12: ...and pull the cable to the desired length then attach to item being pulled Caution Always leave at least five turns of cable on the drum Review winch safety warnings and precautions on page 2 3 before...

Page 13: ...om the bottom under the drum 5 Turning clutch to the CLUTCH IN position 6 Retract Cable Assembly onto drum first five wraps being careful not to allow kinking then winch cable must be wound onto the d...

Page 14: ...Clutch not engaged Turn clutch to the In position If problem persists a qualified technician needs to check and repair Motor runs slowly or without normal power Insufficient current or voltage Battery...

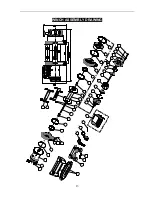
Page 15: ...13 WINCH ASSEMBLY DRAWING 1 6 2 3 5 4 7 8 10 11 12 13 14 15 16 17 18 10 19 20 21 20 22 23 24 25 26 27 28 29 30 31 32 33 34 35 41 42 43 9 9 1 36 37 38 39 14 40 44...

Page 16: ...22 80EN0020 1 Circlip For Hole 23 80EN0021 1 Bearing 24 80EN0300 1 Gear Carrier Assembly Output 25 80EN0022 1 Circlip For Hole 26 80EN0400 1 Gear Carrier Assembly Intermediate 27 80EN0500 1 Brake Sha...

Page 17: ...ne pull lbs kgs Total rope on the drum ft m 1 17637 8000 18 7 5 7 2 14923 6769 42 7 13 3 12932 5866 70 2 21 4 4 11408 5175 92 28 Rated line pull 8000 kgs 17637 lbs Motor series wound 24V Input 6 1kW 8...

Reviews: