Service
Manual
23
42
42. Instruction for pulley and replacing bearings
Fig.
20
•
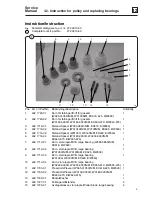
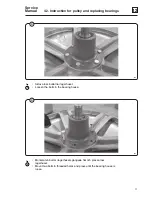
Montera bakgavelpaketet över axeln. Var noga med att hålla gaveln
horisontellt och var uppmärksam på att tätningarna inte skadas på axeln.
•
Mount the rear gable over the drum shaft. Be sure to put it on
horizontally so that the sealings don't get damaged on the shaft.
•
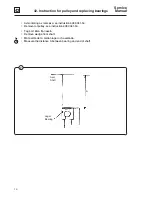
Montera adapter på axeländan och skruva ner den i botten.
•
Mount the adaptor on the shaft end and thread it down to the bottom.
21
366
•
Montera pressdorn, bricka, mutter och avdragarbult. Pressa ner gaveln i
botten. Kontrollera måttet mellan axelända och bakre lagerbana som
uppmättes vid isärtagningen.
•
Mount presser, washer, nut and puller bolt. Press down the rear gable
until stop. Check the measure between the shaft end and bearing race.
This measure was taken before removing the rear gable from the shaft.
Fig.
21
20
365
Summary of Contents for W620 Classic
Page 1: ...DOC NO 438 9205 85 07 EDITION 49 2004 W620 W630 W640 W655 W675 Classic SERVICE MANUAL ...
Page 2: ......
Page 4: ...Intentionally blank ...
Page 6: ...Intentionally blank ...
Page 10: ...Intentionally blank ...
Page 12: ...Intentionally blank ...
Page 13: ...1 1 1 Safety precautions Service Manual Contents Safety precautions 3 ...
Page 14: ...Intentionally blank ...
Page 16: ...Intentionally blank ...
Page 17: ...2 Technical data Contents Technical data 3 Connections 3 ...
Page 18: ...Intentionally blank ...
Page 28: ...Intentionally blank ...
Page 30: ...Intentionally blank ...
Page 37: ...11 Regular maintenance Contents Daily 3 Every third month 3 ...
Page 38: ...Intentionally blank ...
Page 42: ...Intentionally blank ...
Page 58: ...Intentionally blank ...
Page 61: ...27 Thermostat Contents Data 3 Description 3 Repair instructions 4 Replacing the thermostat 4 ...
Page 62: ...Intentionally blank ...
Page 66: ...Intentionally blank ...
Page 76: ...Intentionally blank ...
Page 78: ...Intentionally blank ...
Page 79: ...3 30 30 Motor Service Manual Warnings DANGER Be careful when measuring capacitors and filter ...
Page 85: ...38 Drain valve Contents Description 3 Function 3 Repairs 4 Disassembly 4 Assembling 5 ...
Page 86: ...Intentionally blank ...
Page 90: ...Intentionally blank ...
Page 91: ...39 Detergent compartment Contents Description 3 ...
Page 92: ...Intentionally blank ...
Page 94: ...Intentionally blank ...
Page 96: ...Intentionally blank ...
Page 100: ...Intentionally blank ...
Page 102: ...Intentionally blank ...
Page 108: ...Intentionally blank ...
Page 114: ...Intentionally blank ...
Page 132: ......


