background image

WPL305 Thermal Label Printer 
User’s Guide 


For Wasp Technologies


DT/TT Printer 


 Copyright Wasp Bar Code Technologies 2004. 

All rights reserved. 
 
No part of this publication may be reproduced or transmitted in any 
form or by any means without the written permission of Wasp Bar 
Code Technologies. The information contained in this document is 
subject to change without notice. 


Wasp is a trademark of Wasp Bar Code Technologies. All other trademarks are the property of their 

respective owners. 


i

Summary of Contents for WPL305

Page 1: ...part of this publication may be reproduced or transmitted in any form or by any means without the written permission of Wasp Bar Code Technologies The information contained in this document is subject...

Page 2: ...eration 6 4 Power on Utilities 8 4 1 Initialization 8 4 2 Ribbon Sensor Calibration 9 4 3 Gap Black Mark Calibration 9 5 Maintenance 12 5 1 Cleaning 12 6 Troubleshooting 12 6 1 LED Status 12 6 2 Print...

Page 3: ...g and Inspection This printer has been specially packaged to withstand damage during shipping Please carefully inspect the packaging and printer upon receipt Please retain the packaging materials in c...

Page 4: ...secure surface 2 Make sure the power switch is off 3 Connect the printer to the computer with the Centronics or USB cable 4 Plug the power cord into the power supply connector at the rear of the prin...

Page 5: ...lock and open the cover 2 Wasp Ribbons come with the cardboard rewind core already attached to the ribbon for ease of accurate installation Arrange the ribbon and core as seen in the picture below so...

Page 6: ...n rewind core away from you until the black ribbon is on the rewind core 9 Close the ribbon access window and press down to lock it Make sure both the ribbon access window and the printer top cover ar...

Page 7: ...rinting side face up under the Teflon bar and the paper guide and pass over the platen 5 Adjust the yellow center biased paper guides to slightly touch the edges of the label backing 6 To close the pr...

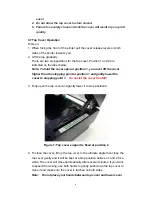
Page 8: ...her than the stopping point at position 1 and gently lower the cover to stopping point 1 Do not let the cover free fall 3 Fully open the top cover and gently lower it to stop position 2 Figure 7 Top c...

Page 9: ...o close the top cover 5 Do not force the cover If you are not sure if top cover is locked at a stop position please do not push top cover to close it or the top cover will be damaged Instead open the...

Page 10: ...the FEED button and then turn on the printer 3 The LED will turn orange blink red 5 times blink orange 5 times and then blink green 5 times Release after the first green light blink 4 Printer configur...

Page 11: ...uld be calibrated at the following conditions 1 A brand new printer 2 Change label stock 3 Printer initialization Please follow the steps below to calibrate the sensor 1 Turn the printer power off 2 P...

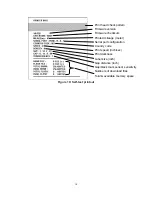
Page 12: ...sum Printed mileage meter Serial port configuration Country code Print speed inch sec Print darkness Label size inch Gap distance inch Gap black mark sensor sensitivity Numbers of download files Total...

Page 13: ...ow Hex decimal data related to left column of ASCII data ASCII Data Figure 11 Dump mode printout The left side characters are received from your system and the right side data are the corresponding he...

Page 14: ...cloth Interior Brush or air blow 6 Troubleshooting This section lists common problems and some suggested solutions Problems are indicated by the LED light pattern 6 1 LED Status LED Status Color Print...

Page 15: ...wing the instructions in Power on Utilities 6 2 Print Quality Continuous feeding labels The printer settings may be wrong Please do the Initialization and Gap Black Mark Calibration No print on the la...

Page 16: ...r LED Green Orange Red Hardware Sensor Transmissive sensor offset 6 mm from liner edge Reflective sensor position adjustable Head open micro switch Ribbon end sensor Memory 1M byte Flash memory 2M byt...

Page 17: ...ter Thickness 0 06mm 0 19mm 2 3 7 4 mil max 150g m2 Roll Diameter 5 Roll Core Diameter 25 4mm 76 2mm 1 3 Gap Height 2mm min Black Mark Height 2mm min Black Mark Width 8mm min 7 3 Ribbon Specifications...

Page 18: ...e it is determined that the print head is defective This warranty is limited to repair or replacement at Wasp Technologies option with reasonable promptness after being notified These provisions do no...

Reviews: