background image

WPL606 Thermal Label Printer 
User’s Guide 
 

For Wasp Technologies


DT/TT Printer 


 Copyright Wasp Bar Code Technologies 2004. 

All rights reserved. 
 
No part of this publication may be reproduced or transmitted in any form or by any 
means without the written permission of Wasp Bar Code Technologies. The 
information contained in this document is subject to change without notice. 
 
Wasp is a trademark of Wasp Bar Code Technologies. All other trademarks are the 
property of their respective owners. 
 
Document Revised August 13th, 2001


Summary of Contents for WPL606

Page 1: ...lication may be reproduced or transmitted in any form or by any means without the written permission of Wasp Bar Code Technologies The information contained in this document is subject to change witho...

Page 2: ...ent knobs 5 3 Set Up 7 3 1 Setting Up the Printer 7 3 2 Ribbon Installation 7 3 3 Label Roll Installation 9 3 4 Peel off Sensor Installation Sold Separately 10 3 5 Loading Label For Peel off Mode 11 3...

Page 3: ...Appendix 1 LCD Control Panel Operation Map 19 3...

Page 4: ......

Page 5: ...Environment Operating Environment Temperature 5 40 O C 41O F 104 O F Humidity 30 85 Storage Environment Temperature 10 60 O C 14 O F 140 O F Humidity 20 95 Ventilation Free air environment 1 1 3 Hard...

Page 6: ...ortable LCD keyboard Memory Internal or External Ethernet print server 1 3 Supplies 1 3 1 Label Specification Item Specification Type Roll and label continuous die cut fan fold ticket Label Width 25 4...

Page 7: ...ent of damage Please retain the packaging materials in case you need to reship the printer 2 2 Equipment Checklist W606 printer unit Quick installation guide Power cord Centronics interface cable 3 76...

Page 8: ...ew RS 232C Port Power Switch Power Supply Connector Print Head Lift Lever Ribbon Rewind Spindle Ribbon Supply Spindle Label Spindle Media Guide Bar Label Guide Ribbon Tension Adjustment Knob USB port...

Page 9: ...ucture and operation logic of the menu PAUSE EXE INC Button This button combines three functions A PAUSE If the printer is in the Ready status pressing the PAUSE 1 Stops at the completion of printing...

Page 10: ...hem to different levels fixes a printing problem you should clean the print head and consider replacing it Print Head Pressure Knobs Print Head Burn Line Knobs Figure 4 Print head adjustment knobs Pri...

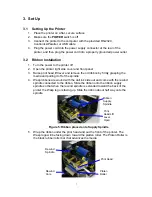
Page 11: ...bon by firmly grasping the media and pulling it off of the spindle 4 Wasp ribbons are wound with the dull ink side out and come with the rewind spindle connected to the ribbon Slide the ribbon onto th...

Page 12: ...ll face up again Figure 7 Ribbon placed onto Rewind Spindle 7 Roll the rewind spindle by hand until some of the actual ribbon shows in the front of the printer The Wasp logo will roll over the top of...

Page 13: ...bel Guide Label Guide Gap Detector Handle Platen Roller Print Head Lever Figure 11 Media guide bar the gap black mark detector 5 Adjust the label guide by sliding it along its bar to meet the width of...

Page 14: ...hed to bar Socket for Peel off sensor Figure 13 Peel Socket 4 Plug the Peel off sensor into the socket by sliding it along the bar into the socket Figure 14 Peel Sensor into Socket 5 Close the panels...

Page 15: ...button several times to advance the label backing through the rollers 5 Either advance the backing or roll back the labels to take the slack out of the media Tear Bar Peeler Roller Platten Roller Lab...

Page 16: ...Country code Print speed inch sec Print darkness Label size inch Gap distance inch Gap black mark sensor sensitivity Numbers of download files Total available memory space Figure 17 Printout of self t...

Page 17: ...Hex decimal data related to left column of ASCII data ASCII Data Figure 18 Printout of dump mode 13...

Page 18: ...aved when Turning off Power Mileage N A No Yes Check Sum N A No Yes Serial Port 9600 n 8 1 Yes Yes Code Page 850 Yes Yes Country Code 001 Yes Yes Tear Mode On Yes Yes Peel Mode Off Yes Yes Cutter Mode...

Page 19: ...Note When printer initialization is done please calibrate the gap sensor again 4 2 Gap Black Mark Sensor Calibration Utility The gap black mark sensor must be calibrated whenever the label media chan...

Page 20: ...n and media are incompatible 4 The pressure of print head is not set properly 1 Clean the print head using the steps in the section 5 1 Print Head Cleaning 2 Adjust the print density in the driver 3 U...

Page 21: ...Cleaning the Outside of the Printer 1 Switch off and unplug the printer 2 Wipe the printer lightly using a lint free cloth soaked in water or mild detergent NOTE Do not use harsh or abrasive cloth an...

Page 22: ...ring the 90 day period once it is determined that the print head is defective This warranty is limited to repair or replacement at Wasp Technologies option with reasonable promptness after being notif...

Page 23: ...nce Y Reference X Offset Density Direction Lang 3 System Setup Simplified Chinese Polski English Traditional Chinese Code Page SPA ITA DAN FRE GER SWI SWE 850 437 852 860 863 865 BRI USA 2 sec 3 sec 4...

Page 24: ...ngment DRAM 512KB free PAUSE Del All FEED Exit Delete File s Exit 001 002 003 031 032 033 034 036 038 039 041 042 046 045 044 061 055 047 048 049 351 358 Print Config 5 Printer Test Rotate Cutter Dump...

Reviews: