background image

 6  Before Starting

 6.1 

Transport

Before transporting the unit, ensure that it has been unplugged from the power socket. 

Make sure that it is packed correctly in order to avoid accidental damage.

Be sure to check for any transport damage when unpacking the goods. Note down 

any damage if found.

 6.2 

Installation

Open the box, remove the packing materials, and carefully lift out the device and 

accessories. Check the included accessories.

The device has to stand horizontally on a steady and even surface.

Install the device in a place where it will not block the working area and the 

functionality (take the dimensions into account). Make sure that there are about 

10 cm of free space on each side to guarantee air circulation (heat dissipation).

Do not install the unit outdoors or in places without proper ventilation.

Before start-up, be sure the device reaches room temperature.

 6.3 

Storage

The unit location is very important when it comes to workplace safety, even if it is only to 

be set up there for a short period. The room should be dry, well ventilated and vibration-

free. An even temperature and wooden supports also help. The unit should not be stored 

or set up outdoors. If the unit is to be stored for an extended period, protect it from 

moisture and dust.

8

Summary of Contents for 172980

Page 1: ...Dosing and Mixing Unit Sidomix II USER MANUAL...

Page 2: ...prevent accidents as well as the precautions given in this user manual We are not liable for any damages which occur due to inappropriate usage or faulty operation of this device Make sure that anyone...

Page 3: ...5 Replacing Bottles Cans 11 8 Operation 12 8 1 General Operating Instructions 12 8 2 Note for the Quantity Flow Control Setting of Quantity Flow Controller 12 8 3 Initial Start up and Material Change...

Page 4: ...roduction of homogene silicone material without any loss or bubbles at the press of a button Saves material and time by filling more than one bowl at the same time with just a single mixing cannula Fo...

Page 5: ...rning This is a warning of risk situations and dangers Failure to observe this warning could be life threatening These warnings has to be observed Information This symbol draws your attention to speci...

Page 6: ...vice in the Hamburg plant necessary Drill a ventilation hole using a drill or similar tool at the upper side edge of the 1 litre bottle or 6 kg or 25 kg can Do not tighten the caps of the 2 litre mate...

Page 7: ...assermann Dental Maschinen GmbH are not extended by these instructions 4 1 Warranty The warranty period for our equipment is 12 months If faults occur within the warranty period contact your dental de...

Page 8: ...where it will not block the working area and the functionality take the dimensions into account Make sure that there are about 10 cm of free space on each side to guarantee air circulation heat dissi...

Page 9: ...d and cleaned Very important Do not tighten the caps of the material containers but just fit them loosely to ensure proper ventilation 7 2 When using 1 kg Bottles Remove the closings of the bottles fi...

Page 10: ...ing bulk containers the cans must be positioned at a height higher than the device Optional pad stands are available on request Remove the closings from the cans filled with two component silicone and...

Page 11: ...confuse the bottles or connection hoses A B not even for a short time since the silicone within the connections and pipes hardens instantly The cleaning procedure is very demanding and may only be pe...

Page 12: ...re located on the side panel of the machine Behind the both sided bores of the hood please use a screwdriver Controller closed rotary knob is turned down quite right until it stops 100 of the componen...

Page 13: ...behind the both sided bores of the hood Turn both quantity flow controllers 2 to 3 to the left from the closed position stop far right to the open position by using a screwdriver Now press the red bu...

Page 14: ...the mixing cannula as long as the period between the single dosage operations lies within the dripping time of the used silicone about 4 min The dosage machine 1 1 dispenses mixed silicone as long as...

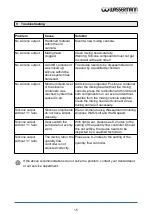
Page 15: ...nd hold it until both components run out even and without bubbles from the mixing cannula adaptors Clean the mixing head and connect a new mixing cannula if necessary Silicone output without 1 1 ratio...

Page 16: ...at regular intervals to ensure trouble free operation It requires only normal cleaning sponge damp cloth mild detergent and no further chemical additives Always keep the mixing cannula adaptor and the...

Page 17: ...d tall for duplicating silicones 2 x 25 kg cask 172632 Connecting tubes cpl 2 pcs 172633 Adapter set for duplicating silicones 2 x 1 kg cask 172634 Adapter set for duplicating silicones 2 x 6 kg cask...

Page 18: ...tect the environment prevent environmental pollution and improve the recycling of raw materials the European Commission adopted a directive that requires the manufacturer to accept the return of elect...

Page 19: ...re Zustimmung ver ndert wird This is to confirm that the above mentioned machine complies with the described EU guidelines This declaration becomes invalid if the machine is modified without our appro...

Page 20: ......

Reviews: