background image

Food Waste Disposer

Owner's Guide

IMPORTANT

- Read all instructions thoroughly. Keep this guide for

future reference.

CAUTION

- Be sure to review SAFETY INSTRUCTIONS PERTAINING TO

A RISK OF FIRE, ELECTRICAL SHOCK OR INJURY TO PERSONS before
installing disposer.

CONGRATULATIONS. YOU HAVE PURCHASED THE

#1 PERFORMANCE LEADER IN FOOD WASTE DISPOSERS.

Our food waste disposer is a reliable appliance that will offer your household many years of

trouble free use. This disposer has been uniquely designed to free your kitchen of all organic

food waste left over after the preparation and clean-up of meals. Simply turn on the water,

switch the disposer on, put your food waste in the disposer and it will shred the garbage into

very fine particles that are easily flushed through the sewer system without any problem. For

Batch Feed Operations, please see Section 6 of this manual.

Before installing and operating this disposer:

1. Make sure that the installation of this appliance is allowed by the authorities.

2. Please read and follow all recommendations in this manual to ensure

trouble free operations.

If you have any questions, please contact your distributor.

1

MOUNTING ASSEMBLY

2

ELECTRICAL CONNECTIONS

3

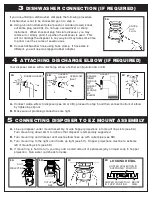
DISHWASHER CONNECTION

4

ATTACHING THE DISCHARGE ELBOW

5

CONNECTING DISPOSER TO MOUNT ASSEMBLY

6

OPERATING INSTRUCTIONS

7

TROUBLESHOOTING

8

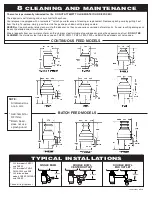
CLEANING AND MAINTENANCE

TABLE OF CONTENTS

560C396P01 REV C

Summary of Contents for 560C396P01

Page 1: ...ply turn on the water switch the disposer on put your food waste in the disposer and it will shred the garbage into very fine particles that are easily flushed through the sewer system without any pro...

Page 2: ...erating the disposer leave the stopper in place to reduce the risk of objects falling into the disposer 9 Do not operate disposer unless splash guard is in place Not applicable to Batch Feed models 10...

Page 3: ...lange through rubber gasket into sink opening Do not rotate sink flange once it is seated F If you use putty instead of the gasket form a ring around underside of sink flange Insert flange into sink o...

Page 4: ...ey are stacked and refer to 1D and 3B to identify each part Unpack the 3 mount screws and screw them half way through the mount ring notice THIS SIDE UP is imprinted on top of the mount ring Next stac...

Page 5: ...this carton is designed to operate at the voltage indicated on the cover plate located at the bottom of the disposer This plate also includes related electrical and identification information B If yo...

Page 6: ...hwasher is not to be connected go on to step 4 A Using a blunt instrument steel punch or wooden dowel knock out entire plug see 3A Do not use a screwdriver or sharp instrument When knockout plug falls...

Page 7: ...ser see 6C One of the two small slots in stopper base must line up with switch plunger inside the neck of the disposer Push down firmly Lift stopper to shut disposer off D Run disposer for 25 seconds...

Page 8: ...eaks at the top it may be due to 1 Improper seating of sink flange gasket choice putty or tightening 2 Support ring not tightened properly 3 Defective cushion mount If unit leaks at the waste elbow le...

Page 9: ...resulting damage can be easily detected and all warranties are void Mineral deposits from your water can form on the stainless steel turntable of your disposer giving the appearance of rust DO NOT BE...

Reviews: