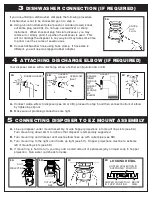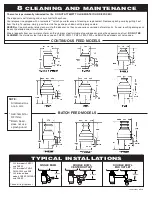
INSTALLATION OF EZ MOUNT ASSEMBLY CONT.
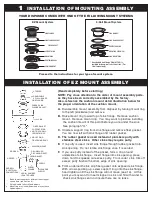
SUPPORT RING
SINK
FIBER
GASKET
MOUNT RING SHOULD BE
FREE TO MOVE UP & DOWN
OPEN AREA, NO
OBSTRUCTION
SINK FLANGE
BEAD OF
CUSHION
MOUNT
1A
1B
1C
RUBBER GASKET
SINK
FLANGE
H.
Place mount ring over sink flange and hold in place
while installing cushion mount (large side down) so
the groove on the
inside of cushion
mount fits over lip on
sink flange, similar to
putting the lid on a
plastic container (see
cushion mount detail
& 1B).
Run fingers around entire cushion mount with
slight pressure. Do not press too hard. When
cushion mount is properly seated, mount ring can
be pulled downward over cushion mount and will
be free to rotate. Illustration 1C shows correct
installed position.
TOP
BOTTOM
BEAD
GROOVE
CUSHION MOUNT DETAIL
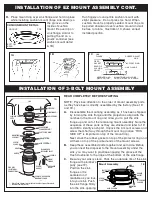
NOTE: Pay close attention to the order of mount assembly parts,
as they have been correctly assembled by the factory. (See 1D
and 1E.)
A.
Disassemble the mounting assembly, as it has been shipped,
by turning the sink flange until the projections align with the
notches in the mount ring and allow you to pull the sink
flange up and out of the remaining mount assembly. Note the
sequence of these parts as they are stacked and refer to 1D
and 3B to identify each part. Unpack the 3 mount screws and
screw them half way through the mount ring (notice “THIS
SIDE UP” is imprinted on top of the mount ring).
Next, stack the rubber gasket on top of the protector ring and
sit them on top of the pointed ends of the mount screws.
B.
Keep these assembled parts together and set aside. Before
you connect the disposer to the mount assembly under the
sink, you may want to practice engaging the groove of the
Hush Cushion® to the ridge at the bottom of the sink flange.
C.
Be sure your sink is clean. Pack the underside rim of the sink
flange with plumberʼs
putty (see 1F).
Position the sink
flange so it is
centered and
readable as you look
into your sink. Push
the sink flange firmly
into the sink opening
READ COMPLETELY BEFORE STARTING
INSTALLATION OF 3-BOLT MOUNT ASSEMBLY
1D
STOPPER*
SINK FLANGE**
SINK
HOPPER
ELBOW
GASKET
SCREWS
SERIAL #- RECORD ON
WARRANTY CARD
MOUNTING
SCREWS**
SCREW
CLAMP**
PROJECTIONS
RIDGE
RIDGE
DISCHARGE
ELBOW
ELBOW
FLANGE
DISHWASHER
DISCHARGE INLET
HUSH CUSHION
®
**
RUBBER SINK
FLANGE GASKET**
PROTECTOR RING**
MOUNT RING**
PLUMBER’S
PUTTY
END BELL
(ELECTRICAL
CONNECTIONS)
MOUNTING
SCREWS
PROTECTOR
RING
RUBBER
GASKET
SINK
FLANGE
HUSH CUSHION
1E
SCREW
CLAMP
MOUNTING
RING
Mount Assembly
*
Batch Feed Stopper looks different than the stopper illustrated.
** Mount Assembly (see 3B)

