background image

www.watchgas.eu

11

D e t e c t i o n

User Manual 

Single Sustainable Gas Detector PDM+

D e t e c t i o n

6.2. BUMP TEST


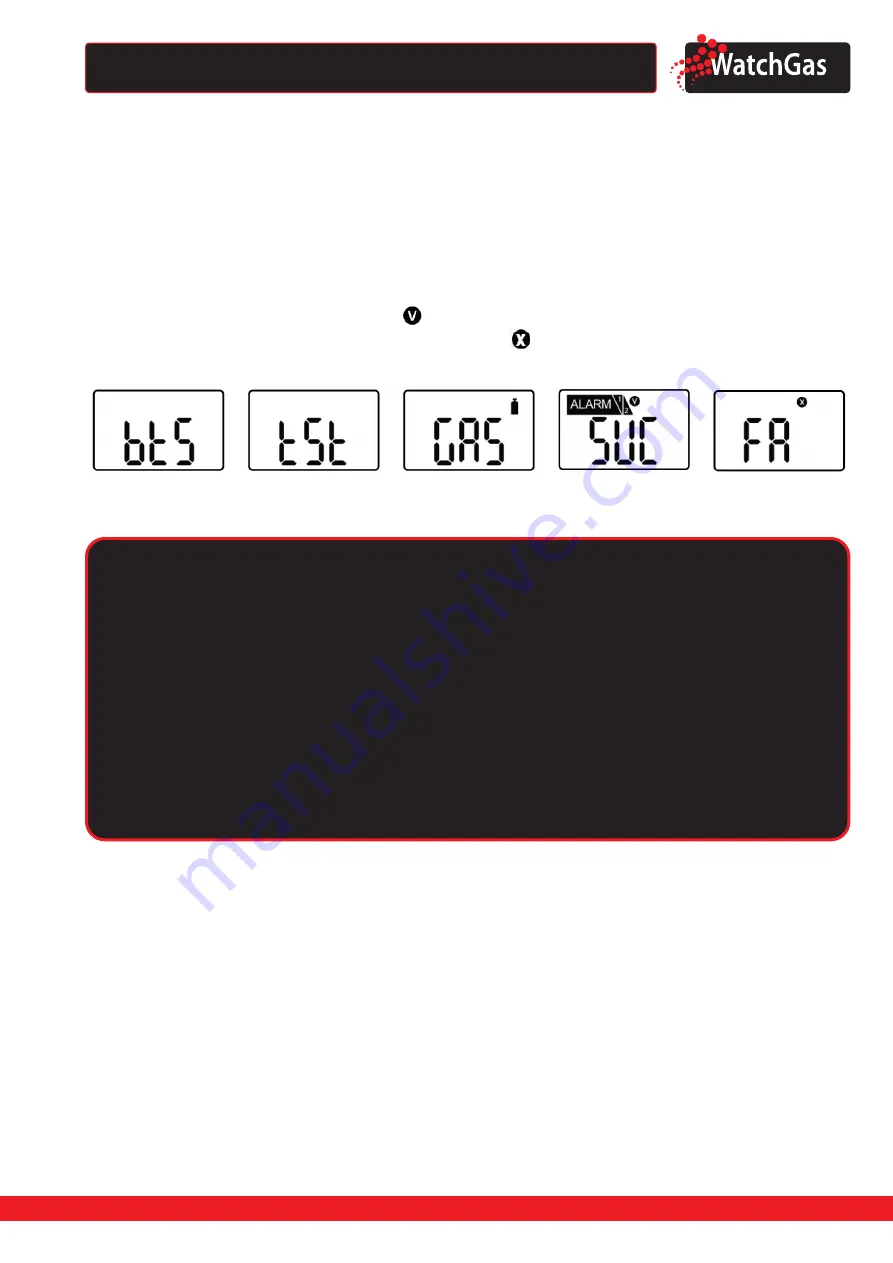
The interval of Bump test is 1~365days, and the default is switched off. To initiate the bump test, set 

the bump test interval. Once the bump test interval expires, Bts message will flash. 

Put the PDM+ in the docking station with a valid and full gas cylinder. Alternatively, attach the 

calibration adapter to PDM+ and a valid and full gas cylinder. Press and hold the key for 3 seconds, the 

TST message will be displayed for 45 seconds (To cancel, press the button for one second). Within the 

45 seconds, start the flow from the gas cylinder. If no gas is applied, the bts message will flash again. 

If the test is successful, SUC message with 


will be displayed for 30 seconds. Stop the flow, remove 

the calibration adapter. If the test fails, FA message with ,   will be displayed and BTS message will be 

flashing until the test is successful. If the bump test repeatedly fails, contact WatchGas.

7. Sensor & Battery Replacement

Caution

It is absolutely prohibited to replace battery at potential explosion or dangerous regions.

Replace the battery in a clean environment, which has no hazardous gases. 

Replacement of components can invalidate the intrinsic safety function. 

Replacing the sensor and battery should be performed by authorized sellers, agents, 

distributors, or managers. Contact WatchGas if replacement is needed. 

Disassembly should be necessary only for sensors & battery replacement.  After the sensor 

replacement, Fresh air and SPAN calibration should be done. Before disassembling, please 

turn off the power and remove screws. 

Only use SB-AA02 3.6V battery.

7.1. SENSOR REPLACEMENT

1.  Deactivate the detector

2.  Remove the 6 screws on the back case and carefully open te case.

3.  Remove the 2 screws on the PCB board. 

4.  After removing the battery, replace with the new sensor matching with the gas type. For instance, 

If you have the PDM+ CO, the CO sensor should be used for the replacement. 

5.  Assemble the detector. 

6.  Have the sensor stabilized for 5 minutes before use.

7.  After assembling, perform the fresh air calibration and standard calibration with the concentration 

in this manual. 

8.  Check the settings.

Summary of Contents for PDM+

Page 1: ...www watchgas eu PDM Single Sustainable Gas Detector User Manual D e t e c t i o n ...

Page 2: ...efault Alarm Set Points 7 3 5 Default Calibration Gas Concentrations 7 4 Event Log 8 5 Calibration 8 5 1 Fresh Air Calibration 8 5 2 Standard Gas Calibration 9 5 3 Remaining Calibration Day 9 5 4 Return to the Detection Mode 10 6 Self Test Bump Test 10 6 1 Self Test 10 6 2 Bump Test 11 7 Sensor Battery Replacement 11 7 1 Sensor Replacement 11 7 2 Battery Replacement 12 8 Specifications 12 8 1 Gene...

Page 3: ...h a dry cloth or hands in hazardous environment to prevent the static electricity Perform cleaning and maintenance of the products in fresh air that is free of hazardous gases Test the response of a sensor regularly by the gas concentration exceeding alarm set point Test LED audio and vibration manually Gas concentration measurements by the sensor can vary based on the environment pressure and hum...

Page 4: ...ease check the activation date and if the activation date is past please do not use the device Clean detectors with a soft cloth and do not use chemvical substances for cleaning To maintain 24 months life time avoid the below activities except the necessary cases to check events Max Min lifetime concentration and alarm set points Otherwise the frequent use of the button will deplete the battery li...

Page 5: ...5 Buzzer 6 Optical alarm LEDs 7 IR communication port 1 2 3 4 5 6 6 7 DISPLAY SYMBOLS Alarm Low Alarm High Alarm Stabilization Success Stabilization Fail Fresh Air Calibration Standard Gas Calibration TWA Time Weighted Average STEL Short Term Exposion Limit Remaining Months Remaining Days Remaining Time Hours Max Peak Value Min Peak Value Unit of Measurement Remaining battery life T W A S T E L ...

Page 6: ...ibration is advisable before using it at the work site The user should check whether the device is properly detecting hazardous concentrations and make sure that the detecting section of the device is not blocked with materials impairing the detection In the event that stabilization of the device fails will appear on the display and gas measurement mode will not be entered In this case perform cal...

Page 7: ... and the PDM will beep intermittently To configurate the alarm setpoints please follow the steps below Press the button until the above alarm setpoint is displayed Press and hold the button for three seconds and the first digit of alarm setpoint starts to blink To increase the value press the button for one second To save the alarm setpoints press the key for 3 seconds Ensure that the second alarm...

Page 8: ...ress and hold the key for 5 seconds to enter the calibration mode icon and CAL mark will appear on the LCD 3 Press the key for three seconds to initiate calibration When calibration begins a countdown starting at 10 will appear on the screen Once completed will appear on the LCD The device will return to the calibration menu If calibration fails will appear on the LCD Check that the air is clean a...

Page 9: ...once To set the calibration setpoints please follow the steps below Press the button until the above calibration setpoint is displayed Press and hold the button for three seconds and the first digit of calibration setpoint starts to blink To increase the value press the button for one second To save the calibration setpoints press the button for 3 seconds Calibration will start Once completed icon...

Page 10: ...ts are blocking the sensor opening and try again If standard gas calibration fails repeatedly contact WatchGas 6 Self Test Bump test 6 1 SELF TEST The default interval of the Self Test is 20hr meaning the PDM will ask for a self test after each 20 hours of use By default the Self Test setting is turned off The interval is configurable via IR Link between 8 20 hours The self test can also be switch...

Page 11: ...or Battery Replacement Caution It is absolutely prohibited to replace battery at potential explosion or dangerous regions Replace the battery in a clean environment which has no hazardous gases Replacement of components can invalidate the intrinsic safety function Replacing the sensor and battery should be performed by authorized sellers agents distributors or managers Contact WatchGas if replacem...

Page 12: ...005 PDM NH3 0 100ppm 1ppm 7192003 PDM H O NON ATEX 0 99 ppm 0 1 ppm 7192007 PDM NO2 0 20 ppm 0 1 ppm 7192004 Size 54mm W x 91mm H x 32mm D Weight 93g Toxic 104g O2 Battery clip included Sensor technology Electrochemical Cell Temperature 40ºC 50ºC for Toxic 35ºC 50ºC for O2 Humidity 5 95 RH Non condensing Alarm type High Alarm Low Alarm TWA Alarm STEL Alarm Over range Alarm Battery low alarm Cal du...

Page 13: ...Compliance Electromagnetic Compatibility Directive 2014 30 EU Standards The electrical apparatus and any acceptable variations to it specified in the schedule of this certificate and the identified documents was found to comply with the following standards IEC 60079 0 2011 Ed 6 IEC 60079 11 2011 Ed 6 IEC 60079 26 2014 10 Ed 3 EN 60079 0 2012 A11 2013 EN 60079 11 2012 Manufacturing Approval The det...

Page 14: ...ny third party s misuse neglect or improper installation testing or calibrations Any unauthorized attempt to repair or modify the product or any other cause of damage beyond the range of the intended use including damage by fire lightening water damage or other hazard voids liability of the manufacturer In the event that a product should fail to perform up to manufacturer specifications during the...

Reviews: