background image

SOHO 6 Wireless Installation Procedures: Windows XP with Internet Explorer 5.x & 6.0

4

Install the SOHO 6 Wireless Appliance

Disable the HTTP proxy setting of your Web browser

To configure a SOHO 6 Wireless you must access the configuration pages in the SOHO 6 Wireless with 
your Web browser. If the HTTP proxy setting in your browser is enabled, you cannot open these pages 
to complete the configuration procedure.

1

Open Internet Explorer.

2

Select 

Tools

 => 

Internet Options

.

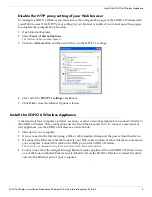
The Internet Options window appears.

3

Click  the 

Advanced

 tab and then scroll down to the HTTP 1.1 settings.

4

Clear all of the 

HTTP 1.1 settings

 checkboxes.

5

Click 

OK

 to close the Internet Options window.

 Install the SOHO 6 Wireless Appliance

A maximum of four computers, printers, scanners, or other network peripherals can connect directly to 
the SOHO 6 Wireless. These connections use the four, Ethernet ports (0-3). To connect a maximum of 
four appliances, use the SOHO 6 Wireless as a network hub.

1

Shut down your computer.

2

If you connect to the Internet using a DSL or cable modem, disconnect the power from this device.

3

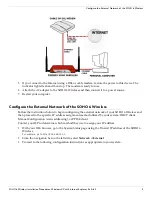
Disconnect the Ethernet cable that connects your DSL, cable modem, or other Internet connection to 
your computer. Connect this cable to the WAN port on the SOHO 6 Wireless.

The SOHO 6 is connected directly to the modem or other Internet connection.

4

Connect one end of the straight-through Ethernet cable supplied with your SOHO 6 Wireless to any 
one of the four, numbered, Ethernet ports (labeled 0-3) on the SOHO 6 Wireless. Connect the other 
end into the Ethernet port of your computer.

Summary of Contents for Firebox SOHO 6 Wireless

Page 1: ...ent length to connect the modem or router to the SOHO 6 Wireless and the SOHO 6 Wireless to your computer The method of network address assignment used by your ISP The possible methods are static addr...

Page 2: ...6 Wireless configure your computer to receive its IP address through DHCP 1 Select Start Settings Control Panel The Control Panel window appears 2 Double click the Network Connections icon 3 Double cl...

Page 3: ...eckbox 7 Select the Obtain DNS server address automatically checkbox NOTE On Windows XP you must be certain that you have full administrative rights on the computer or you will not be able to change y...

Page 4: ...SOHO 6 Wireless Appliance A maximum of four computers printers scanners or other network peripherals can connect directly to the SOHO 6 Wireless These connections use the four Ethernet ports 0 3 To co...

Page 5: ...the SOHO 6 Wireless Follow the instructions below to begin configuring the external network of your SOHO 6 Wireless and then proceed to the specific IP address assignment method utilized by your syst...

Page 6: ...your ISP assigns static IP addresses you must enter the TCP IP settings into the SOHO 6 Wireless manually 1 From the Configuration Mode drop list select Manual Configuration The Manual Configuration...

Page 7: ...by Ethernet cable or wireless connection Because WatchGuard is concerned about the security of your network the wireless network is disabled on the SOHO 6 Wireless by default This allows you to enable...

Page 8: ...e you want to use for your wireless network connection Open System This option does not support shared keys If you disable encryption this is the only option Shared Key This option supports shared key...

Page 9: ...order to access the SOHO 6 Wireless that you have now configured for your wireless network you must install and configure your wireless networking card Refer to the manufacture s documentation for ins...

Page 10: ...less serial number handy You will need this during the registration process To register with the LiveSecurity Service 1 Using your Web browser go to http www watchguard com activate NOTE You must have...

Reviews: