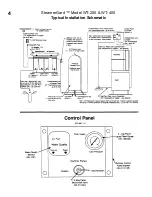
Dimensions
SteamerGard™ Models WT-200 and WT-400:
30 -1/2" Wide x 15 -1/2'' Deep x 19 -1/2" High
SteamerGard™ Storage Tanks:
10 Gallon -16" Diameter x 33'' High (Cylindrical with bottom mount valve)
20 Gallon -16" Diameter x 58" High (Cylindrical with bottom mount valve)
NOTE:
For extra capacity, additional tanks may be added.
SteamerGard™Control Panel:
9 -1/2" Wide x 3-1/2" Deep x 6" High
WARNING:
Reduced performance or failure of the
SteamerGard™
system due to improper
installation, improper maintenance, or improperly treated teed water is not covered under the
manufacturers limited warranty- Specifically, use of the
SteamerGard™
system with water
supplies exceeding 80°F, 80 psi, 20 grains of hardness, or 1500 ppm (mg/l) of TDS will void
the manufacturers warranty.
INSTALLATION INSTRUCTIONS
1.
Locate the SteamerGard™
Model WT 200 or 400 on a floor or shelf (100 Ib. cap. min.), in a dry area,
with adequate ventilation and with access to a cold water supply (preferably softened, less than 20
grains), a drain, and a 115VAC electrical outlet. The location should provide easy accessibility for future
maintenance and service. The
SteamerGard™
unit should, be positioned so the filters face the most
open area for ease of future filter changes. DO NOT plug in the power cord at this time. Ensure that the
power switch is in the "off" position.
2.
Locate the storage tank
in any convenient place between the
SteamerGard™
unit and the steamer.
Generally, the storage tank is located near the
SteamerGard™
unit. The storage tank sets on the floor,
and does not need to be secured to the floor. The storage tank should be within 50 feet of the steamer-
Screw the shut-off valve (supplied) onto the threaded connection of the storage tank, then screw the tee
(supplied) onto the valve.
3.
Locate the control panel
on a wall near the steamer and position it to be within reach with access to a
cold water supply- Carefully holding the control panel against the wall, mark the four mounting hole
locations that will provide a level installation. Drill four holes at the marks for mounting the panel. Secure
the control pane! to the wall using four #12 x 1-1/2" screws and washers into four hollow wall anchors (or
most appropriate method). Ensure that the control panel is level.
4.
Cold Tap Water Feed Line to the SteamerGard
™
Unit:
In accordance with accepted plumbing
methods, the
SteamerGard™
unit should be plumbed from an existing cold water (cold soft water is
preferred if available) supply (1/2" minimum) using a tee and a shut-off valve. Run up to 25 feet of 1/2"
tubing from the valve at the cold water supply (preferably softened) to the FEED WATER connection on
the
SteamerGard™
unit, but do not make the connection yet- If the
SteamerGard™
installation requires
an unusually long feed water plumbing
run
it may be necessary to extend the cold water supply pipe to
within 25 feet of the unit.
OPTIONAL:
Before connecting the feed water line to the
SteamerGard™
unit, the storage tank may be
filled with tap water. Before tank is filled always check that the air precharge is 12 psi- If the tank is not
initially filled with water, it will take up to one hour for the
SteamerGard™
system to fill the tank with
enough purified water to operate the steamer. If it is desirable to fill the tank, remove one of the plugs
from one side of the tee on the shut-off valve of the tank- Use the 1/2" X 3/8" reducer coupling (supplied)
and a short piece of 3/8" tubing to temporarily reduce the feed water line to the tank fitting size. Be sure
the other side of the tee is plugged- Connect the feed water line to the unplugged compression fitting of
the tee. Open the valve on the tank and open the cold tap water supply valve. Allow the tank to fill for
approximately 30 seconds. Close both valves. Disconnect the feed water line from the tank. Move the
tank to its permanent location.
Connect the feed water line to the FEED WATER connection on the
SteamerGard™
unit.
2

