background image

4

USING THE VOLT LEAF VAC

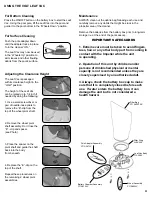
Press the ON/OFF button on the battery box to start the Leaf 

Vac. Using the pool pole, lift the Leaf Vac into the pool and 

guide it to the pool bottom in the “Wheels Down” position.

For Bottom Cleaning

For Surface Cleaning

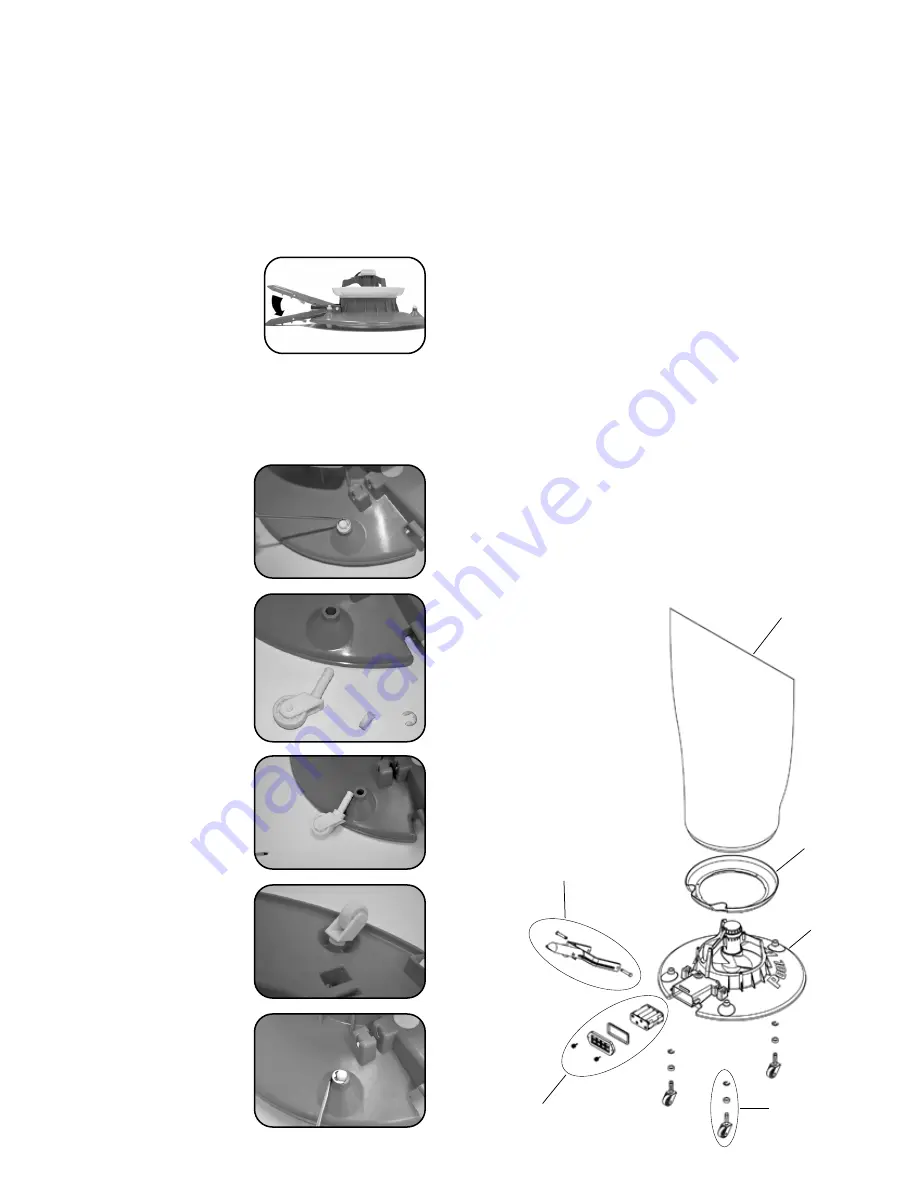
Push the pole adapter down 

until the adapter locks in place.  

Turn the cleaner “ON.”

The Leaf Vac may now be used 

in the “Wheels Up” position to 

skim leaves and other floating 

debris from the pool’s surface.

Adjusting the Clearance Height

The Leaf Vac is packaged 

with its clearance height in the 

“LOW” position.

The height of the Leaf Vac 

can be raised up to 1/4 inch if 

needed by doing the following:

1. Use a small screwdriver or 

pair of needle-nose pliers to 

remove the “E”-clip from the

top of the wheel pivot shaft.

2. Remove the wheel pivot 

shaft assembly. Don’t lose the 

“E” - clip and spacer. 

(see Photo).

3. Place the spacer on the 

pivot shaft and guide the shaft 

back into the body

from beneath.  

4. Replace the “E”-clip on the 

top of the shaft. 

Repeat these procedures on 

the remaining 2 wheel pivot 

assemblies.

Maintenance

ALWAYS clean out the debris bag following each use and 

carefully remove any debris that might be stuck in the 

propeller area of the cleaner.

Remove the batteries from the battery box prior to long-term 

storage (ie. at the end of the pool season).

IMPORTANT SAFEGUARDS

1. Extreme care must be taken to avoid fingers, 

toes, hair or any other body part from coming in 

contact with the Impeller while the unit

is operating.

2. Operation of this unit by children and/or 

persons of diminished physical or mental 

capacity is not recommended unless they are 

closely supervised by an authorized adult.

3. Always check the battery box cap to make 

sure that it is completely closed before each 

use.  If water enters the battery box, it can 

damage the unit but is not considered a

health hazard.

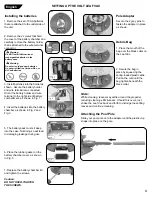
Filter Bag

P11AX022AP

Filter Ring

LVAC056

Leaf Vac Body

11A0060

Wheel Assembly

P11A050LV

Battery Chamber Assembly

P11A015LV

Pole Adapter Assembly

P11A061LV

Summary of Contents for Volt 11A0060

Page 1: ...ilure to do so may result in serious personal injury AVERTISSEMENT Lisez attentivement et comprenez tous les avertissements de s curit avant de l utiliser Ne pas le faire peut entra ner des blessures...

Page 2: ...rther direction If Alkaline batteries are the Alkaline batteries that came with the unit HUGE brand refer to the following URL for safety data sheet https watertechcorp com msds 14 Keep hair loose fit...

Page 3: ...e website you must write your RMA number in thick black indelible marker on two sides of the box 4 Send the package by USPS or express courier of choice to Water Tech Corp 10 Alvin Court East Brunswic...

Page 4: ...chamber lid and tighten the screws Caution DO NOT OVER TIGHTEN THE SCREWS English SETTING UP THE VOLT LEAF VAC Pole Adapter Secure the 2 grey pins to fasten the adapter in place as shown 2 Secure the...

Page 5: ...shaft back into the body from beneath 4 Replace the E clip on the top of the shaft Repeat these procedures on the remaining 2 wheel pivot assemblies Maintenance ALWAYS clean out the debris bag followi...

Page 6: ...Reportez vous la fiche de donn es de s curit des fabricants de piles alcalines pour plus d informations Si les piles alcalines sont les piles alcalines fournies avec l appareil marque HUGE reportez vo...

Page 7: ...chambre de la batterie et retirez d licatement le support de la batterie qui est attach au connecteur de la borne de fil 3 Installez les piles dans le support comme illustr Assurez vous que le suppor...

Page 8: ...ement Voir la photo 3 Placez la cale sur l arbre de pivot et guidez l arbre dans l aspirateur par le dessous 4 Replacez l attache en E en haut de l arbre R p tez ces tapes sur les deux pivots de roue...

Page 9: ...trucciones Si las pilas alcalinas son las pilas alcalinas que vienen con la unidad marca HUGE consulte la siguiente URL para ver la hoja de datos de seguridad https watertechcorp com msds 14 Mantenga...

Page 10: ...o de las bater as y apriete los tornillos Precauci n NO APRIETE DEMASIADO LOS TORNILLOS Espa ol Adaptador del tubo Fije los dos pasadores grises para asegurar el adaptador en su lugar como se ilustra...

Page 11: ...cuerpo de la aspiradora desde la parte de abajo 4 Vuelva a colocar el sujetador en E en la parte superior del eje Repita estos procedimientos en los ensambles del eje pivotante restantes de dos ruedas...

Page 12: ...0 Alvin Ct Suite 111 East Brunswick NJ 08816 USA Tel 732 967 9888 US Canada International Fax 732 967 0070 US International www WaterTechCorp com Register at www watertechcorp com register Rev 1111202...

Reviews: