background image

8

 PROGRAMMING PROCEDURES:

1

DAYS BETWEEN REGEN

SET

 3

2

REGEN TIME HOUR

AM

SET

12:00

3

REGEN TIME MINUTES

AM

SET

12:00

4

LIGHT NORMALLY

SET

ON

8

Return to general display.

5

6

7

REGENS PER DAY

SET

4 PER

SERVICE ALARM 

SET

OFF

SERVICE ALARM 

SET

OFF

  YR

GAL

ALARM BUZZER START

SET

ALARM BUZZER END

SET

6:00

AM

10:00

PM

ALARM BUZZER

SET

ON

Example:

Indicates 

unit is set to 

regenerate 

four times in 

one day

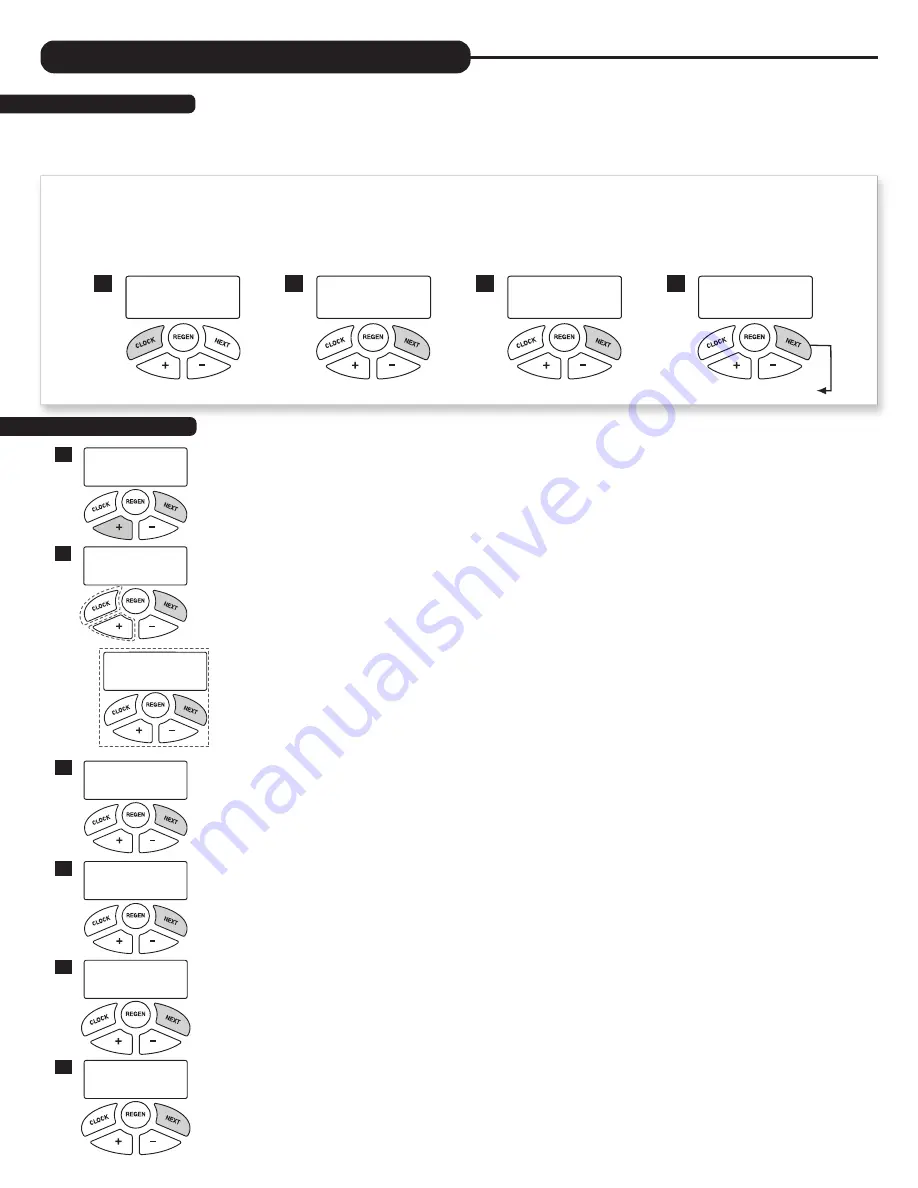
Typically, time of day should only need to be set after extended power outages or when daylight saving time begins or ends or after the 

battery has been replaced. If an extended power outage occurs, the time of day will flash on and off indicating that the time should be reset. 

To set the clock:

STEP 1 –

 Press the 

CLOCK

 button.

STEP 2 –

  Set the hour of the day using 

+

 or 

 buttons. AM/PM toggles after 12. Press 

NEXT 

to go to step 3.

STEP 3 –

   Set the minutes using 

+

 or 

 buttons. Press 

NEXT

 to go to step 4 or 

REGEN

 to return to previous step. 

STEP 4 –

  Set the day of the week using 

+

 or 

 buttons. Press 

NEXT

 to exit clock setting or 

REGEN

 to return to previous step. 

1 . Set Time of Day

1

TIME

HOUR

AM

SET

2:00

TIME

MINUTES

AM

SET

2:00

2

3

CURRENT DAY

SET

MON

4

Return to general display.

The manufacturer has preset the unit so that the gallons between regenerations will be automatically calculated 

after the hardness is entered. Press 

NEXT

 to cycle to the next step or 

REGEN

 to return to the previous step. 

STEP 1

 – Press and hold the 

NEXT

 and 

+

 buttons simultaneously for 3 seconds.


STEP 2

 – 

DAYS BETWEEN REGENERATION (DAY OVERRIDE): 

Use the 

+

 or 

 buttons to adjust the day 

override. Adjustable from 1-28 days or OFF. The manufacturer has factory set 3 days or 1000 GALLONS 

as the default.
The Day Override value represents the maximum number of days between regenerations. If any number 

is set (1-28 days), a regeneration will be scheduled for that day if the gallon capacity has not been met.  If 

OFF is set, the unit will only initiate a regeneration once the gallon capacity has been met.

Note: This valve has the capability of regenerating up to six times in one day. This can be set 

by pressing the 

CLOCK

 and 

+

 buttons simultaneously (on the DAYS BETWEEN REGEN 

screen). Use the 

+

 or 

 buttons to toggle the correct number of regenerations per day 

as desired (see example to right). Press 

NEXT

 to set the times per day or select “OFF” 

to return to Days Between Regen. These settings are typically used in commercial 

settings and should only be set by an authorized dealer. 


STEP 3

 –  

REGENERATION HOUR: 

Use the 

+

 or 

 buttons to adjust the time of day the unit will regenerate. 

AM/PM toggles after 12. The manufacturer has factory set 2:00 A.M. as the default setting which is 

recommended for a normal household. 

STEP 4

 – 

 REGENERATION  MINUTES:


Use the 

+

 or 

 buttons to set minutes. 

STEP 5

 –


SERVICE ALARM GALLONS:


Use the 

+

 or 

 buttons to schedule a service alarm by gallons. Adjustable 

in 100 gallon increments or OFF. The manufacturer has factory set OFF as the default. 

This feature is typically set by the installing dealer to warn the homeowner that service is required after 

a number of gallons have been consumed. If the feature is active, a specific gallon amount will appear. 

For more information regarding how to set service alarms, the installer should consult the master 

programming guide that corresponds to the unit being installed. 
Press the 

NEXT

 button three times to advance to the next screen. 

STEP 6

 –


SERVICE ALARM TIME:


Use the 

+

 or 

 buttons to schedule a service alarm in years. Adjustable in .25 

year increments or OFF. The manufacturer has factory set OFF as the default. 

This feature is typically set by the installing dealer to warn the homeowner that service is required after 

an amount of time has passed. If the feature is active, a specific number of days will appear. For more 

information regarding how to set service alarms, the installer should consult the master programming 

guide that corresponds to the unit being installed. 
Press the 

NEXT

 button three times to advance to the next screen.

2 . Programming

Summary of Contents for Ion ProSeries

Page 1: ...Installation Instructions Owner s Manual Ion Pro and CareClear Pro Series Water Filters For Models IPHS IPFE IPG IPCG AN CCP CCP AN...

Page 2: ...__________________ yes no Total Dissolved Solids_____________ Over 10 ppm may be harmful for human consumption Water conditioners do not remove nitrates or coliform bacteria this requires specialized...

Page 3: ...rate capacity remaining days to a regeneration and vacation mode are optional displays For more explanation consult the operating displays and maintenance section Pressing the NEXT button on a general...

Page 4: ...es point in the direction of flow indicated by the engraved arrows on the control valve Water flows through the control valve for normal operation of a water softener or filter During the regeneration...

Page 5: ...vacuum breaker in the installation 6 INLET OUTLET PLUMBING Be sure to install Bypass Valve onto main control valve before beginning plumbing If it is desired to bypass outside hydrants a cold water ki...

Page 6: ...drainage system or other safe location Remember to follow all local codes When installing the drain line on any backwashing filter especially filters that utilize air as the regenerant hard piping su...

Page 7: ...y to relieve the pressure from the system Place filter into by pass mode Fig 2 Page 4 and release pressure by manually stepping through an entire regeneration sequence This will adequately release the...

Page 8: ...apacity has been met Note This valve has the capability of regenerating up to six times in one day This can be set by pressing the CLOCK and buttons simultaneously on the DAYS BETWEEN REGEN screen Use...

Page 9: ...Press the or buttons to select the hour when the buzzer should begin sounding AM PM toggles after 12 Default setting is 6 00 a m BUZZER STOP TIME Press the or buttons to select the hour when the buzze...

Page 10: ...ckwash Air cycle will skip the remaining mini steps and proceed to the next cycle of regeneration which is usually Backwash The system is now ready for filling with water and for testing for Air Filte...

Page 11: ...ter meter is installed GPM flashes on the display when water is being treated indicating gallons per minute flowing through the system 2 VACATION MODE This feature may be used to shut down the system...

Page 12: ...th the valve unplugged to avoid causing a short and potentially ruining the board 6 Reset the time of day see programming procedures and initiate regeneration see operating displays and maintenance If...

Page 13: ...nside the tank Pay close attention to media level when filling see diagram Do not overfill The additional media added should not be higher than two thirds of the tank height when measuring from the bo...

Page 14: ...ned water tap and flush until clear For Acid Neutralizers With the 100245758 CD1220 In Out Head With Fill Port 1 Check the media height by shining a flashlight through the tank to see the height of th...

Page 15: ...B Connect meter to three pin connection labeled METER on PC board C Restricted stalled meter turbine C Remove meter and check for rotation or foreign material D Meter wire not installed securely into...

Page 16: ...debris and if necessary replace H Damaged seal stack assembly piston H Replace seal stack assembly and or piston I Control valve body type and piston type mix matched I Verify proper control valve bod...

Page 17: ...n the PC board labeled MOTOR Press NEXT and REGEN buttons for 3 seconds to resynchronize software with piston position or disconnect power supply from PC board for 5 seconds and then reconnect B PC bo...

Page 18: ...V NHBP motor to PC board two pin connection labeled DRIVE Press NEXT and REGEN buttons for 3 seconds to resynchronize software with piston position or disconnect power supply from PC board for 5 secon...

Page 19: ...ory screens These do not flash when error occurs A Occurs when dP input is active for ALARM and the input is closed The alarm buzzer will activate and the screen will display the error A Check for low...

Page 20: ...Soft Elite CareSoft Pro cover blue buttons 1 2 CV3107 1 100246273 Motor Assembly 1 3 CV3002 A 100246193 Drive assembly includes 5 and 6 4 CV4050WX 02 100246447 PC board 1 CV4237YB BOARD 100246452 PC b...

Page 21: ...generant piston 1 6 CV3001 04 100244557 1 body assembly downflow 1 CV3001 04UP 100243827 1 body assembly upflow 1 CV3020 100246239 1 25 body assembly downflow 1 7 CV3541 100249867 Drive backplate 1 No...

Page 22: ...e assembly 1 Loosens Injector And Bypass Caps Loosens Drive Cap BYPASS VALVE Item Current Part Description Qty 1 100249845 Bypass assembly 1 Although no tools are necessary to assemble or disassemble...

Page 23: ...221 Injector assembly plug 1 5 100246215 F injector assembly 100246216 G injector assembly The injector plug and the injector each use one lower and one upper O ring REPLACEMENT PARTS 3 1 2 WATER METE...

Page 24: ...1 elbow 5 100243824 FTG Drain 1 Strt No Silencer requires DLFC 1 REPLACEMENT PARTS Water flow Proper DLFC orientation directs water flow towards the washer face with rounded edge 2 3 8 5 7 6 1 DRAIN L...

Page 25: ...ription Qty 100245758 1190 In Out Head W Port 1 Not Shown 100246307 Base O Ring 1 100246272 Distributor Pilot O Ring 215 1 100246281 O Ring Fill Cap 1 4 43 112 4 OZONE GENERATOR Item Current Part Desc...

Page 26: ...100246200 3 4 john guest elbow assembly 2 Legacy Part Current Part Description Qty CV3007 17 100245045 1 john guest assembly 2 Legacy Part Current Part Description Qty CV3007 09 100243922 1 1 4 1 1 2...

Page 27: ...99 129 4 150 IPFE 1054 IPFE 1252 IPFE 1354 Birm 1 0 Birm 1 5 Birm 2 0 14 lb 1 4 x 1 8 7 lb 20 14 lb 1 4 x 1 8 7 lb 20 21 lb 1 4 x 1 8 7 lb 20 5 0 6 0 7 0 18 0 19 0 19 0 5 3 9 0 10 0 5 0 5 0 5 0 1 0 1...

Page 28: ...N A N A N A N A N A N A N A 10 W x 50 H 10 W x 60 H 13 W x 60 H 63 90 66 135 84 225 MODEL CCP 1044 CCP 1054 CCP 1354 Mineral Type Amount Cu Ft Carbon 1 0 Carbon 1 5 Carbon 2 5 Gravel Amount Size No 1...

Page 29: ...freight collect The above provisions of the warranty are valid as long as the unit is connected in compliance with local plumbing codes and in an equivalent manner and condition of the original instal...

Page 30: ...and TIME OF DAY will flash alternately if a regeneration is expected tonight TREATED WATER EXITS SUPPLY WATER ENTERS SUPPLY WATER EXITS SUPPLY WATER ENTERS NORMAL OPERATION BYPASS OPERATION ERROR 106...

Page 31: ...n simultaneously 2 Adjust days between regenerations using and buttons 3 Press 4 Adjust time of regeneration hour with and buttons AM PM toggles at 12 5 Press 6 Adjust time of regeneration minutes wit...

Page 32: ...100248125 2000592008 RevA0422 Manufactured exclusively for WaterCare Dealers at 1900 Prospect Court Appleton WI 54914 Phone 920 739 9401 Fax 920 739 9406 Love your WaterCare filter Scan the QR code a...

Reviews: