background image

10

Garantie / 

Warranty

Советы по использованию / 

Training advices

Рекомендации по выполнению упражнений

E

x

ercises instructions

1. 

Э

т

а

п

 ра

зм

и

н

ки

 / 

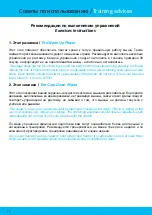
The Warm Up Phase

Этот  этап  помогает  обеспечить  приток  крови  к  телу  и  правильную  работу  мышц.  Также 
снижается риск возникновения судорог и мышечных травм. Рекомендуется выполнить несколько 
упражнений  на  растяжку.  Каждое  упражнение  следует  выполнять  в  течение  примерно  30 
секунд, не форсируйте и не перетягивайте мышцы - если больно, остановитесь.

This stage helps get the blood flowing around the body and the muscles working properly. It will 

also 

reduce the risk of cramp and muscle injury. It is advisable to do a few stretching exercises as shown 
below. Each stretch should be held for approximately 30 seconds, do not force or jerk your muscles 
into a stretch – if it hurts, STOP.

2. 

Э

т

а

п


з

а

м

и

н

ки

 / 

The Cool Down Phase

Этот этап позволяет вашей сердечно-сосудистой системе и мышцам расслабиться. Повторяйте 
движения, выполняемые во время разминки, не травмируя мышцы

, снизьте темп

. Далее следует 

повторить упражнения  на  растяжку,  не  забывая  о  том,  что  мышцы  не  должны  тянуться  с 
усилием или рывками.

This stage is to let your Cardio-vascular System and muscles wind down. This is a repeat of the 
warm up exercise e.g. reduce your tempo. The stretching exercises should now be repeated, again 
remembering not to force or jerk your muscles into the stretch.

П

о  мере  улучшения  физической  подготовки  вам  могут  понадобиться  более  длительные  и 

интенсивные  тренировки.  Рекомендуется  тренироваться  не  менее  трех  раз  в  неделю  и  по 
возможности распределять тренировки равномерно в течение недели.

As you get trained you may need to train longer and harder. It is advisable to train at least three 
times a week, and if possible space your workouts evenly throughout the week.

Summary of Contents for WR 3 AIR

Page 1: ...USER S MANUAL Keep this user s manual...

Page 2: ...2...

Page 3: ...e of your bike please follow these instructions Regularly check the pH of your pool water It must be between 6 7 and 7 6 In case of water shock treatment please get out the bike from water Avoid placi...

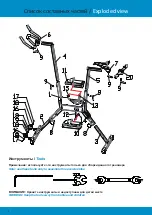
Page 4: ...4 Exploded view Tools Note use these tools only to assemble this exercise bike WARNING Keep the tools away from babies and children...

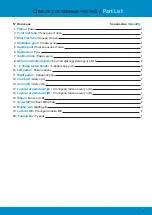
Page 5: ...5 Part List Quantity 1 1 1 1 1 1 1 2 5 1 1 1 1 1 1 2 2 4 2 1...

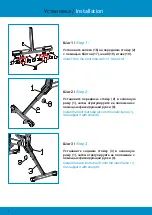
Page 6: ...9 Install 16 to the front tube with 17 18 and 19 2 Step 2 2 1 8 Install the front foot tube 2 onto the main frame 1 then adjust it with knob 8 3 Step 3 3 1 8 Install the back foot tube 3 onto the main...

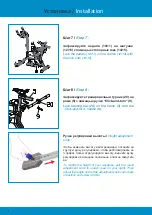
Page 7: ...e 1 then adjust their position with the Click and turn handles 9 5 Step 5 6 4 Click and turn 9 Install the handlebar 6 onto its support 4 then fix it with the Click and turn handle 9 6 Step 6 7 5 Clic...

Page 8: ...Step 8 20 5 Click and turn 9 Lock training bar 20 on the frame 5 with the Click and turn handle 9 Height adjustment knob To modify the height of your aquabike pull the round adjustment knob to unlock...

Page 9: ...corrosion process 5 When first cleaning the surfaces of the swimming pool before filling it as well as subsequent maintenance cleaning it is advised that you remove the bike from the pool so as to avo...

Page 10: ...seconds do not force or jerk your muscles into a stretch if it hurts STOP 2 The Cool Down Phase This stage is to let your Cardio vascular System and muscles wind down This is a repeat of the warm up...

Page 11: ...t or the cost of transporting the parts in question The following are expressly excluded from the warranty Malfunction or damage arising from the use of unauthorized accessories Damage resulting from...

Page 12: ...Waterflex est une marque du groupe Poolstar www poolstar fr Conseils www waterflex fr Assistance SAV http support waterflex fr...

Reviews: