11
MULTI-PORT VALVE SERVICE
Hazardous pressure. Stop pump and re-
lease all pressure from system before working on filter,
valve, or clamp.
NOTICE:
If Multi-Port valve is below pool water level,
close suction and discharge valves before disassembly to
prevent draining pool.
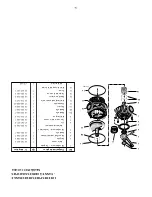
Handle Replacement:
1. Stop pump.
2. Place handle in ‘FILTER’ position.
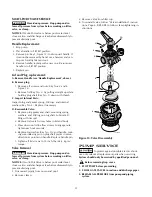
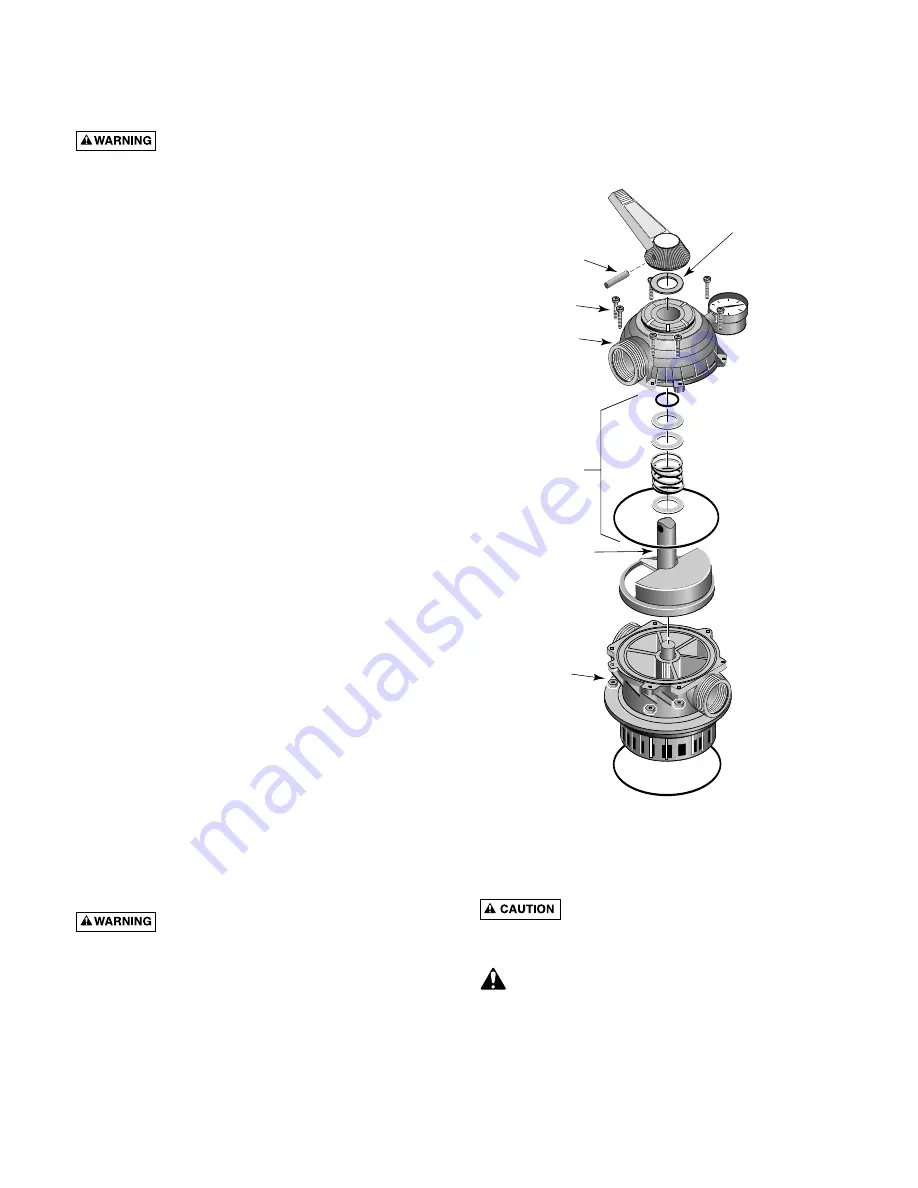
3. Remove pin (Key 1, Figure 13) to disconnect handle. If
it cannot be removed by hand, use a hammer and cen-
ter punch and lightly tap it out.
4. Remove handle; replace with a new one. Be sure new
handle is in ‘FILTER’ position.
5. Replace pin.
Lid and Plug replacement:
A. Remove Handle (see ‘Handle Replacement’, above).
B. Remove plug:
1. Remove all screws and nuts (Key Nos. 2 and 6,
Figure 13).
2. Remove lid (Key No. 3) by pulling straight up while
holding plug shaft (Key No. 5) down with thumb.
C. Inspect Internal Parts:
Inspect plug and gasket spring, O-Rings, and internal
washers (Key No. 4). Replace if necessary.
D. Reassemble Valve:
1. Replace plug gasket and shaft, mounting spring,
washers, and O-Ring on plug shaft. Lubricate O-
Ring with Amojel.
2. Replace lid; match screw holes in lid and body.
3. Press down on lid to allow screws to engage nuts;
tighten each nut securely.
4. Replace top washer (Key No. 1A) and handle, mak-
ing sure indexing pin on plug shaft points in same
direction as pointer on handle. Replace handle pin.
5. Tighten all lid screws to 55 inch-lbs. (63.4 kg-cm)
torque.
Valve Removal
Hazardous pressure. Stop pump and re-
lease all pressure from system before working on filter,
valve, or clamp.
NOTICE:
If multi-Port Valve is below pool water level,
close suction and discharge valves before disassembly to
prevent draining pool.
1. Disconnect piping from pump and pool.
2. Remove clamp.
3. Remove valve from filter top.
4. To reinstall valve, follow “Valve installation” instruc-
tions, Page 6. BE SURE to follow clamp tightening in-
structions.
PUMP SERVICE
To protect against possible electric shock,
use only identical replacement parts when servicing.
System should only be serviced by qualified personnel.
Before removing trap cover:
1. STOP PUMP before proceeding.
2. CLOSE GATE VALVES in suction and discharge pipes.
3. RELEASE ALL PRESSURE from pump and piping
system.
RE
CI
RC
UL
AT
E
B
A
C
K
W
A
S
H
C
L
O
SE
D
W
I
NTERIZ
E
W
A
S
T
E
F
IL
TE
R
RIN
SE
1
1A
2
3
4
5
6
Aquatools
.WATERFORD, WI.
53185
USA
744 0294
Figure 13: Valve Disassembly

