background image

24

NSZ/NDZ INSTALLATION MANUAL 

Leak Testing

The refrigeration line set must be pressurized and 
checked for leaks before purging and charging the unit. 
To pressurize the line set, attach refrigerant gauges to the 
service ports and add an inert gas (nitrogen or dry carbon 
dioxide) until pressure reaches 60 to 90 PSIG. Never use 
oxygen or acetylene to pressure test. Use an electronic leak 
detector or a good quality bubble solution to detect leaks 
on all connections made in the field. Check the service 
valve ports and stem for leaks and all connections made in 
the field. If a leak is found, repair it and repeat the above 
steps. For safety reasons do not pressurize the system 
above 150 psi. Purge pressure from line set. The system is 
now ready for evacuating and charging.

System Evacuation

Ensure that the line set and air coil are evacuated before 
opening service valves to the split unit. The line set must be 
evacuated to at least 200 microns to remove the moisture 
and air that may still be in the line set and coil. Evacuate 
the system through both service ports to prevent false 
readings on the gauge because of pressure drop through 
service ports.

Charge Amount When Using NAH Air Handler

The Envision Split is shipped with a factory pre-charge. This 
volume of refrigerant is not sufficient to run the system and 
additional refrigerant must be added. If using an NAH Air 
Handler please refer to the Line Set Sizes table for charge 
amounts to be added. The “Factory Charge” column is the 
charge amount the compressor section/split is shipped 
with from the factory. The “Charge Amount with NAH Air 
Handler” column is the total amount of charge for the NAH 
Air H Compressor section/split. This column does 
not factor in additional refrigerant needed for the line set. 
The installer of the system must add charge appropriately 
for the specific length of the line set. A 3/8 in. liquid line is 
calculated at 0.50 oz. of charge per linear foot, and a 1/2 
in. liquid line is calculated at 1.0 oz. of charge per linear 
foot using R-410A refrigerant. The suction line will not hold 
“liquid” and should be ignored for the charge calculation.

Example:

  NSZ036/NAH036 with 20 ft. of 3/8 in. liquid 

line. Remember that when using the NAH Air 
Handler, the column “Charge Amount with NAH 
Air Handler” will be used. Now calculate for the 
additional 20 ft. line set.


Additional refrigerant to be added = (20 ft. x 0.5 oz.)  


= 10 oz.

Solution:

  10 oz. should be added to the recommended 

charge of 86 oz. found in the “Charge Amount 
with NAH Air Handler” column for a total charge 
of 96 oz.

Refrigeration cont.

After initial charge, the system should be operated and 
the system subcooling and superheat verified to the Unit 
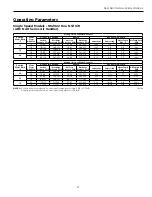
Operating Parameters table.

If an air handler manufactured by others is used then 
refrigerant should be added to the Envision Split factory 
pre-charge. Refrigerant should be added for liquid line 
length.  This should result in a slightly under-charged 
system exhibiting low subcooling and high superheat.  
As charge is added, the subcooling should rise and the 
superheat should fall.

Charging the System

Charge Method – After purging and evacuating the line set, 
fully open the service valves counterclockwise. Add R-410A 
(liquid) into the liquid line service port until the pressure 
in the system reaches approximately 200 PSIG. Never add 
liquid refrigerant into the suction side of a compressor. 
Start the unit and measure superheat and subcooling. Keep 
adding refrigerant until the unit meets the superheat and 
subcooling values on the Operating Parameters tables.

Checking Superheat and Subcooling

Determining Superheat

Measure the temperature of the suction line at the 

1. 

point where the expansion valve bulb is clamped.
Determine the suction pressure in the suction line 

2. 

by attaching refrigeration gauges to the Schrader 
connection on the suction side of the compressor.
Convert the pressure obtained in Step 2 to the 

3. 

saturation temperature by using the R-410A Pressure/
Temperature Conversion Chart.
Subtract the temperature obtained in Step 3 from 

4. 

Step 1. The difference is the amount of superheat for 
the unit. Refer to the Operating Parameters tables for 
superheat ranges at specific entering water conditions.

Superheat Adjustment

TXVs are factory set to a specific superheat; however, the 
superheat should be adjusted for the application. To adjust 
the TXV to other superheat settings:

Remove the seal cap from the bottom of the valve. 

1. 

Turn the adjustment screw clockwise to increase 

2. 

superheat and counterclockwise to decrease 
superheat. One complete 360° turn changes the 
superheat approximately 3-4°F, regardless of 
refrigerant type. You may need to allow as much as 30 
minutes after the adjustment is made for the system to 
stabilize.
Once the proper superheat setting has been achieved, 

3. 

replace and tighten the seal cap.

Summary of Contents for NSZ

Page 1: ...ons Hot Water Generation Connections Electrical Startup Procedures Troubleshooting Preventive Maintenance IM1003SN 05 10 NSZ NDZ Installation Manual Geothermal Water Source Indoor Split Heat Pump 2 to...

Page 2: ......

Page 3: ...e Systems 12 Hot Water Generator Connections 13 14 Electrical Data 15 Thermostat Wiring 15 Wiring Schematics 16 17 Microprocessor Control 18 21 Operation Logic Data 22 DIP Switch Settings 22 Refrigera...

Page 4: ...59 56 1 59 56 1 59 74 2 1 90 2 55 92 2 61 108 3 06 52 1 47 56 1 59 90 2 55 92 2 61 104 2 95 Coax and Water Piping Water Connections Size Swivel in mm 1 25 4 1 25 4 HWG Connection Size Swivel in mm 1...

Page 5: ...Model Height Width Depth Water In Water Out Service Valve HWG In HWG Out Low Voltage External Pump Line Voltage Liquid Gas A B C D E F G H J K L M 022 030 19 25 22 50 26 50 1 93 6 93 8 44 11 55 13 43...

Page 6: ...blower coil units air coils must be installed as specified by the manufacturer s installation instructions however the following recommendations should be considered to minimize noise and service prob...

Page 7: ...ndlers used with dual capacity units must be capable of operating with a minimum of 2 blower speeds Refer to the manufacturer s instructions for the blower coil unit for details on installing the air...

Page 8: ...T o Thermostat Up Flow Fossil Fuel Furnace Condensate Drain must be trapped A or Slab Coil Supply Duct Air Temperature Limit Switch to prevent compressor operation when entering air is greater than 9...

Page 9: ...ion Tighten the connectors by hand then gently snug the fitting with pliers to provide a leak proof joint When connecting to an open loop ground water system thread the 1 in MPT fitting SCH80 PVC or c...

Page 10: ...olenoid Control Valve Rubber Bladder Pressure Tank Lineset T o Air Handler Flow Regulator Shut Off Valves Water Out Water In From W ell Acc Com Acc NC Acc NO 1 2 3 C R P1 P3 SV Solenoid Valve CC GND C...

Page 11: ...pm Less than 5 ppm Total Dissolved Solids TDS Less than 1000 ppm 1000 1500 ppm 1000 1500 ppm LSI Index 0 5 to 05 0 5 to 05 0 5 to 05 Iron Fouling Biological Growth Iron Fe2 Ferrous Bacterial Iron Pote...

Page 12: ...lly 2 5 to 3 GPM of flow per ton of cooling capacity is recommended in earth loop applications Figure 7 Typical Split System Application Closed Loop Earth Coupled Disconnect Thermostat Wire From Air H...

Page 13: ...ot water generator follow these installation guidelines Turn off the power to the water heater 1 Attach a water hose to the water tank drain connection 2 and run the other end of the hose to an open d...

Page 14: ...e tank 2 Open a hot water faucet in the building to bleed air 3 from the system Close when full Open the pressure relief valve to bleed any remaining 4 air from the tank then close If so equipped unsc...

Page 15: ...253 26 0 16 6 82 0 29 0 0 4 5 4 22 4 26 6 40 049 208 230 60 1 197 253 33 0 21 1 96 0 34 0 0 4 5 4 26 9 32 2 50 064 208 230 60 1 197 253 40 0 25 6 118 0 41 0 0 4 5 4 31 4 37 8 60 072 208 230 60 1 197 2...

Page 16: ...CR1 CR2 CR3 CR4 F1and F2 FD HE HP LP PB1 PB2 PS RV SW1 SW2 SW3 SW4 TS Compressor Contactor Condensate overflow sensor DHW pump relay Loop pump relay Fuses Freeze Detection Sensor Heater element High p...

Page 17: ...sition for pulsed L lockout signal and in the ON position for constant L lockout signal 5 DHW pump only in models with hot water generation option 6 Connection of remote unit that does not have a loop...

Page 18: ...n control board allows all inputs and outputs to be displayed on the LEDs for fast and simple control board diagnosis Refer to the Field Selection DIP Switch SW2 1 Hot Water High Limit Domestic Hot Wa...

Page 19: ...The blower starts and operates on low speed Lockout Conditions During lockout mode the appropriate unit and thermostat lockout LEDs will illuminate The compressor loop pump hot water pump and accesso...

Page 20: ...cription Automatic Reset of Alert Codes Flash Code 1 Long Run Time Thirty alert free on and off cycles to reset automatically Flash Code 2 System Pressure Trip Not applicable Flash Code 3 Short Cyclin...

Page 21: ...ckout condition text or error number A slow flash of 1 second on and off means the heat pump microprocessor SW2 1 is configured for Test Mode or thermostat is miswired Lockout code 10 see Comfort Aler...

Page 22: ...econds Loop Protection 15 F Well Protection 30 F 3 Accessory Relay Allows field selection of the accessory relay to operate with the compressor or fan Fan Comp 4 NOT USED N A N A 5 NOT USED N A N A 6...

Page 23: ...n should be painted with UV resistant paint or covering to insure long insulation life Refrigeration Replace caps after opening system Service ports for attaching refrigerant gauges Insulated Suction...

Page 24: ...te for the additional 20 ft line set Additional refrigerant to be added 20 ft x 0 5 oz 10 oz Solution 10 oz should be added to the recommended charge of 86 oz found in the Charge Amount with NAH Air H...

Page 25: ...izes NOTES The Charge Amount with NAH Air Handler column is based on the charge amount for a NAH Air Handler Compressor Section Split Additional charge will have to be added accordingly for line set l...

Page 26: ...8 5 586 146 5 108 35 4 228 78 1 348 106 7 468 128 8 588 146 8 110 36 4 230 78 7 350 107 2 470 129 1 590 147 1 112 37 3 232 79 2 352 107 6 472 129 4 592 147 3 114 38 2 234 79 8 354 108 0 474 129 8 594...

Page 27: ...2 Heating No Hot Water Generator Entering Water Temp F Water Flow GPM Ton NSZ022 thru NSZ060 NSZ070 NSZ022 thru NSZ070 Suction Pressure PSIG Discharge Pressure PSIG Suction Pressure PSIG Discharge Pre...

Page 28: ...2 2 14 8 12 24 39 3 0 145 160 330 360 140 160 375 425 7 17 7 15 4 9 24 39 Second Stage Operation Cooling No Hot Water Generator Entering Water Temp F Water Flow GPM Ton NDZ026 thru NDZ064 NDZ072 NDZ02...

Page 29: ...6 0 5 7 5 3 4 9 4 6 21 7 8 7 3 6 8 6 4 5 9 10 2 3 2 1 2 0 1 9 1 7 13 3 6 3 3 3 0 2 8 2 6 16 5 0 4 6 4 3 4 0 3 7 19 6 5 6 2 5 8 5 4 5 0 5 30 06 038 full load 049 part load 064 full load 072 part load...

Page 30: ...ng set point several degrees and 8 verify high speed blower operation Adjust the cooling setpoint above the room 9 temperature and verify that the compressor and water valve or loop pumps deactivate U...

Page 31: ...suction temperature here at TXV bulb in cooling modes Cooling Cycle Analysis COOLING TXV ACTIVE RIGHT TO LEFT ClgTXV Measure liquid line temperature and pressure here in both heating and cooling mode...

Page 32: ...it LED NORMAL DISPLAY MODE DIAGNOSTIC MODES CURRENT FAULT STATUS INPUTS OUTPUTS 1 OUTPUTS 2 Field Selection DIPS SW2 1 On SW2 1 Off SW2 1 NA SW2 1 NA SW2 1 NA SW2 6 On SW2 6 On SW2 6 Off SW2 6 On SW2...

Page 33: ...erated without a filter Obtaining Parts When ordering service or replacement parts refer to the model number and serial number of the unit as stamped on the serial plate attached to the unit If replac...

Page 34: ...01 TXV 33P609 01 33P609 03 33P609 05 33P609 06 33P609 01 33P609 03 33P609 05 33P609 06 Reversing Valve 33P506 04 33P503 05 33P526 04 33P506 04 33P503 05 33P526 04 Filter Dryer 36P500B01 36P500B02 36P...

Page 35: ......

Page 36: ...Manufactured by WaterFurnace International Inc 9000 Conservation Way Fort Wayne IN 46809 www waterfurnace com 2010 WaterFurnace International Inc 9000 Conservation Way Fort Wayne IN 46809 9794 WaterFu...

Reviews: