3
Section 2. Unpacking and Installation
Your system includes:
Carton Contents
The main 5 stage RO/filter unit assembly;
One encapsulated membrane (pre-installed), one sediment filter cartridge, two block carbon filter cartridges;
One drain fitting and clamp with push-on tube fitting;
One cold water supply adapter;
One long reach faucet with mounting hardware;
Two #10 X1” Wall mounting screws;
5 m (15’) - white ¼” Poly tubing for water connections;
3m (10’) – black ¼” Poly tubing for drain connections;
One plastic tank shut-off valve;
One filter housing wrench;
One Owner’s package including owner’s manual, warranty certificate, Extended Warranty Plan enrolment
form, Waterite Parts Program enrolment form;
One 12 litre (4 gallon) RO holding tank.
Step 1. Selecting the System Location
1.
This reverse osmosis system is designed for installation under a sink. It can however, be mounted
anywhere within 20 feet of the faucet, such as the basement or adjoining utility room. Keep in mind that filter
housings will need periodic replacement and that easy access must be maintained. Do not install in a
location with high humidity, direct sun or a direct source of heat. Both the RO system and the tank may be
installed horizontally or vertically. If you are installing a booster pump for your system, you will need a
standard 110V plug nearby.
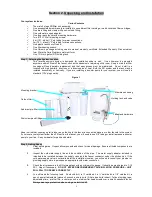
Figure 1.
Keep in mind that you may install a tube tee on the line to the faucet to connect icemakers or other faucets to the system.
If you locate your system farther than 20 feet from the faucet, you will need to use 3/8” tubing or install a pressure booster
pump to your line. See your dealer for parts and details.
Step 2. Getting Ready
1.
Clear working area. Unpack all components and check for visual damage. Ensure all listed components are
included.
2.
Inspect the cold water supply line and the condition of the pipe. The water supply adapter included is
intended to be installed between the supply valve and the faucet connector, under the kitchen sink. If the
cold water supply valve is not available at the installation location, you will need to consult your plumber or
plumbing supply store to purchase an appropriate cold water connection.
3.
Check the air pressure in the RO storage tank with an ordinary tire gauge. It should be pre-charged to 7-10
PSI. Adjust if necessary.
DO NOT EXCEED RECOMMENDED TANK INFLATION PRESSURE – UNIT
WILL FAIL TO OPERATE CORRECTLY.
4.
You will need the following tools: An electric drill, a ½” carbide bit, a ¼” carbide bit, a 1/8” carbide bit, a
pencil, a small adjustable (crescent) wrench, a sharp knife (X-Acto type knife is best), Teflon plumbing tape,
adjustable pliers, a rat-tail file, a center punch, a medium flat head screwdriver, a small household funnel.
Always wear eye protection when using an electric drill.
Mounting bracket
Carbon filter
Sediment pre-filter
Drain clamp and fittings
Membrane housing
Holding tank and valve
Faucet and hardware


