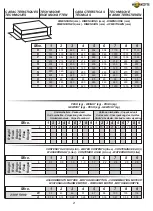
background image

31

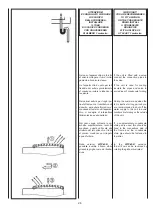
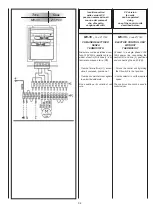
Le  bornier  monté  sur  le  ventilo-

convecteur  est  déjà  prêt  pour  la

connexion  des  différentes  com-

mandes selon les instructions fournies

dans  la  section  “Commandes  et

Schémas électriques”.

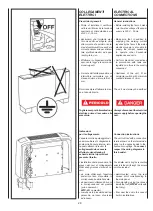
Toutes les commandes à installer

à bord de la machine sont munies

d’un  bornier  avec  des  bornes  à

branchement  rapide.  Quand  ce

bornier  est  raccordé  au  bornier

correspondant  placé  sur  le  côté,

serrer  les  vis  de  chaque  bornier

pour garantir un bon contact élec-

trique. Ne pas se conformer à cette

prescription  pourrait  causer  un

grave danger.

Die am Klimakonvektor montierte

Klemmleiste  ist  bereits  für  den

Anschluss  der  verschiedenen

Steuerungen gemäß der Anleitungen

des  Kapitels  “Steuerungen  und

Schaltpläne” vorbereitet.

Alle  am  Gerät  zu  installierenden

Steuerungen sind mit Klemmleiste

mit Steckerstiften für den problem-

losen  Anschluss  ausgestattet.

Nachdem die Steckerklemmleiste

mit der entsprechenden Buchsen-

klemmleiste  an  der  Seitenwand

verbunden ist, die Schrauben der

einzelnen Klemmen fest anziehen,

damit  der  elektrische  Kontakt

gewährleistet wird. Die Unterlassung

dieser Vorschrift  kann schwerwiegende

Gefahrensituationen verursachen.

La caja de bornes montada sobre

el ventilador convector ya está pre-

parada para la conexión a los distin-

tos  mandos  de  acuerdo  con  las

indicaciones dadas en la sección

“Mandos y Esquemas eléctricos”.

Todos los mandos que se instala-

rán en la máquina estarán provi-

stos de caja de bornes con clavijas

preparadas  para  una  conexión

rápida. Una vez que esta caja de

bornes esté acoplada a la caja de

bornes correspondiente situada en

el lateral, apretar adecuadamente

los  tornillos  de  cada  borne  para

garantizar  un  contacto  eléctrico

correcto. El no observar esta pre-

scripción puede ocasionar un gran

riesgo.

Het klemmenbord gemonteerd op

de ventilatorconvector is al uitgerust

voor de verbinding met de verschillende

bedieningen volgens de aanwijzingen

in  de  afdeling  “Bedieningen  en

elektrische schema’s”.

Al de bedieningen voor de installatie

aan boord, zijn voorzien van een

klemmenbord  met  pennen  voor

een  vlugge  verbinding.  Wanneer

het  klemmenbord  aan  het  over-

eenkomstige klemmenbord op de

zijkant gekoppeld is, de schroeven

van de klemmen aanspannen om

het  correct  elektrisch  contact  te

verzekeren.  Dit  voorschrift  niet

naleven, kan zeer gevaarlijk zijn.
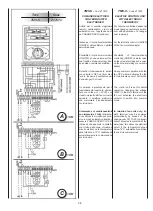
COMMANDES

ET SCHEMAS

ELECTRIQUES

STEUERGERÄTE

UND SCHALTPLÄNE

MANDOS

Y ESQUEMAS

ELÉCTRICOS

BEDIENINGEN

EN ELEKTRISCHE

SCHEMA’S

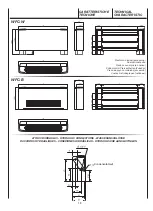
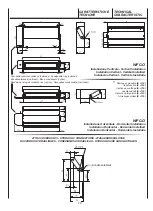
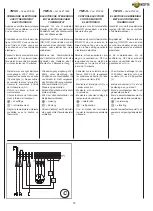
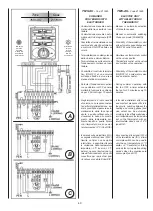
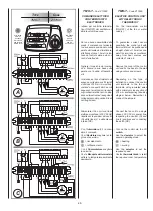
Les ventilo-convecteurs sont équipés

d’un bornier à vis dans lequel doit

être branché le bornier mâle de la

commande  à  fixer  sur  le  ventilo-

convecteur ou auquel doivent être

raccordés les conducteurs provenant

de la commande à distance.

A la commande ne peut être raccordé

qu’un seul ventilo-convecteur. Pour

obtenir  le  contrôle  de  plusieurs

ventilo-convecteurs avec une seule

commande,  il  faut  que  chaque

appareil soit équipé d’un sélecteur

de vitesse SEL. Sur signal de la

commande à distance centralisée,

chaque sélecteur actionnera l’ap-

pareil sur lequel il est installé.

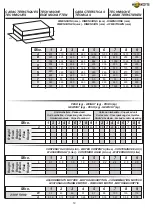
Les ventilo-convecteurs disposent

d’un ventilateur équipé d’un moteur

à 6 vitesses dont seulement 3 sont

branchés sur le bornier. Les vitesses

du moteur sont obtenues au moyen

d’un  autotransformateur.  Si  l’on

voulait intervenir sur le chantier sur

les vitesses il suffit de déplacer le

branchement  des  câbles  de  la

vitesse (rouge, orange et noir) reliés

à l’autotransformateur en suivant la

numération indiquées sur le schéma.

La connexion n.6 de l’autotransformateur

correspond à la vitesse 1 du tableau

mentionné sur le catalogue commercial.

Ainsi de suite pour toutes les autres

vitesses.

Die Gebläsekonvektoren sind mit

einem Schraubklemmenbrett 

ausgestattet, in das das am Gerät 

zu befestigende Steuerungsklem-

menbrett gesteckt werden muss 

bzw. an das die von der Fernsteue-

rung kommenden Drähte angeschlos-

sen werden müssen.

An  der  Steuerung  kann  nur  ein

Gebläsekonvektor  angeschlossen

werden.  Um  mehrere  Gebläse-

konvektoren  mit  einer  einzigen

Steuerung zu bedienen, muss jedes

Gerät  mit  einem  Drehzahlwähl-

schalter SEL ausgestattet werden,

der auf Signal der zentralisierten

Fernbedienung sein Gerät betätigt.

Die  Gebläsekonvektoren  besitzen

einen Gebläsemotor mit 6 Drehzahl-

stufen,  von  denen  nur  3  an  die

Klemmleiste angeschlossen sind.

Die Motordrehzahlen werden über

einen Spartransformator geregelt.

Sollen die Drehzahlen vor Ort geändert

werden, genügt es, die Anschlüsse

der am Spartransformator angesch-

lossenen Drehzahlkabel (rot, orange

und schwarz) zu versetzen und dabei

die im Plan angegebene Nummerierung

zu beachten. Anschluss Nr. 6 des

Spartransformators 

entspricht

Drehzahl 1 der im Verkaufskatalog

abgedruckten Tabelle. Analog für

alle anderen Drehzahlen.

Los ventiloconvectores están dota-

dos de regleta de bornes con tor-

nillos en la que debe introducirse

el borne macho del mando a fijar

a bordo o a la que se conectan los

cables procedentes del mando a

distancia.

Con el control es posible conectar

un solo fan coil. Para lograr con-

trolar varios fan coils mediante un

solo control es preciso que cada

aparato tenga un selector de velo-

cidad, SEL el cual, sobre la base

de la señal del mando a distancia

centralizado,  accionará  al  propio

aparato.

Los  ventiloconvectores  cuentan

con un ventilador con motor de 6

velocidades, de las cuales sólo 3

conectadas al bornero. Las veloci-

dades del motor se obtienen me-

diante un autotransformador. Si en

la obra se desea intervenir sobre

las velocidades, es suficiente de-

splazar la conexión de los cables

de  velocidad  (rojo,  anaranjado  y

negro) conectados al autotransfor-

mador siguiendo la numeración que

se muestra en el esquema. La co-

nexión nr. 6 del autotransformador

corresponde a la velocidad 1 de la

tabla presente en el catálogo co-

mercial. Y así sucesivamente para

las otras velocidades.

De ventilatorconvectors zijn voorzien

van een klemmenbord met schroeven

waarin het mannelijke klemmenbord

van  de  bediening  dat  aan  boord

bevestigd moet worden of waaraan de

snoeren die uit de afstandsbediening

komen vastgekoppeld moeten worden.

Aan  de  bediening  kan  slechts

één  ventilatorconvector  worden

gekoppeld; om meerdere ventilator-

convectors  te  bedienen  met  één

enkele bediening, moet elk apparaat

uitgerust  zijn  met  een  snelheids-

schakelaar SEL die, op een signaal

van de centrale afstandsbediening,

zijn aangesloten apparaat in werking

stelt.

De ventilators-convectors beschikken

over een ventilator met motor op

6  snelheden,  waarvan  slechts  3

aangesloten op het klemmenbord.

De motorsnelheden worden verkregen

door middel van een autotransformator.

Indien men op de werf wenst in te

grijpen op de snelheden, volstaat het

de aansluiting van de snelheidkabels

(rood, oranje en zwart) aangesloten

op de autotransformator te verplaatsen

volgens de nummering aangeduid in

het schema. De aansluiting nr. 6 van

de autotransformator komt overeen met

de snelheid 1 van de tabel vermeld op

de commerciële catalogus. Werk naar

analogie voor alle andere snelheden.

Summary of Contents for WFC-W

Page 1: ...H UND WARTUNG DER GEBL SEKONVEKTOREN MANUAL DE INSTALACI N USO Y MANTENIMIENTO DE LOS VENTILADORES CONVECTORES HANDLEITUNG VOOR DE INSTALLATIE HET GEBRUIK EN HET ONDERHOUD VAN DE VENTILATORS CONVECTOR...

Page 2: ...resi le cui capacit fisiche sensoriali o mentali siano ridotte oppure con mancanza di esperienza o di conoscenza a meno che esse abbiano potuto beneficiare attra verso l intermediazione di una perso n...

Page 3: ...eur s curit d une surveillance ou d instructions pr alables concernant l utilisation de l appareil Il convient de surveiller les enfants pour s assurer qu ils ne jouent pas avec l appareil Die Gebl se...

Page 4: ...i sfoghi d aria e di scarichi d acqua 1 8 gas La posizione di serie degli attacchi a sinistra guardando l apparec chio Su richiesta o comunque con facile operazione eseguibile in can tiere la posizion...

Page 5: ...mler der W rmetauscher sind mit Entl ftungs ffnungen und Wasserablass Anschl ssen 1 8 versehen Serienm ig befinden sich die Anschl sse von vorne gesehen links Auf Anfrage oder mit einem einfachen Eing...

Page 6: ...te the appliance connect hydraulically to a boiler chiller and electrically to a 230 V single phase power supply PESI E DIMENSIONI UNIT IMBALLATA WEIGHTS AND DIMENSIONS PACKED UNIT Copyright 2010 by W...

Page 7: ...tgestellt werden sollten oder wenn die Artikelnummer nicht mit dem bestellten Ger t ber einstimmt wenden Sie sich bitte an Ihren H ndler Geben Sie bei R ck fragen immer Serie und Ger te modell an F r...

Page 8: ...ni provocati da modifiche o manomis sioni dell apparecchio After removing the packaging make sure the contents are as requested and not damaged If this is not the case contact the dealer where you bou...

Page 9: ...caso contrario dirigirse al esta blecimiento donde se ha comprado el aparato Los fan coils se han estudiado para calentar y o acondicionar las habita ciones y no deben usarse para otro fin Declinamos...

Page 10: ...rtata dei bambini perch potenziale causa di pericolo Non installare in atmosfera esplo siva o corrosiva in luoghi umidi all aperto o in ambienti con molta polvere Fan coils must never be used by child...

Page 11: ...rohibe el uso del fan coil a los ni os y a las personas incapaci tadas no asistidas Es peligroso tocar el aparato te niendo partes del cuerpo mojadas y con los pies descalzos No efectuar ning n tipo d...

Page 12: ...ani parti interne dei vani tecnici e parti sotto tensione Il mancato mon taggio di queste chiusure di grave pregiudizio per la sicurezza delle persone Before carrying out any operation on the applianc...

Page 13: ...ntr chtigt Antes de efectuar cualquier ope raci n es preciso comprobar que 1 El fan coil no est alimentado el ctricamente 2 Cerrar la v lvula de alimenta ci n del agua de la bater a y dejar que se enf...

Page 14: ...fety labels inside the appliance If you cannot read the labels ask for replacements ATTENZIONE NON TOGLIERE LA PROTEZIONE DEL CIRCUITO STAMPATO DELLA SCHEDA ELETTRONICA DAL SUPPORTO COMANDI IMPORTANT...

Page 15: ...zijn laat u ze vervangen ATTENTION NE PAS RETIRER LA PROTECTION DU CIRCUIT IMPRIME DE LA CARTE ELECTRONIQUE DU SUPPORT DES COMMANDES ACHTUNG DIE SCHUTZABDECKUNG DER GEDRUCKTEN SCHALTUNG DER PLATINE DA...

Page 16: ...tion of the fan coil and heat exchanger is given below Fan coil and heat exchanger Maximum temperature of heat vector fluid 85 C Minimum temperature of refrigerant fluid 5 C Maximum working pressure 1...

Page 17: ...el fluido de enfriamiento m n 5 C M xima presi n de ejercicio 1000 kPa Tensiones de alimentaci n 230 V 50 Hz Consumo de energ a el ctrica ver placa de datos t cnicos Los datos t cnicos de las v lvulas...

Page 18: ...EXIONES HIDR ULICAS Hydraulische aansluitingen CARATTERISTICHE TECNICHE TECHNICAL CHARACTERISTIC Piedini non inclusi accessorio Feet optional extra Pieds non compris en option F e nicht im Preis entha...

Page 19: ...allata Packed unit Unit emball e Verpackung des Ger tes Unidad embalada Verpakte eenheid 4 Mod Ranghi Rows Rangs Reihen Filas Rangen Unit non imballata Unpacked unit Unit seule Unverpackung des Ger te...

Page 20: ...RAULIC CONNECTIONS WASSERANSCHL SSE RACCORDS HYDRAULIQUES CONEXIONES HIDR ULICAS Hydraulische aansluitingen CARATTERISTICHE TECNICHE TECHNICAL CHARACTERISTIC Sezione di mandata E x 119 Outlet section...

Page 21: ...HNIQUES TECHNISCHE EIGENSCHAFTEN CARACTER STICAS T CNICAS TECHNISCHE KARAKTERISTIEKEN Dimensioni mm Dimensions mm Dimensions mm Dimensionen mm Dimensi n mm Afmetingen mm PESO kg WEIGHT kg POIDS kg GEW...

Page 22: ...the air intakes are free from obstructions see illustration When installing the fan coils on the ceiling keep in mind the possible problem of stratification of the air it should also be remembered tha...

Page 23: ...a del fan coil WFC W B Oalapared WFC B Oal techo En correspondencia con las ranuras que lleva colocar 4 tacos de expan si n tornillos aconsejados M8 Para la instalaci n contra crista leras o en cualqu...

Page 24: ...t the wires taking note of the colour Undo the screws fixing the terminal board and remove it 3 Replace the coil fixing it with the four screws 4 Fix the control unit and terminal board on the opposit...

Page 25: ...e las conexiones 5 Para restablecer los enlaces el ctricos ajustarse a cuanto apuntado previamente y seguir los esquemas 1 Draai de 4 schroeven los 2 aan weerszijden die de batterij aan de structuur b...

Page 26: ...a zione If the unit is fitted with a valve connect the connection pipes to the valve If the unit is used for cooling insulate the pipes and valve to avoid drops of condensate forming During the summer...

Page 27: ...r mucho tiempo para evitar formaciones de con densado al exterior del aparato se aconseja interceptar el agua de alimentaci n de la bater a En el caso de que se requiera la pileta suplementaria de rec...

Page 28: ...denza della fiancata da pavimento utilizzando il vano in corrispondenza del piedino solo apparecchi WFC W con piedini comunque in prossimit dell ap parecchio nel caso di versioni ad incasso ELECTRICAL...

Page 29: ...scripciones generales Antes de instalar el ventilador convector verificar que la tensi n nominal de alimentaci n sea de 230 V 50 Hz Asegurarse de que la instalaci n el ctrica sea apta para distribuir...

Page 30: ...e ogni apparecchio sia corredato di un selettore di ve locit SEL che su segnale del co mando remoto centralizzato azio ner il proprio apparecchio I ventilconvettori dispongono di un ventilatore con mo...

Page 31: ...r en suivant la num ration indiqu es sur le sch ma La connexion n 6 de l autotransformateur correspond la vitesse 1 du tableau mentionn sur le catalogue commercial Ainsi de suite pour toutes les autre...

Page 32: ...1 Hot water valve or electrical heater E2 Cold water valve Summer cold air Winter warm air CH External season mode switch over IAQ Electronic filter or electrical heater SA Air probe TMM TMM low tempe...

Page 33: ...da de aire TMM Sonda TMM de m nima TME Sonda TME de m nima Q1 Interruptor de maniobra seccionator de una polo protecci n con fusible recomendado GNYE Amarillo Verde RD Rojo M nima OG Naranja Media BK...

Page 34: ...wer line respecting the neutral N and line L positions and connecting the earth PE Turn on the control unit by turning the O I switch to the I position Use the selector to set the required speed The c...

Page 35: ...la velocidad preferida No es apto para el control de v l vulas Voed met een eenfasige lijn van 230V 50Hz waarbij u let op de neutrale N en lijnposities L Zorg tevens voor een aardaansluiting PE Met de...

Page 36: ...a For the thermostatic control ON OFF of the fan or water valve s Possibility of thermostatically controlling ON OFF a water valve on the cold water piping and a valve on the hot water piping or an el...

Page 37: ...einstellen Apto para el control termost tico ON OFF del ventilador o de la las v lvula s del agua Posibilidad de control termost tico ON OFF de una v lvula en la l nea del agua fr a y de una v l vula...

Page 38: ...ettrico se la temperatura sar inferiore a 15 C realizzando automaticamente la commutazione al ciclo estivo For remote centralised seasonal mode change or automatic switch over with application of a ch...

Page 39: ...a el cambio remoto de temporada centralizado o en modo autom tico con la aplicaci n de un CHANGE OVER opci n Apto para el control termost tico ON OFF del ventilador o de la las v lvula s del agua Posi...

Page 40: ...onamento del ventil convettore per i periodi nei quali i locali non sono abitati Vedi DIP Manual or automatic selection of three fan speeds Manual or automatic switching of season mode SUM WIN Possibi...

Page 41: ...IP Schalter Conmutaci n manual o auto m tica de las tres velocidades del ventilador Conmutaci n manual o auto m tica del ciclo de temporada VER INV Posibilidad de regulaci n termo st tica con cambio a...

Page 42: ...zione estate inverno locale Local summer winter switching Sommer Winterumschaltung in der Bedienung Commutation t hiver locale Conmutaci n Verano Invierno local Plaatselijke zomer winter omschakeling...

Page 43: ...oals hieronder beschreven OMSCHAKELING ZOMER WINTER Mogelijkheid van cyclusselectie van zomer of winterfunctie d m v het knopbord op de bediening ofwel met een elektrisch signaal uit de thermische cen...

Page 44: ...using anchors and screws Connect the control unit terminals to the fan coil terminals using insulated wires with a minimum cross section of 0 75 mm2 and respecting the wiring diagram alongside Connect...

Page 45: ...posiciones de la l nea L del neutro N y de la toma de tierra PE Con el interruptor 0 1 encen der el dispositivo de acciona miento posici n 1 Con el conmutador elegir la velo cidad del ventilador para...

Page 46: ...to settare la temperatura ambiente desiderata For the thermostatic control ON OFF of the fan or water valve s To guarantee correct sensor sensitivity the control unit with thermostat must be positione...

Page 47: ...tur einstellen Apto para el control termost tico ON OFF del ventilador o de la las v lvula s del agua Para una buena sensibilidad de la sonda es preciso colocar el control con termostato en la pared d...

Page 48: ...ettori consente il controllo di pi apparecchi Max 8 su segnale di un unico comando remoto Fitted to the frame of the fan coil this enables up to eight units to be cotrolled by the signal from a single...

Page 49: ...er te mit dem Signal einer einzigen Fernbedienung Aplicado en la structura de los fan coils permite controlar varios aparatos como m ximo 8 mediante la se al de un nico mando a distancia Gemonteerd op...

Page 50: ...nvettori consente il controllo di pi apparecchi Max 8 su segnale di un unico comando remoto Fitted to the frame of the fan coil this enables up to eight units to be cotrolled by the signal from a sing...

Page 51: ...8 Ger te mit dem Signal einer einzigen Fernbedienung Aplicado en la structura de los fan coils permite controlar varios aparatos como m ximo 8 mediante la se al de un nico mando a distancia Gemonteer...

Page 52: ...to esi stente fra la temperatura am biente e la temperatura settata con zona morta di 2 C After choosing the required functions mount the control unit to the wall taking care to position it on an inne...

Page 53: ...ique y lejos de las fuentes de calor y de las corrientes de aire fr o conectar la caja de bornes M1 M2 situada sobre la tarjeta electr nica a la caja de bornes situada en el lado del ventilador convec...

Page 54: ...ulle valvole per impianti a 4 tubi con commutazione automatica Estate Inverno in funzione della temperatura aria con zona morta di 2 C Thermostatic control on the valves for 4 pipe systems with automa...

Page 55: ...MUTATION T HIVER Possibilit de s lectionner le cycle de fonctionnement t ou hiver directement partir du tableau de commande ou avec un signal lectrique partir de la centrale thermique ou dans les inst...

Page 56: ...i pi apparecchi Max 8 su segnale di un unico comando remoto Fitted to the frame of the fan coil this enables up to eight units to be cotrolled by the signal from a single remote control unit SELETTORE...

Page 57: ...m Signal einer einzigen Fernbedienung Aplicado en la structura de los fan coils permite controlar varios aparatos como m ximo 8 mediante la se al de un nico mando a distancia Gemonteerd op de structuu...

Page 58: ...ttori consente il controllo di pi apparecchi Max 8 su segnale di un unico comando remoto Fitted to the frame of the fan coil this enables up to eight units to be cotrolled by the signal from a single...

Page 59: ...te mit dem Signal einer einzigen Fernbedienung Aplicado en la structura de los fan coils permite controlar varios aparatos como m ximo 8 mediante la se al de un nico mando a distancia Gemonteerd op d...

Page 60: ...e il profilo portafiltro ed estrar re il filtro dalle guide Si pulisce periodicamente usando un aspirapolvere oppure percuo tendolo leggermente Sostituirlo nel caso non si possa pi pulire RICAMBI Per...

Page 61: ...nd vorher entsprechend geschulte Personal darf Eingriffe an den Ger ten vornehmen ELEKTROVENTILATOR Dieser bedarf keinerlei Wartung BATTERIE Diese bedarf keiner ordentlichen Wartung FILTER Mit Hilfe e...

Page 62: ...RIMEDIO Controllare che l inclinazione sia in direzione dello scarico condensa Controllare che lo scarico condensa non sia ostruito TROUBLESHOOTING PROBLEM 1 The motor does not rotate or rotates inco...

Page 63: ...llieren ob die Schr ge in Richtung des Kondensatabflusses verl uft Kontrollieren ob der Kondensatabfluss frei ist AVER A 1 El motor no gira o gira de modo incorrecto SOLUCI N Verificar que est conecta...

Page 64: ...e coefficient K de le table suivante Der Druckverlust bezieht sich auf eine durchschnittliche Temperatur des Wassers von 10 C f r abweichende Temperaturen den Druckverlust mit dem Koeffizienten K der...

Page 65: ...65 NOTES...

Page 66: ...NOTES...

Page 67: ...NOTES...

Page 68: ...bH Gewerkenstra e 15 D 44628 Herne Tel 0049 0 2323 9376 0 Fax 0049 0 2323 9376 99 E mail info waterkotte de Internet http www waterkotte de Copyright 2010 by WATERKOTTE GmbH Herne Subject to change wi...

Reviews: