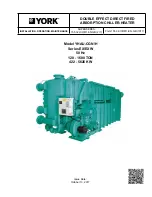


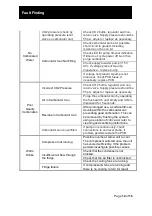


Installation and Commissioning
Page
4
of
16
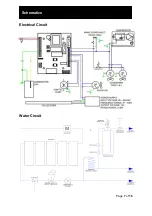
• The unit must be installed by a competent person, on a firm level
surface capable of supporting the weight of the machine, when the
bath is filled.
• Make all connections for water (inlet and outlet), gas and electricity,
but do not turn these on at this stage.
o
If the recirculation system for this unit is not being utilised the
Outlet and Return can be linked by a length of insulated John
Guest tubing.
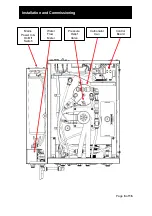
• Important: Ventilation openings in the machine must not be blocked
and free movement of air through the unit must be possible.
Inadequate ventilation will shorten the life of the fridge system. Air is
drawn in through the front, sides and bottom of the unit and
exhausted to the rear.
• Ensure that the supplied base guard is fitted to the underside of the
unit.
• Fill the bath with water. To do this remove the lid from the unit and
remove the bath inspection cover. Min and Max water levels are
marked on the front of the unit.
o
If the recirculation system is being utilized, then the bath water
will need to be monitored and topped up accordingly as the
recirculation tubing fills up. This will occur during first power on.
• Remove the cover from the filter housing and fit all water filters into
the housing. The filters are a twist and lock design and will lock into
place after a ¼ turn (a clicking sound will be heard, and the red
release tab will spring into its locked position.
• Turn on the CO2 gas supply, ensuring the pressure is set to 55 psi
(3.8 Bar).
• Purge the carbonator can by pulling the ring pull of the pressure
relief valve on top of the can and let gas flow for up to 5 seconds
then close.