


December 11, 2015, WAT051512 Rev. B
Page 3
Follow the next procedure if tubing cutting is required to connect the gradient mixer.
To trim the tubing:
1. Using a file with a cutting edge, (such as the file included in the startup tool kit,
part number WAT096146, supplied with each Waters LC System) scribe the
circumference of the tubing at the desired break.
2. Grasp the tubing on both sides of the scribe mark with cloth-covered pliers (to
prevent marring the tube surface) and gently work the tube back and forth until
it separates.
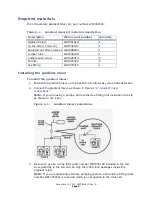
Figure 1–2:
Compression screw and ferrule assembly
3. Slide the compression fitting, followed by the ferrule (large end of the taper
first) over the tube. Bottom the tube in the fitting seat where it will actually be
attached to assure a leak-free connection.
4. Tighten the screw 3/4-turn from finger tight.
Note:
Before running your sample, flush the gradient mixer thoroughly with
selected mobile phase.
Operating the gradient mixer
Assess your system volume variables. For example, leaving a manual injector in the
"inject" position can increase volume by as much as 2 3 mL. Such practices contribute
significantly to solvent changeover time.
Starting up
Flush the Gradient Mixer with at least 10 mL of fresh mobile phase when starting up
your LC system after a brief shutdown (overnight).
Note:
Making a mobile phase changeover also requires flushing the gradient mixer
with at least 10 mL of new mobile phase. However, if the new mobile phase is
immiscible with the old one, flush with 10-15 mL of an intermediate polarity mobile
phase before changing over.
Shutting down
For overnight shut down, be sure to flush salt buffers from the gradient mixer with
water.


