10
The most important consideration for installing the sen-
sors is maintaining good contact between the sensor and
the soil. This ensures optimum performance. Before any
installation, be sure that the EC electrode has been cleaned
with alcohol and is recently calibrated (see Calibrating the
EC Sensor p. 8)
Important: The sensor can be damaged if it is pushed
directly into hard, native soil. Please read installation
guidelines before installing the sensors.
Surface Installation
If the sensor is being installed near the surface such that
the molding and cable will remain above the soil surface
the sensor can sometimes be pushed directly into the soil.
Because the sensor board is flexible, care should be taken
to avoid snapping it during installation. Do not strike the
sensor with a hammer or other blunt instrument as this
could damage the sensor electronics. If the soil is very
hard, a small slit can be dug into the soil with a knife or
shovel to facilitate easier insertion. Subsequently, pushing
that same implement into the ground surrounding the sen-
sor will improve the contact between soil and sensor.
Deep Installation
Vertical Orientation
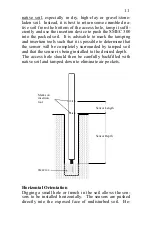
To install the sensor in a vertical orientation, dig an access
hole to the desired depth. This can be done with an auger
or shovel. If a large hole has been dug with a shovel, the
sensor can be installed similar to the surface installation
and back
-
filled.
If using an auger, it is recommended that the hole be at a
slight angle. This will reduce the effect of water channel-
ing down to the sensor via the sensor cable. A length of
½
”
Schedule 40 PVC works well as an insertion device
because the sensor molding has a width of
7/8”.
In gen-
eral, it is not recommended to push the sensor directly into
Installation


