Service Procedures
•
BookMaster Standard
Watkiss BookMaster Service Manual - Issue 1 - 14/12/00
27
should not be tight on the clutch plate. Do NOT fit the outer locking nut.
2. Fit a new securing pin to the collar on the clutch. Only insert it a small
amount so that the clutch shaft can still pass through.
3. Fit the new clutch assembly to the BookMaster.
4. Fit the clutch shaft.
5. Fit the fold crank arms to the clutch shaft. Do not forget to re-fit the nylon
washers between the crank arms and the shaft bearings.
6. Line up the holes in the clutch shaft with the holes in the crank arms. Use
an allen key or similar to line up one hole whilst you punch the opposite
pin through.
7. Turn the shaft so that the fold knife is in its fully retracted position. Punch
the clutch pin through.
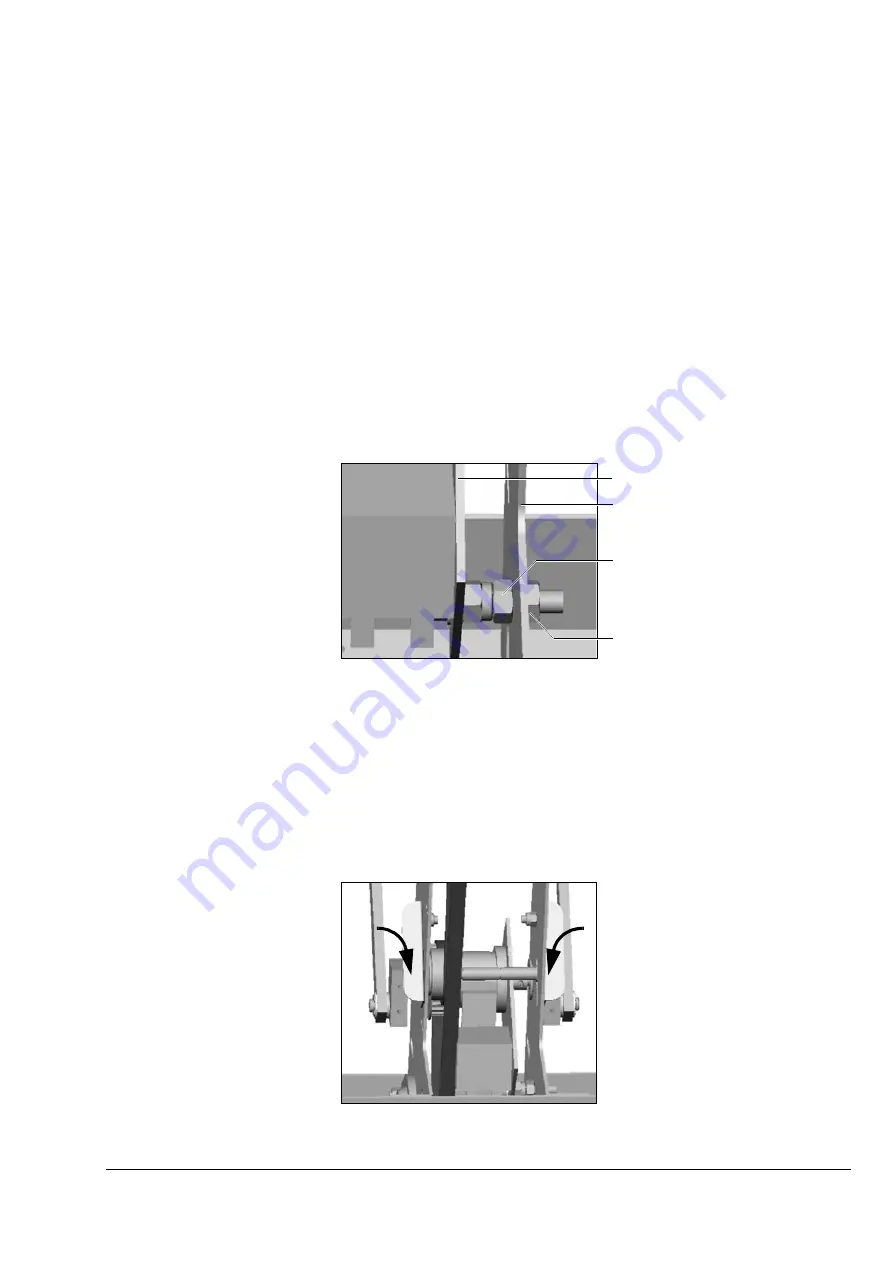
8. Fit the outer locking nut to the anti-rotation screw. Tighten the outer and
inner locking nuts together. Be careful not to bias the clutch assembly to
one side or the other, the plate should be parallel with the central panel.
There should be a slight amount of play between the clutch plate and anti-
rotation screw to absorb the movement from the fold knife action.
9. Fit the earth strap to the central panel but do not tighten the nut and screw
yet.
10. Refit the drive belt and tension. Tighten the tensioner shaft and locking
plate screws and then back them off slightly. Push down evenly on the
locking plates (see Figure 3:12) to tension the belt. The belt should be taut
but a small amount of play should be evident. Tighten the screws. Ensure
the tensioner shaft is parallel with the clutch shaft.
Figure 3:11 Anti-rotation Screw
Clutch Plate
Central Panel
Inner Locking Nut
Outer Locking Nut
Figure 3:12 Drive Belt Tensioning
Summary of Contents for BookMaster
Page 6: ...c iv Watkiss BookMaster Service Manual Issue 1 14 12 00...
Page 18: ...12 Watkiss BookMaster Service Manual Issue 1 14 12 00 System Description Fuses...
Page 54: ...48 Watkiss BookMaster Service Manual Issue 1 14 12 00 Service Procedures TrimMaster Pro...
Page 56: ...50 Watkiss BookMaster Service Manual Issue 1 14 12 00 Electronics Software Connection Diagrams...
Page 57: ...Electronics Software Connection Diagrams Watkiss BookMaster Service Manual Issue 1 14 12 00 51...
Page 58: ...52 Watkiss BookMaster Service Manual Issue 1 14 12 00 Electronics Software Connection Diagrams...
Page 59: ...Electronics Software Connection Diagrams Watkiss BookMaster Service Manual Issue 1 14 12 00 53...
Page 60: ...54 Watkiss BookMaster Service Manual Issue 1 14 12 00 Electronics Software Connection Diagrams...
Page 61: ...Electronics Software Connection Diagrams Watkiss BookMaster Service Manual Issue 1 14 12 00 55...
Page 62: ...56 Watkiss BookMaster Service Manual Issue 1 14 12 00 Electronics Software Connection Diagrams...
Page 63: ...Electronics Software Connection Diagrams Watkiss BookMaster Service Manual Issue 1 14 12 00 57...
Page 64: ...58 Watkiss BookMaster Service Manual Issue 1 14 12 00 Electronics Software Connection Diagrams...
Page 65: ...Electronics Software Connection Diagrams Watkiss BookMaster Service Manual Issue 1 14 12 00 59...
Page 66: ...60 Watkiss BookMaster Service Manual Issue 1 14 12 00 Electronics Software Connection Diagrams...
Page 67: ...Electronics Software Connection Diagrams Watkiss BookMaster Service Manual Issue 1 14 12 00 61...
Page 127: ......


