4
Watkiss BookMaster Service Manual - Issue 1 - 14/12/00
System Description
•
BookMaster Overview
trols the park position (2b) and travel of the belt by detecting the tabs as they
pass.]
The set is then stapled.
Note:
If needed, the pre-knock (or pre-jog) function allows additional jogging
for heavy or large sheets. Selecting this option from the menu engages the edge
staple latch (7) located between the staple heads. The set will drop onto the
edge staple latch where it is pre-jogged, the staple sensor (4) will activate the
sidelays and then the set is released onto the staple latch.
Stapling:
The unit is fitted with two electronically controlled Isaberg staple
heads (5), featuring 5000 capacity staple cartridges. When a staple cartridge
runs out, the corresponding red indicator light on the lid will blink once per
second. The staple legs are driven through the set and are formed against the
motorised clinchers (6). Power to the clinchers is supplied via large capacitors
on the BookMaster Interface PCB.
The staple heads and clinchers may be positioned either 115mm or 138mm
apart to suit different sheet sizes. If required, a third staple head can be fitted
to one side of the existing heads to allow corner stapling.
If stapling is not required, it can be disabled in one of two ways:
• By switching off on the control panel, in which case the staple latch
does not engage, and the sets falls straight onto the fold latch.
• By deselecting the staple head using the staple head selector button, in
which case the staple latch engages as normal. This can be useful if the
set requires additional jogging.
Folding:
After stapling the sidelays are released and the staple latch is retract-
ed, allowing the set to fall on to the fold stop (11). The fold knife (9) pushes
the set through the two steel fold rollers (12), which then open up (via a planet
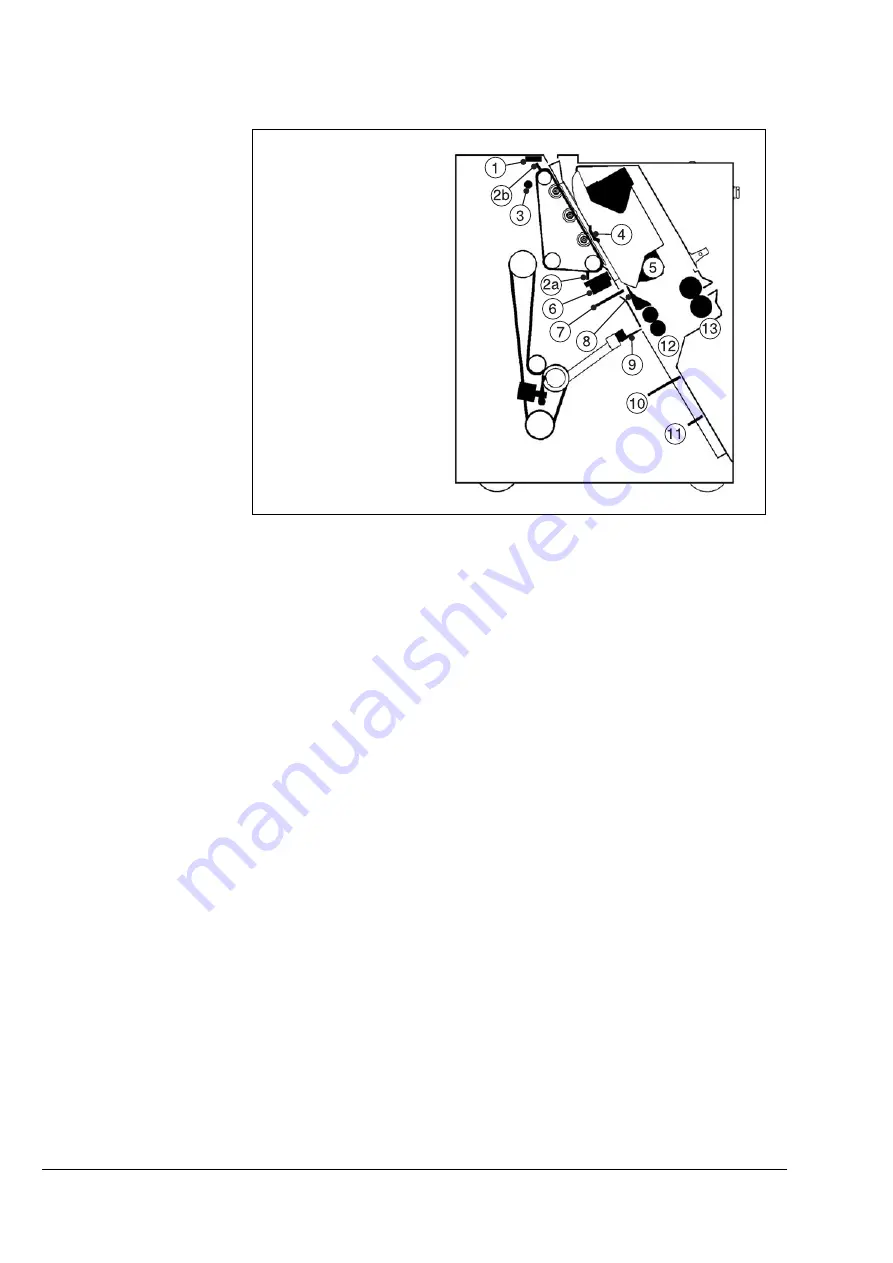
Figure 1:1 BookMaster : Overview of key components
1.
Infeed Sensor
2a.
Top Jog
2b.
Top Jog Park Position
3.
Top Jog Sensor
4.
Staple Sensor
5.
Staple Head
6.
Staple Clincher
7.
Edge Staple Latch
8.
Edge Stitch Deflector
9.
Fold Knife
10.
Staple Latch
11.
Fold Stop
12.
Steel Fold Rollers
13.
Rubber Fold Rollers
(Note : items 2a, 2b and 3 are
only on BMP)
Summary of Contents for BookMaster
Page 6: ...c iv Watkiss BookMaster Service Manual Issue 1 14 12 00...
Page 18: ...12 Watkiss BookMaster Service Manual Issue 1 14 12 00 System Description Fuses...
Page 54: ...48 Watkiss BookMaster Service Manual Issue 1 14 12 00 Service Procedures TrimMaster Pro...
Page 56: ...50 Watkiss BookMaster Service Manual Issue 1 14 12 00 Electronics Software Connection Diagrams...
Page 57: ...Electronics Software Connection Diagrams Watkiss BookMaster Service Manual Issue 1 14 12 00 51...
Page 58: ...52 Watkiss BookMaster Service Manual Issue 1 14 12 00 Electronics Software Connection Diagrams...
Page 59: ...Electronics Software Connection Diagrams Watkiss BookMaster Service Manual Issue 1 14 12 00 53...
Page 60: ...54 Watkiss BookMaster Service Manual Issue 1 14 12 00 Electronics Software Connection Diagrams...
Page 61: ...Electronics Software Connection Diagrams Watkiss BookMaster Service Manual Issue 1 14 12 00 55...
Page 62: ...56 Watkiss BookMaster Service Manual Issue 1 14 12 00 Electronics Software Connection Diagrams...
Page 63: ...Electronics Software Connection Diagrams Watkiss BookMaster Service Manual Issue 1 14 12 00 57...
Page 64: ...58 Watkiss BookMaster Service Manual Issue 1 14 12 00 Electronics Software Connection Diagrams...
Page 65: ...Electronics Software Connection Diagrams Watkiss BookMaster Service Manual Issue 1 14 12 00 59...
Page 66: ...60 Watkiss BookMaster Service Manual Issue 1 14 12 00 Electronics Software Connection Diagrams...
Page 67: ...Electronics Software Connection Diagrams Watkiss BookMaster Service Manual Issue 1 14 12 00 61...
Page 127: ......


