background image

9

Good pump installation practice

9.1

General recommendations

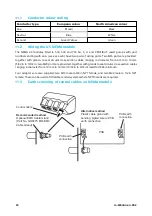
It is recommended that the pump is sited on a flat, horizontal, rigid surface, free from excessive
vibration, to ensure the correct lubrication of the gearbox and correct pumphead operation. Allow a
free flow of air around the pump to ensure that heat can be dissipated. Ensure that the ambient
temperature around the pump does not exceed the recommended maximum operating temperature.

The STOP key on pumps supplied with a keypad will always stop the pump. However, it is recommended
that a suitable local emergency stop device is fitted into the mains supply to the pump.

Do not stack the pumps more than the recommended maximum number. When the pumps are
stacked, ensure that the ambient temperature around all the pumps in the stack does not exceed the
recommended maximum operating temperature.

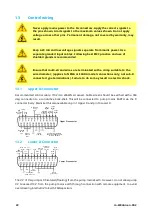
The pump may be set up so that the direction of rotor rotation is clockwise or counter-clockwise,
whichever is convenient.

Please note, however, that for some pumpheads the tube life will be greater if the rotor rotates
clockwise; and that performance against pressure will be maximised if the rotor rotates counter-
clockwise. To achieve pressure in some pumpheads the pump must rotate counter-clockwise.

Optimum
tube life

Maximum
pressure

Peristaltic pumps are self-priming and self-sealing against backflow. No valves are required in inlet or
discharge line, except those specified as below.

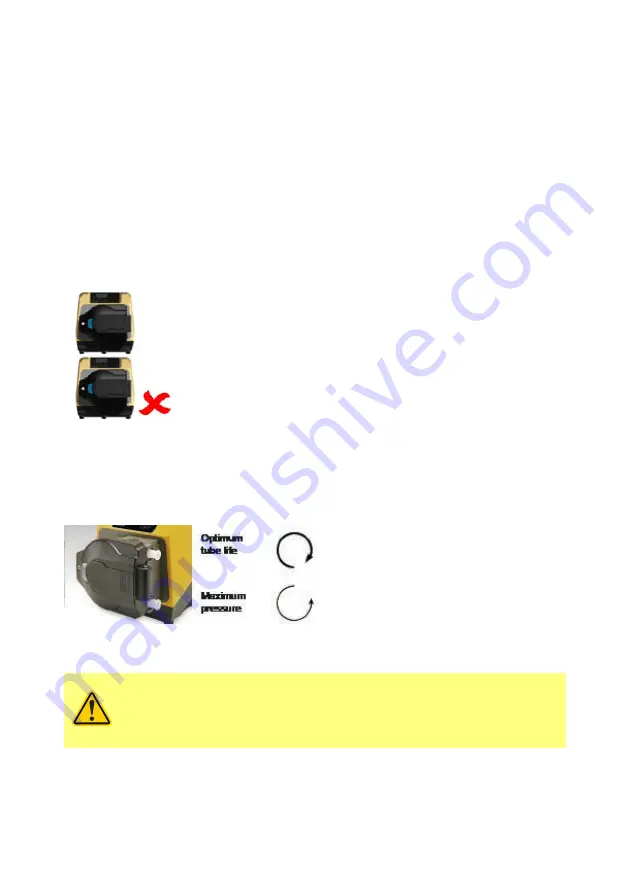
Users must fit a non-return valve between the pump and the discharge
pipework to avoid the sudden release of pressurised fluid in the event of a
pumphead or tube failure. This shall be fitted immediately after the
discharge of the pump.

Valves in the process flow must be opened before the pump operates. Users are advised to fit a pressure
relief device between the pump and any valve on the discharge side of the pump to protect against
damage caused by accidental operation with the discharge valve closed.

m-630dun-en-08.2

15

Summary of Contents for 630 Du

Page 1: ... returning pumps 8 5 Peristaltic pumps an overview 8 6 Warranty 9 7 Safety notes 10 8 Pump specifications 13 8 1 Specification ratings 13 8 2 Weights 14 8 3 Pumphead options 14 9 Good pump installation practice 15 9 1 General recommendations 15 9 2 Dos and don ts 16 10 Pump operation 17 10 1 Keypad Layout and Key IDs 17 10 2 Starting and stopping 18 10 3 Using up and down keys 18 10 4 Maximum spee...

Page 2: ... first time 44 14 1 Selecting the display language 44 14 2 First time start up defaults 46 15 Switching the pump on in subsequent power cycles 48 16 Mode menu 49 17 Manual 50 17 1 START 50 17 2 STOP 51 17 3 INCREASING AND DECREASING FLOW RATE 51 17 4 MAX FUNCTION Manual mode only 52 18 Flow calibration 53 18 1 Setting the flow calibration 53 19 Analog mode 56 19 1 Analog calibration 57 19 2 Calibr...

Page 3: ...et flow rate 73 21 3 Resume interrupted doses 74 21 4 Master dose 75 21 5 Manual dosing 78 22 Main menu 80 22 1 Security settings 82 22 2 General settings 93 22 3 Control settings 103 22 4 Configure outputs 106 22 5 Configure inputs 107 22 6 Help 111 23 Troubleshooting 112 23 1 Leak detection 113 23 2 Error codes 113 23 3 Technical support 114 24 Drive maintenance 115 25 Drive spares 116 26 Pumphe...

Page 4: ...4 Pumphead spares 128 29 Performance data 132 29 1 620RE 620RE4 and 620R performance data 132 30 Trademarks 136 31 Disclaimers 137 32 Publication history 138 Original instructions The original instructions for this manual have been written in English Other language versions of this manual are a translation of the original instructions 4 m 630dun en 08 2 ...

Page 5: ... Machinery Directive 2006 42 EC EMC Directive 2014 30 EC ROHS Directive 2015 863 6 Harmonised standards used BS EN61010 1 2010 third edition Safety requirements for electrical equipment for measurement control and laboratory use Part 1 General requirements EN61326 1 2013 Electrical equipment for measurement control and laboratory use EMC requirements Part 1 General requirements BS EN 60529 1992 A2...

Page 6: ...ality Management System ISO 9001 and the technical documentation is compiled in accordance with Annex VII B of the Directive We undertake to transmit in response to a reasoned request by the appropriate national authorities relevant information on the partly completed machinery identified above The method of transmission shall be by mail or email The pump head is incomplete and must not be put int...

Page 7: ... Components supplied 630 Components l 630 pump drive unit fitted with pumphead if specified as a pump l The designated power cable attached to the pump drive unit l A 630N module providing pump ingress protection to IP66 NEMA 4X if a DuN l Note the module is attached for transit but must be removed to allow wiring up voltage selection and fuse inspection and then re affixed before the pump is oper...

Page 8: ...er advances along the tube the seal also advances After the roller has passed the tube returns to its original shape creating a partial vacuum which is filled by fluid drawn from the inlet port Before the roller reaches the end of the track a second roller compresses the tube at the start of the track isolating a packet of fluid between the compression points As the first roller leaves the track t...

Page 9: ...arranty does not obligate Watson Marlow to bear any costs of removal installation transportation or other charges which may arise in connection with a warranty claim Watson Marlow shall not be responsible for shipping damage of returned items Conditions o Products must be returned by pre arrangement to Watson Marlow or a Watson Marlow approved service centre o All repairs or modifications must hav...

Page 10: ... regulations and guidance This symbol used on the pump and in the manual means An appropriate safety instruction should be followed or caution to a potential hazard exists This symbol used on the pump and in the manual means Do not allow fingers to contact moving parts This symbol used on the pump and in the manual means Caution hot surface This symbol used on the pump and in the manual means Caut...

Page 11: ... are no user serviceable fuses or parts inside this pump Note the mains power supply cable is supplied hardwired into the pump and is not customer replaceable Observe voltage selector switch setting for your region IP66 pumps are supplied with a mains plug The gland at the NEMA Module end of the cable is IP66 rated The mains plug at the opposite end of the cable is NOT IP66 rated It is the user s ...

Page 12: ...us settings Do not use auto restart for more than 12 times in 24 hours We recommend remote control where a high number of starts is required If the pump is configured to network mode or analog mode it will respond to remote commands at any time including immediately after power on The Symbol is shown on the screen to warn users that the pump may operate without any manual intervention e g a remote...

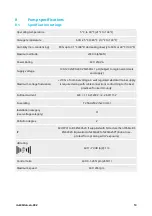
Page 13: ...m voltage fluctuation 10 of nominal voltage A well regulated electrical mains supply is required along with cable connections conforming to the best practice of noise immunity Full load current 630 1 1 A 230 V 2 2 A 115 V Fuse rating T2 5AH250V 5x20 mm Installation category overvoltage category II Pollution degree 2 IP 630 IP31 to BS EN 60529 if supplied with N module then IP66 to BS EN 60529 Equi...

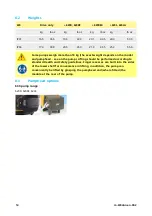
Page 14: ...act weight depends on the model and pumphead see on the pump Lifting should be performed according to standard Health and Safety guidelines Finger recesses are built into the sides of the lower shell for convenience in lifting in addition the pump can conveniently be lifted by grasping the pumphead and where fitted the module at the rear of the pump 8 3 Pumphead options 630 pump range 620R 620RE 6...

Page 15: ...t the direction of rotor rotation is clockwise or counter clockwise whichever is convenient Please note however that for some pumpheads the tube life will be greater if the rotor rotates clockwise and that performance against pressure will be maximised if the rotor rotates counter clockwise To achieve pressure in some pumpheads the pump must rotate counter clockwise Optimum tube life Maximum press...

Page 16: ...pipe runs with a bore several times larger than the pump tube l Do site the pump at or just below the level of the fluid to be pumped if possible This will ensure flooded suction and maximum pumping efficiency l Do run at slow speed when pumping viscous fluids Flooded suction will enhance pumping performance particularly for materials of a viscous nature l Do recalibrate after changing tubing flui...

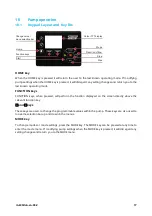
Page 17: ...nown operating mode FUNCTION keys FUNCTION keys when pressed will perform the function displayed on the screen directly above the relevant function key and keys These keys are used to change the programmable values within the pump These keys are also used to move the selection bar up and down in the menus MODE key To change modes or mode settings press the MODE key The MODE key can be pressed at a...

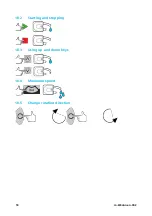
Page 18: ...10 2 Starting and stopping 10 3 Using up and down keys 10 4 Maximum speed 10 5 Change rotation direction 18 m 630dun en 08 2 ...

Page 19: ...switch plate at the rear of the pump protected from water by the N module The module must be removed to allow access to the switch plate Do not switch the pump on unless you have checked that it is set to suit your power supply by removing the module and inspecting the switch and then refitting the module 1 2 3 4 We recommend using a commercially available supply voltage surge and or noise suppres...

Page 20: ...to 13 32 in two M20 ports are provided together with glands to seal circular cross section cables ranging in diameter from 10 mm to 14 mm 13 32 in to 9 16 in rated for IP66 minimum Four adaptors are also supplied two M16 male to 3 8 in NPT female and two M20 male to 1 2 in NPT female These can be used to fit flexible conduit systems where NPT threads are required 11 3 Earth screening of control ca...

Page 21: ...hat proper connections are achieved between the pump and suction and discharge piping o Ensure proper connection has been made to a suitable power supply o Ensure that the recommendations in the section Good pump installation practice on page 15 are followed m 630dun en 08 2 21 ...

Page 22: ... connection to a conductive back shell This will be connected to pump mains EARTH via the D connector body Mains Earth is also available on pin 1 Upper D and pin 13 Lower D Functional earth Leak Auto man Reserved do not use Reserved do not use Signal ground 0V VAUX 22 5V Commoning terminals used for voltage supply for logic outputs Signal ground 0V Logic output 1 Logic output 2 Logic output 4 Logi...

Page 23: ...ROTATION ALARM OUTPUT OPEN COLLECTOR TO GROUND INPUT OUTPUT MANUAL KEYPAD CONTROL ANALOGUE 4 20mA 0 10V CONTROL START DOSE ON RISING EDGE DRY NO LEAK WET LEAK DETECTED KEYPAD DIRECTION CHANGE REMOTE DIRECTION CHANGE ALARM PULL UP RESISTOR COMMON Wiring the upper D connector Signal Name Input or output Configurable Signal response LEAK LEAK LEAK Yes Leak high Leak low m 630dun en 08 2 23 ...

Page 24: ...Signal Name Input or output Configurable Signal response AUTO MAN AUTOMAN AUTOMAN No LOGIC OUT 1 LOGIC OUT 1 Yes Output 1 LOGIC OUT 2 LOGIC OUT 2 Yes Output 2 24 m 630dun en 08 2 ...

Page 25: ...or output Configurable Signal response LOGIC OUT 3 LOGIC OUT 3 Yes Output 3 LOGIC OUT 4 logic_out4 pdf LOGIC OUT 4 Yes Output 4 COMMON Commoning terminals used for voltage supply for logic outputs No m 630dun en 08 2 25 ...

Page 26: ...Wiring the lower D connector Function Input or output Configurable Signal response TACHO FREQUENCY TACHO F Hz No TACHO TACHO mA No 4 20 mA TACHO 0 10V No 0 10 V 26 m 630dun en 08 2 ...

Page 27: ...Function Input or output Configurable Signal response TTL 1 TTL OUT 1 Yes Output 1 TTL 2 TTL OUT 2 Yes Output 2 m 630dun en 08 2 27 ...

Page 28: ...Function Input or output Configurable Signal response DIRECTION DIRECTION DIRECTION No START STOP START STOP START STOP Yes Stop high Stop low 28 m 630dun en 08 2 ...

Page 29: ...Function Input or output Configurable Signal response DIRECTION ENABLE DIRECTION ENABLE DIRECTION ENABLE No DOSE DOSE DOSE No m 630dun en 08 2 29 ...

Page 30: ...Function Input or output Configurable Signal response ANALOG 1 ANALOG 1 0V 0V Yes Either 0 10 V or 4 20 mA ANALOGUE 1 10V REF Yes 0 10 V ANALOG 2 ANALOG 2 No 30 m 630dun en 08 2 ...

Page 31: ...all screws supplied Failure to do so may compromise the IP66 NEMA 4X protection Ensure that unused openings on the module are sealed using the blanking plugs provided Failure to do so may compromise the IP66 NEMA 4X protection 13 6 Standard N Module Note Not all functions may be available those available will depend on your pump model 5V J1 J14 J15 J16 J17 J10 J11 J12 J13 SW1 SW2 PL1 RL1 RL2 RL3 R...

Page 32: ...within the N module Apply the correct signals to the terminals Limit signals to the maximum values shown Do not apply voltage across other terminals Permanent damage not covered by warranty may result The maximum rating on the relay contacts of this pump is 30 V DC maximum load 30 W Note Also suitable for low power ie 1 mA at 5 V DC minimum Key to symbols RUN STOP CLOCKWISE ROTATION ANTI CLOCKWISE...

Page 33: ...nector No Function Input or output Configurable Signal response J2 DIRECTION CW CCW DIRECTION No J3 DOSE DOSE No J4 STOP HIGH RUN STOP STOP LOW RUN STOP RUN STOP Yes Stop high Stop low m 630dun en 08 2 33 ...

Page 34: ...tput Configurable Signal response J5 ANALOGUE 1 Yes J6 DIRECTION EN No J7 REMOTE POT No 10 V 10 mA Max J8 ANALOGUE 2 Yes J9 LEAK DETECT HIGH LEAK DETECT LEAK DETECT LOW LEAK DETECT LEAK DETECT Yes Leak high Leak low 34 m 630dun en 08 2 ...

Page 35: ...15 16 17 RELAY 1 4 Yes LOW N C HIGH N O 24 V DC MAX SW1 SW1 Switches in or out a 124R termination resistor May be required for long cable lengths SW2 SW2 Switches in or out a filter capacitor for optional use when internal terminal is selected May be of use if data errors occur with long lines 13 7 SCADA N Module Note Not all functions may be available those available will depend on your pump mode...

Page 36: ...mm 5 mm The cable section must be circular to ensure a seal Never apply mains power above 130 V AC to the terminals within the SCADA module Apply the correct signals to the terminals shown Limit signals to the maximum values shown Do not apply voltage across other terminals Permanent damage not covered by warranty may result 130 VAC Max on Relay 1 4 terminals Dose Auto and Start Stop All others Ma...

Page 37: ...on Input or Output Configurable Signal Response J1 AUTO MAN No J2 DIRECTION No J3 DOSE No J4 RUN STOP Yes Stop high Stop low J5 ANALOGUE 1 Yes J6 DIRECTION EN No SCADA N Module Input output Connectors m 630dun en 08 2 37 ...

Page 38: ...x J8 ANALOGUE 2 Yes J9 LEAK DETECT LEAK DETECT Yes Leak high Leak low J10 TACHO O P No 0 10 V 4 20 mA J12 J13 J14 J15 RELAY 1 4 img_scada_mod_j12 15 pdf Yes LOW N C HIGH N O 110 VAC MAX SW1 SW1 Switches in or out a 124R termination resistor May be required for long cable lengths 38 m 630dun en 08 2 ...

Page 39: ... use the historical basic protocol or the new enhanced protocol New enhanced protocol Command strings have a comma separated format without spaces and with an optional checksum enclosed within a start of message SOM indicator and an end of message EOM indicator SOM address command parameter parameter parameter checksum EOM e g 1 SP 1032 CS Message structure additional definitions SOM Address range...

Page 40: ... 3 RT Return the total deci pump revolutions count W Line1 Line2 Line3 Line4 Display text on 1 to 4 lines lines 2 3 and 4 are optional so that between 1 and 4 lines can be displayed The text must be enclosed by a comma as shown The allowable characters are 0 1 2 3 4 5 6 7 8 9 A B C D E F G H I J K L M N O P Q R S T U V W X Y Z a b c d e f g h i j k l m n o p q r s t u v w x y z ZY Return for stopp...

Page 41: ...ng Leak detect 0 InActive 1 Active Auto Manual 0 Manual 1 Auto Adapter detect 0 not fitted 1 fitted Direction enable 0 disabled 1 enabled Spare1 input4 0 inactive 1 active Spare2 input5 0 inactive 1 active checksum EOM e g 1 530Du 15 12 520R 9 6 220 0 CW 123456789 12345 1 0 0 0 0 0 0 CS Note 4 If the pump network ID in the command is replaced with all zeros this indicates a broadcast message In th...

Page 42: ...ons of the gearbox output shaft 10 pulses per revolution This in turn allows the count to be equated to the amount of material dispensed assuming that the pumphead type and tube size are known Note 2 The status is returned to the sender in the following format SOM address pumptype ml rev pumphead tubesize speed CW or CCW pumpnumber pump revs count 0 or 1 for stopped or running Leak detect 0 InActi...

Page 43: ...ocol Note 4 In all cases n can be any number from 1 to 16 inclusive and by exception the symbol can be used as an all drives command but not with the RS RT or ZY commands as the results would be indeterminate m 630dun en 08 2 43 ...

Page 44: ...irst time Power up the pump The pump displays the start up screen with the Watson Marlow Pumps logo for three seconds 14 1 Selecting the display language 1 Use the keys to select your chosen language and press SELECT 44 m 630dun en 08 2 ...

Page 45: ...e will now be displayed on screen Choose CONFIRM to continue All text will now appear in your chosen language 3 Choose REJECT to return to the language choice screen This then proceeds to the home screen P m 630dun en 08 2 45 ...

Page 46: ...s rpm SG value 1 Keypad lock Disabled Auto restart OFF Analog signal type mA Analog scaling type mA Analog min current 5 mA Analog max current 19 mA Analog min flow rate rpm 0 rpm Analog max flow rate rpm 265 rpm Beeper ON Security code Not set MemoDose flow rate Mid flow rate of chosen pumphead MemoDose volume 100 ml Pump number baud rate 9600 Stop bits 2 Remote start stop input High stop Leak de...

Page 47: ...ause the pump to start as soon as power is turned on Auto restart only affects operation of manual mode network mode and memodose mode If Auto restart is enabled the Symbol is shown on the screen to warn users that the pump may operate without any manual intervention pump resumes with previous settings Do not use auto restart for more than 12 times in 24 hours We recommend remote control where a h...

Page 48: ...es Do not power up power down the pump more than 12 times in 24 hours whether manually or by means of the auto restart facility which only affects manual mode network mode and memodose operation We recommend remote control where a high frequency of power cycles is required If the Auto restart feature is enabled it may cause the pump to start as soon as power is turned on Auto restart only affects ...

Page 49: ...he Change mode menu Use the and keys to scroll through the available modes Manual default Flow calibration Analog Network Memodose CANCEL Use SELECT to choose mode Use the right hand function key to alter mode settings m 630dun en 08 2 49 ...

Page 50: ...s the pump will return to the last known settings from that operating mode when the power is re applied When the pump is running it displays an animated clockwise arrow In normal operation the direction of flow is into the bottom port of the pumphead and out of the top port If an exclamation mark is displayed it indicates that the pump could automatically restart at any time In manual mode network...

Page 51: ... press will decrease flow rate by the least significant digit of the chosen flow rate unit o Repeat key presses as required to achieve the desired flow rate o Hold down the key for flow rate scrolling Increasing flow rate o A single key press will increase flow rate by the least significant digit of the chosen flow rate unit o Repeat key presses as required to achieve the desired flow rate o Hold ...

Page 52: ...N Manual mode only o Press and hold the MAX key to run at maximum flow o Release the key to stop the pump o The volume dispensed and time elapsed are displayed while the MAX key is pressed and held 52 m 630dun en 08 2 ...

Page 53: ... This pump displays flow rate in ml min 18 1 Setting the flow calibration Using the keys scroll to Flow calibration and press CALIBRATE Using the keys enter the maximum flow rate limit and press ENTER m 630dun en 08 2 53 ...

Page 54: ...Press START to begin pumping a volume of fluid for calibration Press STOP to stop pumping fluid for the calibration Use the keys to enter the actual volume of fluid pumped 54 m 630dun en 08 2 ...

Page 55: ...To accept the new calibration press ACCEPT or RE CALIBRATE to repeat the procedure Press HOME or MODE to abort The pump is now calibrated m 630dun en 08 2 55 ...

Page 56: ... be proportional or inversely proportional to the analog input The default values stored in the pump are A 5 mA 0 and B 19 8 mA 100 Flow rate When the analog signal received is greater than the level defined by point A the run status output will be energised as the pump is running To select Analog mode select MODE Using the keys scroll to Analog and press SELECT The analog signal being received by...

Page 57: ...values High and low signals must be within range If the signal sent is out of range you will not be able to set the signal input value and progress to the next step in the process Select MENU then select MODE menu Using the keys scroll to Analog and press CALIBRATE m 630dun en 08 2 57 ...

Page 58: ...CT Select the input signal type using the keys and press SELECT The pump gives the option to enter the high and low mA or V signals manually or via the analog input Entering mA values is described here however the process for entering V signals is identical 58 m 630dun en 08 2 ...

Page 59: ...nt values manually via the keypad or whether to apply the current signals electrically to the analog input 19 3 Setting a high signal Send the high signal input to the pump or enter the current value using the keys m 630dun en 08 2 59 ...

Page 60: ...imits Press ACCEPT to accept the high signal input or CANCEL to return to the previous screen 19 4 Setting high flow calibration Using the keys scroll to the desired flow rate Select SET FLOW or press BACK to return to the previous screen 60 m 630dun en 08 2 ...

Page 61: ...w signal Send the low signal input to the pump or enter the current value using the keys If the range between the low and high signal is less than 1 5 mA the following error message will be displayed m 630dun en 08 2 61 ...

Page 62: ... is within tolerance limits Press ACCEPT to accept the low signal input or CANCEL to return to the previous screen 19 6 Setting low flow calibration Using the keys scroll to the desired scale factor Select SET FLOW 62 m 630dun en 08 2 ...

Page 63: ...This proceeds to the screen confirming calibration is complete Select ANALOG to start in analog mode or MANUAL to continue in manual mode m 630dun en 08 2 63 ...

Page 64: ...signal from Analog 2 according to the formula y as where a is the speed set by Analog 1 s is the scaling set by Analog 2 and y is the scaled rotation speed Using the keys scroll to Scaling input and press SELECT Select the input signal type using the keys and press SELECT The pump gives the option to enter the high and low mA or V signals manually or via the analog input Entering mA values is desc...

Page 65: ...Choose whether to enter the current values manually via the keypad or whether to apply the current signals electrically to the analog input m 630dun en 08 2 65 ...

Page 66: ...gh signal input to the pump or enter the current value using the keys ACCEPT appears when high mA signal is within tolerance limits Press ACCEPT to accept the high signal input or CANCEL to return to the previous screen 66 m 630dun en 08 2 ...

Page 67: ...ing the keys scroll to the desired scale factor Select SET SCALE or press BACK to return to the previous screen 19 10 Setting a low signal Send the low signal input to the pump or enter the current value using the keys m 630dun en 08 2 67 ...

Page 68: ...l is within tolerance limits Press ACCEPT to accept the low signal input or CANCEL to return to the previous screen 19 11 Setting low flow calibration Using the keys scroll to the desired flow rate Select SET SCALE 68 m 630dun en 08 2 ...

Page 69: ...This proceeds to the screen confirming calibration is complete Select ANALOG to start in analog mode or MANUAL to continue in manual mode m 630dun en 08 2 69 ...

Page 70: ...ODE o Using the keys scroll to Network and press SETTINGS In both RS485 and RS232 mode there is the option to run in ENHANCED or BASIC communication protocol 20 2 Protocol Du models are RS232 DuN and DuS models are RS485 20 3 Pump No Pump Number Pump No will be highlighted first Adjust the pump number using the keys and press NEXT to assign the pump number 70 m 630dun en 08 2 ...

Page 71: ...ed Adjust using the keys and press NEXT to assign and move on The following table shows the available baud rates RS232 RS485 Baud rates 1200 1200 2400 2400 4800 4800 9600 9600 19200 20 5 Stop bits With Stop bits highlighted use the keys to select the required value and NEXT to change an alternative setting or FINISH to save the network settings m 630dun en 08 2 71 ...

Page 72: ...20 6 Save network settings The following screen is displayed Press SAVE to save the new network settings or DISCARD to discard the new settings and return to the HOME screen 72 m 630dun en 08 2 ...

Page 73: ...se a precise volume of fluid This can be achieved by dispensing a master dose or entering a dose volume manually using the keypad MemoDose can repeat this dose exactly or proportionately 21 1 To configure MemoDose o Select MODE o Using the keys scroll to MemoDose and press SETTINGS Note the pump must be stopped to enter MemoDose Settings 21 2 Set flow rate Using the keys scroll to Flow rate and pr...

Page 74: ...an be discarded and a new dose started when power is resumed From the MemoDose settings screen use the keys to scroll to Resume Interrupted Dose and press ENABLE The red cross will become a green tick to indicate that Resume interrupted dose is enabled If this function is enabled the ENABLE key becomes DISABLE If this is pressed interrupted doses will be discarded after a power cycle 74 m 630dun e...

Page 75: ...21 4 Master dose Using the keys scroll to Master dose and press SELECT The following screen is displayed press MANUAL to enter a dose via the keypad or DOSE to dispense a master dose m 630dun en 08 2 75 ...

Page 76: ...Dispensing a master dose Press START to begin dispensing the Master Dose Press STOP to finish dispensing the Master Dose 76 m 630dun en 08 2 ...

Page 77: ...screen Using the keys enter the required dose volume and press SELECT to record the master dose or CANCEL to return to MemoDose Settings Save dose volume Press SAVE to record the Master Dose or CANCEL to return to MemoDose settings m 630dun en 08 2 77 ...

Page 78: ...d press MEMODOSE to start in MemoDose Mode or BACK to return to MemoDose settings 21 5 Manual dosing From the MemoDose Home screen press START to deliver a dose The screen displays the dose flow rate and the dose remaining counting down from 100 to 0 78 m 630dun en 08 2 ...

Page 79: ... the master dose Use the keys to alter the percentage The new dose size is displayed as a percentage on the home screen 107 0 If STOP is pressed during dosing the pump stops Pressing START will resume or discard the interrupted dose depending on the settings in Resume interrupted doses on page 74 m 630dun en 08 2 79 ...

Page 80: ...of the HOME screens or INFO screens This will display the main menu as shown below Use the keys to move the selection bar between the available options Press SELECT to choose an option Press EXIT to return to the screen from where the MENU was called 80 m 630dun en 08 2 ...

Page 81: ...m 630dun en 08 2 81 ...

Page 82: ...e Main menu Auto keypad lock Press ENABLE DISABLE to switch on off the Auto keypad lock When active the keypad will lock after 20 seconds of inactivity Once locked it will display the screen below when any key is pressed To unlock the keypad press the two UNLOCK keys together 82 m 630dun en 08 2 ...

Page 83: ...equired to disable PIN lock Setting Master PIN Setting the Master PIN protects all functionality The Master is able to selectively enable functionality for two additional operators These are defined as User 1 and User 2 They will be able to access this functionality by entering a PIN code assigned to them by the Master user To set the Master PIN scroll to Master level and press ENABLE To define a ...

Page 84: ...Now press CONFIRM to check that the number entered is the PIN you require Press CHANGE to return to PIN entry 84 m 630dun en 08 2 ...

Page 85: ...tionality Press NEXT to selectively enable functionality access for User 1 and User 2 Configure User 1 security settings The PIN PROTECTION level screen will be displayed with User 1 highlighted press ENABLE to configure User 1 security settings or scroll to configure an alternative User m 630dun en 08 2 85 ...

Page 86: ...igit User 1 PIN use the keys to select each digit from 0 9 Once you have the required digit press the NEXT DIGIT key After selecting the fourth digit press ENTER Now press CONFIRM to verify that the number entered is the PIN you require Press CHANGE to return to PIN entry 86 m 630dun en 08 2 ...

Page 87: ...he functionality and press ENABLE User 1 PIN will allow access to only the enabled functionality to disable functionality highlight the enabled functionality and press DISABLE When all the required functionality has been enabled press FINISH m 630dun en 08 2 87 ...

Page 88: ...er 2 security settings or scroll to configure an alternative User ENABLE user 2 security settings displays the PIN entry screen for User 2 To define a four digit User 2 PIN use the keys to select each digit from 0 9 Once you have the required digit press the NEXT DIGIT key After selecting the fourth digit press ENTER 88 m 630dun en 08 2 ...

Page 89: ...he functionality and press ENABLE User 2 PIN will allow access to only the enabled functionality to disable functionality highlight the enabled functionality and press DISABLE When all the required functionality has been enabled press FINISH m 630dun en 08 2 89 ...

Page 90: ...e displayed A PIN is now required to access all functionality The Master PIN accesses all pump functionality and the User 1 and User 2 PINs access only the defined functionality To enter the PIN use the keys to select each digit from 0 9 Once you have the required digit press the NEXT DIGIT key After selecting the fourth digit press ENTER 90 m 630dun en 08 2 ...

Page 91: ...played NOTE this screen will also display if the PIN entered does not allow access to that functionality If a PIN number is entered that is already in use the following screen will be displayed press CHANGE to input an alternative PIN or EXIT to abort m 630dun en 08 2 91 ...

Page 92: ...ot allow access to the functionality the following screen will be displayed Keypad beep From SECURITY settings scroll to Keypad beep using the keys and select ENABLE The pump will now beep at every key press 92 m 630dun en 08 2 ...

Page 93: ... PIN code operation Anyone wishing to modify pump settings will still need to enter the PIN code 22 2 General settings To view the general settings menu select GENERAL SETTINGS from the main menu Auto restart This pump includes a feature called auto restart This setting only applies to pump operation in manual mode network mode and memodose mode If the pump is operating in any of these modes and t...

Page 94: ...ed to network mode or analog mode it will respond to remote commands at any time including immediately after power on The Symbol is shown on the screen to warn users that the pump may operate without any manual intervention e g a remote setpoint could start the pump with no key press required The symbol is a warning that the pump could remotely activate at any time It will always be displayed when...

Page 95: ...LECT All flow rates displayed on screens will now be in the chosen units If a mass flow unit is selected the specific gravity of the fluid must be entered The following screen is displayed Use the keys to enter the value of the specific gravity and press SELECT m 630dun en 08 2 95 ...

Page 96: ...u entry and press SELECT If a pump label has been previously defined this will be displayed on screen to allow editing otherwise it will display the default label WATSON MARLOW Use the keys to scroll through the available characters for each digit The available characters are 0 9 A Z and SPACE Press NEXT to move onto the next character or PREVIOUS to move back to the previous character 96 m 630dun...

Page 97: ... and return to the general settings menu Pumphead type Select GENERAL SETTINGS from the main menu Use the keys to move the selection bar over Pumphead type and press SELECT The following screen will be displayed m 630dun en 08 2 97 ...

Page 98: ...Use the keys to move the selection bar over Pumphead and press SELECT Use the keys to move the selection bar over the required pumphead type and press SELECT 98 m 630dun en 08 2 ...

Page 99: ...rial Select Tube size from GENERAL SETTINGS then use the keys to move the selection bar over Bore size and press SELECT Use the keys to move the selection bar over the tube size to be used and press SELECT m 630dun en 08 2 99 ...

Page 100: ...ed as pressure and bore This screen also allows you to select the tube material used Use the keys to move the selection bar over Tube material and press SELECT Use the keys to move the selection bar over the tube material to be used and press SELECT 100 m 630dun en 08 2 ...

Page 101: ...it The available characters are 0 9 A Z and SPACE Press NEXT to move onto the next character or PREVIOUS to move back to the last character Press FINISH to save the entry and return to the general settings menu Restore defaults To restore the factory default settings select Restore defaults from the general settings menu There are two confirmation screens to ensure that this function is not carrie...

Page 102: ...ge Select language from the general settings menu to choose an alternative display language for the pump The pump must be stopped before changing the language Use the keys to move the selection bar to your required language Press SELECT to confirm 102 m 630dun en 08 2 ...

Page 103: ...ease see Mode menu on page 1 for further details 22 3 Control settings Select CONTROL SETTINGS from the main menu to access the sub menu shown below Use the keys to move the selection bar Press SELECT to choose the required function Speed limit The maximum speed the pump is capable of running at is 265 rpm Select Speed limit from the control settings menu to define a lower maximum speed limit for ...

Page 104: ...0RE and 620RE4 rotor warranty is limited to 2 bar from 165rpm to 265rpm l A warning is displayed when the user sets the speed above 165rpm Increasing life Avoid running in this area 5 YEAR WARRANTY Peak pressure bar Pump speed rpm ROTOR IS CONSUMABLE 620RE RE4 LOADSURE Hard Marprene M Sta Pure Chem sure 620LG Increasing life Avoid running in this area 5 YEAR WARRANTY Peak pressure bar Pump speed r...

Page 105: ...620R and 620L Peak pressure bar Pump speed rpm 5 YEAR WARRANTY Reset run hours Select Reset run hours from the control settings menu Select RESET to zero the run hours counter The run hours counter can be viewed by pressing INFO from your home screen The following screen will be displayed Press RESET to reset the run hours or CANCEL to return to the CONTROL SETTINGS menu m 630dun en 08 2 105 ...

Page 106: ...m the CONTROL SETTINGS menu Use the keys and press SELECT to choose which output to configure Use the keys and press SELECT to choose which pump status you require for the chosen output The tick symbol indicates the current setting 106 m 630dun en 08 2 ...

Page 107: ...SELECT to program the output or BACK to cancel 22 5 Configure inputs Select Configure inputs from the CONTROL SETTINGS menu Use the keys and press SELECT to choose which input to configure Use the keys and press SELECT to choose the logic state of the chosen input m 630dun en 08 2 107 ...

Page 108: ...is model Inputs 4 and 5 are configured for a pressure sensor Disable remote stop in manual mode Users can disable enable the remote stop input when the pump is in manual mode by using the following sequence to configure the start stop settings 108 m 630dun en 08 2 ...

Page 109: ...fault is û The start stop input is not disabled in manual mode Press SELECT to change the setting to ü Press HOME to return and store the setting The input is now disabled in manual mode m 630dun en 08 2 109 ...

Page 110: ... mode The setting isü The start stop input is disabled Press SELECT to open the logic state menu Use the keys and press SELECT to choose the logic state of the chosen input for your connected control hardware 110 m 630dun en 08 2 ...

Page 111: ...Press HOME to return and store the setting The input is now enabled in manual mode 22 6 Help Help Select Help from the main menu to access the help screens m 630dun en 08 2 111 ...

Page 112: ...t there is little or no flow make the following checks Check that fluid is supplied to the pump Check for any kinks or blockages in the lines Check that any valves in the line are open Check that the tube and rotor are in the pumphead Check that the tube is not split or burst Check that the correct wall thickness tube is being used Check the direction of rotation Check that the rotor is not slippi...

Page 113: ...creen with a red background is displayed Note Signal out of range over signal and leak detected error screens report the nature of an external condition They do not flash Error code Error condition Suggested action Er 0 FRAM write error Attempt to reset by switching power OFF ON Or seek support Er 1 FRAM corruption Attempt to reset by switching power OFF ON Or seek support Er 2 FLASH write error d...

Page 114: ...7 Under voltage Stop pump immediately Check supply Power OFF ON may reset Er20 Signal out of range Check analog control signal range Trim signal as required Or seek support Er21 Over signal Reduce the analog control signal Err50 Communication error internal pump communications error and not a network error Attempt to reset by switching power OFF ON Or seek support 23 3 Technical support Watson Mar...

Page 115: ...24 Drive maintenance There are no user serviceable parts inside the pump Please contact your local Watson Marlow representative to arrange repair m 630dun en 08 2 115 ...

Page 116: ...25 Drive spares Description Part No Replaceable main fuse type T5A H 250 V Pack of 5 Foot Pack of 5 MNA2101A Glands Std GR0056 Glands EMC GR0075 116 m 630dun en 08 2 ...

Page 117: ...umps is provided by the tool lockable pumphead guard Secondary backup protection is provided in the form of an electrical guard switch which stops the pump if the pumphead guard is opened The electrical guard switch on cased pumps should never be used as primary protection Always disconnect the mains power supply to the pump before opening the pumphead guard Removal 1 2 3 4 5 6 Refitting Check ada...

Page 118: ...Rotor refitting 1 2 3 4 Ensure that the rotor hub spacer is still installed 620R 620RE and 620RE4 waste port 1 2 3 118 m 630dun en 08 2 ...

Page 119: ... pump from the mains power supply before opening any guard or track or performing any positioning removal or maintenance operation 27 1 Continuous tubing 620R 1 2 3 4 5 6 620L 1 2 3 4 5 8 0 mm 230 mm 12 mm 16 mm 240 mm m 630dun en 08 2 119 ...

Page 120: ...27 2 Tube elements 630Du RE and 630Du RE4 1 2 3 4 5 6 630 Sanitary connectors 1 2 3 630 Industrial connectors 1 2 3 630Du L 1 2 3 120 m 630dun en 08 2 ...

Page 121: ...ure to less than one minute risk of attack Halogenated chlorinated solvents Not recommended possible risk to polycarbonate tube clamp adjusters and polypropylene tube clamp locators Alcohols general No precaution necessary Glycols Minimize rotor cap and clutch boot exposure to less than one minute risk of attack Estersolvents Remove guard Minimize rotor cap and tube clamp location cap exposure to ...

Page 122: ...UK mains plug E EU mains plug A American mains plug K Australia mains plug R Argentina mains plug C Swiss mains plug D India South Africa mains plug B Brazilian mains plug Not available for US or DuS models U and Du models only Only available with American mains plug Special NEMA module 069 911F 100 Ethernet Watertight Module 630F IP66 NEMA 4X is required for KROHNE flow sensor combined with IP31 ...

Page 123: ... 032 913 A127 032 15 9 5 8 184 0159 032 933 0159 032 913 A159 032 mm inch STA PURE Series PCS Neoprene 6 4 1 4 26 961 0064 032 920 0064 032 9 6 3 8 73 961 0096 032 920 0096 032 12 7 1 2 82 961 0127 032 920 0127 032 15 9 5 8 184 961 0159 032 920 0159 032 mm inch PureWeld XL STA PURE Series PFL 6 4 1 4 26 966 0064 032 9 6 3 8 73 941 0096 032 966 0096 032 12 7 1 2 82 941 0127 032 966 0127 032 15 9 5 ...

Page 124: ...prene TL 933 0120 PFT 933 0170 PFT Pumpsil silicone 913 A120 PFT 913 A170 PFT Marprene TM 902 P120 PPC 902 P170 PPC Marprene TL 902 0120 PPC 902 0170 PPC Neoprene 920 0120 PPC 920 0170 PPC Note for 4 bar use 620L tubing codes Marprene Dispensing information Bore mm Litres rev 902 E080 K40 Y element 8 0 0 01689 902 E120 K40 12 0 0 03029 902 E160 040 16 0 0 04251 902 0080 040 Continuous 8 0 0 01689 ...

Page 125: ...g information Bore mm Litres rev 913 AE80 K40 Y element 8 0 0 01672 913 A12E K40 12 0 0 03214 913 A16E K40 16 0 0 04353 913 A080 040 Continuous 8 0 0 01672 913 A120 040 12 0 0 03214 913 A160 040 16 0 0 04353 Neoprene Dispensing information Bore mm Litres rev 920 E080 K40 Y element 8 0 0 01721 920 E120 K40 12 0 0 02901 920 E160 K40 16 0 0 05004 920 0080 040 Continuous 8 0 0 01721 920 0120 040 12 0 ...

Page 126: ...mm Litres rev 961 E080 K40 Y element 8 0 0 01979 961 E120 K40 12 0 0 03349 961 E160 K40 16 0 0 04689 STA PURE Series PFL Dispensing information Bore mm Litres rev 966 E080 K40 Y element 8 0 0 01979 966 E120 K40 12 0 0 03349 966 E160 K40 16 0 0 04689 126 m 630dun en 08 2 ...

Page 127: ...PCS tube elements can be used in steam in place sterilisation processes l STA PURE Series PCS tubing elements can be sterilised to 3A Class 2 and FDA minimum recommended standard which is 121 C 250 F at 1 bar 14 5 psi saturated steam for 20 minutes l Monitor the process continuously l If a tube failure occurs shut down the process Do not touch the pumphead until a 20 minute cooling down period has...

Page 128: ...E4 Mark II pumphead 1 069 4101 000 620RTC continuous tubing clamp set 2 MRA0249A Roller assembly element pumphead 2 MRA0250A Roller assembly continuous pumphead 3 MR2053B Clip Oddie retainer 3 MR2054T Oddie washer 3 SG0021 Oddie spring 3 CX0150 Oddie circlip snap ring 4 MRA3020A Track assembly 5 MR2027T Controlled waste threaded fitting 620R RE RE4 128 m 630dun en 08 2 ...

Page 129: ...4 roller element 9 MRA0322A Rotor assembly 2 roller continuous 10 XX0220 Key metal 11 MR2096T Controlled waste threaded fitting locking nut 12 MR2029T Cased drive MG605 shaft rotor hub spacer 13 FN0488 Cased drive track locating screws M6 x 10 13 FN0523 Close coupled track locating screws 14 FN0581 Rotor locating washer M6 15 MR2251B Rotor locating bolt M6 x 25 16 TT0006 5 mm Allen key 17 MA0017 M...

Page 130: ...n 063 4603 000 620L pumphead 063 4623 000 620LG pumphead 1 069 4001 000 Tube clamp set 2 MR3017S Adaptor plate 3 FN0493 M6x12 screws x 6 4 MR0890T Tube locating peg 5 MRA0150A Rotor assembly 6 BB0018 Shaft bearing 7 MR0850S Front plate 130 m 630dun en 08 2 ...

Page 131: ...Number Spare Description 8 TT0005 10 mm 3 8in spanner 9 MRA3026A Track assembly m 630dun en 08 2 131 ...

Page 132: ...ce it is important to determine flow rates under operating conditions for each new piece of tubing 620R and 620L family pumpheads flow rates are directly proportional to rotor speed If you wish to run the pump at a speed not shown in the tables below flow figures can be reached by dividing the maximum flow shown in the tables below by the maximum rpm figure and multiplying the result by your requi...

Page 133: ...tandard 620RE4 standard Speed rpm 6 4mm 9 6mm 12 7mm 15 9mm 12 0mm 17 0mm 12 0mm 17 0mm 0 1 0 001 0 003 0 004 0 01 0 004 0 01 0 003 0 005 265 3 4 6 6 11 12 9 8 18 8 3 12 630 Marprene TM Bioprene TM l min 620RE hard 620RE4 hard Speed rpm 12 0mm 17 0mm 12 0mm 17 0mm 0 1 0 004 0 01 0 003 0 004 265 9 8 16 8 3 11 630 Pumpsil silicone l min 620R 620RE 620RE4 Speed rpm 6 4mm 9 6mm 12 7mm 15 9mm 12 0mm 17...

Page 134: ...dard 620RE4 standard Speed rpm 6 4mm 9 6mm 12 7mm 15 9mm 12 0mm 17 0mm 12 0mm 17 0mm 0 1 0 0003 0 001 0 001 0 002 0 001 0 002 0 001 0 001 265 0 9 1 8 2 8 3 0 2 6 4 7 2 2 3 3 630 Marprene TM Bioprene TM USGPM 620RE hard 620RE4 hard Speed rpm 12 0mm 17 0mm 12 0mm 17 0mm 0 1 0 001 0 002 0 001 0 001 265 2 6 4 1 2 2 2 9 630 Pumpsil silicone USGPM 620R 620RE 620RE4 Speed rpm 6 4mm 9 6mm 12 7mm 15 9mm 12...

Page 135: ... mm 16 0 mm 0 1 0 002 0 003 0 004 0 1 0 0004 0 0008 0 0011 265 4 5 8 0 11 3 265 1 18 2 12 2 98 620L Pumpsil silicone l min 620L Pumpsil silicone USGPM Speed rpm Tube bore 4 0 mm wall Speed rpm Tube bore 4 0 mm wall 8 0 mm 12 0 mm 16 0 mm 8 0 mm 12 0 mm 16 0 mm 0 1 0 002 0 003 0 004 0 1 0 0004 0 0008 0 0011 265 4 4 8 5 11 5 265 1 17 2 25 3 05 620LG flow rates 4 bar pressure capacity 620L STA PURE S...

Page 136: ...e registered trademarks of Watson Marlow Limited Tri Clamp is a registered trademark of Alfa Laval Corporate AB STA PURE Series PCS and STA PURE Series PFL are trademarks of W L Gore and Associates EtherNet IP is a trademark of ODVA Inc Studio 5000 is a trademark of Rockwell Automation 136 m 630dun en 08 2 ...

Page 137: ...ect but Watson Marlow Fluid Technology Group accepts no liability for any errors it contains and reserves the right to alter specifications without notice WARNING This product is not designed for use in and should not be used for patient connected applications m 630dun en 08 2 137 ...

Page 138: ...updated combined to single source and unified to Issue 4 m 630dun en 08 630 Du DuN pump 04 2020 All versions updated and unified to Issue 8 m 630dun en 08 1 630 Du DuN pump 12 20 Removed PROFIBUS information that was included in error m 630dun en 08 2 630Du DuN pump 01 21 Issue 8 2 Section 23 Help corrected to Section 22 6 Help 138 m 630dun en 08 2 ...

Reviews: