9
❑
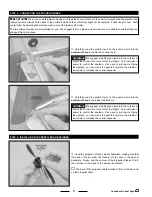
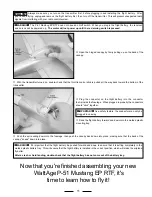
Slide the propeller and spinner backplate onto the propeller
shaft, making sure that the back of the propeller fits firmly over the
hex nuts.
☞
Remember, the back of the propeller hub is molded to fit over
the hex nuts.
❑
Slide the flat washer up against the propeller and thread on a
hex nut. Tighten the hex nut, using an adjustable wrench, to hold
the propeller in place.
❑
Push the spinner cone onto the spinner backplate and line up the
holes in the spinner cone with the holes in the spinner backplate.
❑
Install the spinner cone by threading two screws through the
spinner cone and into the spinner backplate. Tighten the screws
firmly to secure the spinner cone into place.
Continued On Next Page
☛
☛
☛
☛
☛
❑
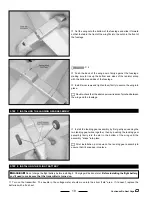
Thread two hex nuts onto the propeller shaft and tighten them by hand until they will not thread on any further.
✦
✦
✦
✦
✦
IMPORTANT
✦
✦
✦
✦
✦
When tightening the hex nut you'll need to gently hold the propeller, so the propeller shaft doesn't spin.
X 2
STEP 6: INSTALLING THE WING
❑
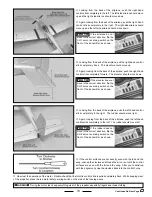
Carefully plug the aileron servo lead from the wing into the
matching 3-prong plug that is inside the fuselage.
✦
✦
✦
✦
✦
IMPORTANT
✦
✦
✦
✦
✦
Make sure that when you plug the two leads
together that the polarity matches - red to red, black to black and
white to white.
✦
✦
✦
✦
✦
IMPORTANT
✦
✦
✦
✦
✦
When you install the wing in the next procedure, make sure that you push the aileron servo wires down into the
fuselage and out of the way. This will prevent them from interfering with the aileron linkage, and they won't get pinched between
the wing and the fuselage.
Summary of Contents for P-51 MUSTANG EP RTF
Page 21: ...21...


