3
4
5
6
INTERIOR UNIT
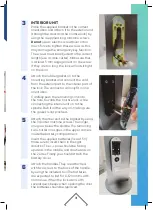
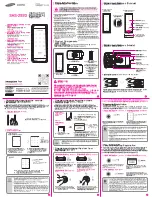
Place the supplied bracket in the correct
orientation and attach it to the exterior unit
(through the door and the mortise lock) by
using the 4 supplied long machine screws.
Do not
use an electric screwdriver or too
much force to tighten these screws as this
may damage the emergency key function
The screws must be adjusted to the correct
length (use a cable cutter). Make sure ther
is at least 5 mm engagement on the screw.
If they are too long, the lock will not sit tight
on the door.
Attach the rubber gasket on to the
mounting bracket and connect the cord
from the exterior part to the interior part of
the lock. The connector will only fit in one
orientation.
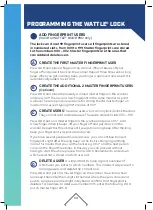
Carefully push the remaining cord into
the hole, towards the mortise lock, while
connecting the interior unit on to the
spindle. Push it all the way on, making sure
the gasket is not pinched.
Attach the inner unit to the bracket by using
the 3 shorter machine screws. The longer
one goes below the spindle. The remaining
two shorter ones goes in the upper corners
inside the battery compartment.
Insert the supplied batteries (3x AA 1,5V).
Make sure to insert them in the right
direction The «-» pole should be facing
upwards in the middle, and downwards on
the 2 sides. Finally you should attach the
battery cover.
Attach the handles. They are attached
with two screws to the back of the handle
by using the included tool.The batteries
are expected to last for 6-12 months with
normal use. When the lock warns with
several quick beeps when opening the door,
the batteries should be replaced.
31

