1
2
3
4
5
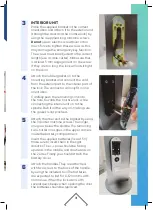
Try to turn the inner handle. It should move easily at the same time
as the large pin on the mortise lock is pulled in. If not, the lock may
be mounted at an angle to the door and must be adjusted.
By pushing in the smallest pin on the mortise lock, the hook bolt
should pop out. Turn the inner handle all the way to return it to the
unlocked position. The hook bolt should now be retracted into the
mortise lock.
Insert the emergency key into the exterior handle and turn the key
90 degrees. The exterior handle should now be active, repeat step
1 and 2 with the outdoor handle. Turn the key back to the starting
position and remove it. Keep the emergency key in your pocket.
When everything is mounted, checked and fastened, test the
lock (KEEP THE DOOR OPEN) by entering the factory code on the
exterior part and the lock is now unlocked. The display flashes
green and the lock beeps before the door can be opened. The
factory set admin code is 123 #, and you always end the sequence
with # (even after you have changed the code to your own).
Close the door and see that the hook bolt pops out when the door
is completely closed. If it does not pop all the way out, this might
be because the space between the door and the strike plate is
too large. In that case you might need to space out the strike
plate from the jamb by using the included 2mm spacer. If the
problem persist, you might need to adjust the placement of the
strike plate to ensure that the bolts engage correctly.
Before closing the door, read and follow the
instructions below!
IMPORTANT!
ALWAYS TRY THE LOCK BEFORE CLOSING THE
DOOR. For user administration, please look at
page 35.
CHECKLIST
32


