Benchmark 750-3000 Installation & Startup Manual
SECTION 2
– INSTALLATION
OMM-115_D
•
GF-200
•
5/9/2019
Technical Support
•
(800) 526-0288
•
Mon-Fri, 8 am - 5 pm EST Page 36 of
126
When mounting the sensor, it must be located on the North side of the building where an
average outside air temperature is expected. The sensor must be shielded from direct sunlight
as well as impingement by the elements. If a shield is used, it must allow for free air circulation.
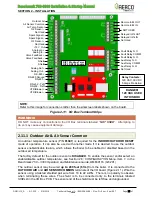
2.11.2 AIR TEMP SENSOR
The
AIR TEMP SENSOR
terminal is used to monitor the air inlet temperature sensor (P/N
123449
). This input is always enabled and is a
“view only” input. It can be seen in the
AIR
TEMP
setting in the
Operating
menu (see Section 2.4:
OPERATING Menu,
item 4, of the
Benchmark 750
– 3000 Operation and Maintenance Guide
, OMM-0116 (GF-201). A resistance
chart for this sensor is provided in APPENDIX C of the same guide. This sensor is an active part
of the combustion control system and must be operational for accurate air/fuel mixing control.
2.11.3 O
2
SENSOR (+ &
–
)
The two
O
2
SENSOR
terminals (+ and
–) are used to connect an integrated oxygen sensor to
the I/O board. The O
2
concentration is displayed in the
Operating
menu after a 60 second warm-
up period. See Section 2.4:
OPERATING Menu,
item 13, of the
Benchmark 750
– 3000
Operation and Maintenance Guide
, OMM-0116 (GF-201).
2.11.4 SPARK SIGNAL (+ &
–
)
The two
SPARK SIGNAL
terminals (+ & -) connect to the spark monitor (P/N
61034
, also called
"AC Current transducer"), which monitors the current going to the ignition transformer (P/N
65085
. See Section 5.12 in the
Benchmark 750
– 3000 Operation and Maintenance Guide
,
OMM-0116 (GF-201) for more information. If the current is insufficient (too high or low) during
the ignition sequence, the controller will abort the ignition cycle. The controller will attempt up to
three ignition cycles. If the current is insufficient by the third try, the controller will shut down and
display a fault message.
2.11.5 ANALOG IN
The two
ANALOG IN
terminals (+ and
–) are used when an external signal is used to change
the setpoint (REMOTE SETPOINT mode) of the boiler.
Either a
4 to 20 mA/1
– 5 VDC
or a
0 to 20 mA/0
– 5 VDC
signal may be used to vary the set-
point or air/fuel valve position. The factory default setting is
4 to 20 mA/1
– 5 VDC
, however this
may be changed to
0 to 20 mA/0
– 5 VDC
in the
Configuration
menu; see Section 2.6:
CONFIGURATION Menu
, item 6, in the
Benchmark 750
– 3000 Operation and Maintenance
Guide
, OMM-0116 (GF-201).
If voltage rather than current is selected as the drive signal, a DIP switch must be set on the
PMC Board located inside the C-More Controller. Contact the AERCO factory for information on
setting DIP switches.
All supplied signals must be floating (ungrounded) signals. Connections between the source
and t
he boiler’s I/O board (Figure 2-11) must be made using twisted shielded pair of 18–22
AWG wire such as Belden 9841. Polarity must be maintained and the shield must be connected
only at the source end and must be left floating (not connected) at the Boiler’s I/O board.
Whether using voltage or current for the drive signal, they are linearly mapped to a 40°F to
240°F (4.4 to 116
°
C) setpoint or a 0% to 100% air/fuel valve position. No scaling for these
signals is provided

