background image

WARNING

Only connect the RT-200 to a Single Pole Circuit. 

The RT-200 is not suitable for 3-way switching. 

If the existing wiring does not match the description for a Single 

Pole Circuit, you should consult with a qualified electrician.  

3.   Prepare the wires.

  Tag the wires currently connected to the existing switch, 

so that they can be identified later. Disconnect the wires. 

Make sure the insulation is stripped off the wires to 

expose their copper cores to the length indicated by the 

“Strip Gage” (approximately ½ inch). 

4.   Wire the time switch.

  Twist the existing wires together with the wire leads on the RT-200 as indicated 

in the table below. Cap them securely using the wire nuts provided. 

Power wire from the circuit (hot) 

to

Black wire on RT-200

Power wire from the lamp or fan (load) 

to

Red wire on RT-200

Neutral wires from the circuit 

to

White wire on RT-200

Ground wire from the circuit

to

Ground terminal on RT-200

5.   Put the RT-200 in the wall box with the display 

positioned above the ON/OFF button.

  Secure it to the wall box with the screws provided.

6.   Install cover plates. 

  Install industry standard decorator wall switch 

cover plate (not included).

7.   Restore power to the circuit.

  Turn on the breaker or replace the fuse.


SETUP

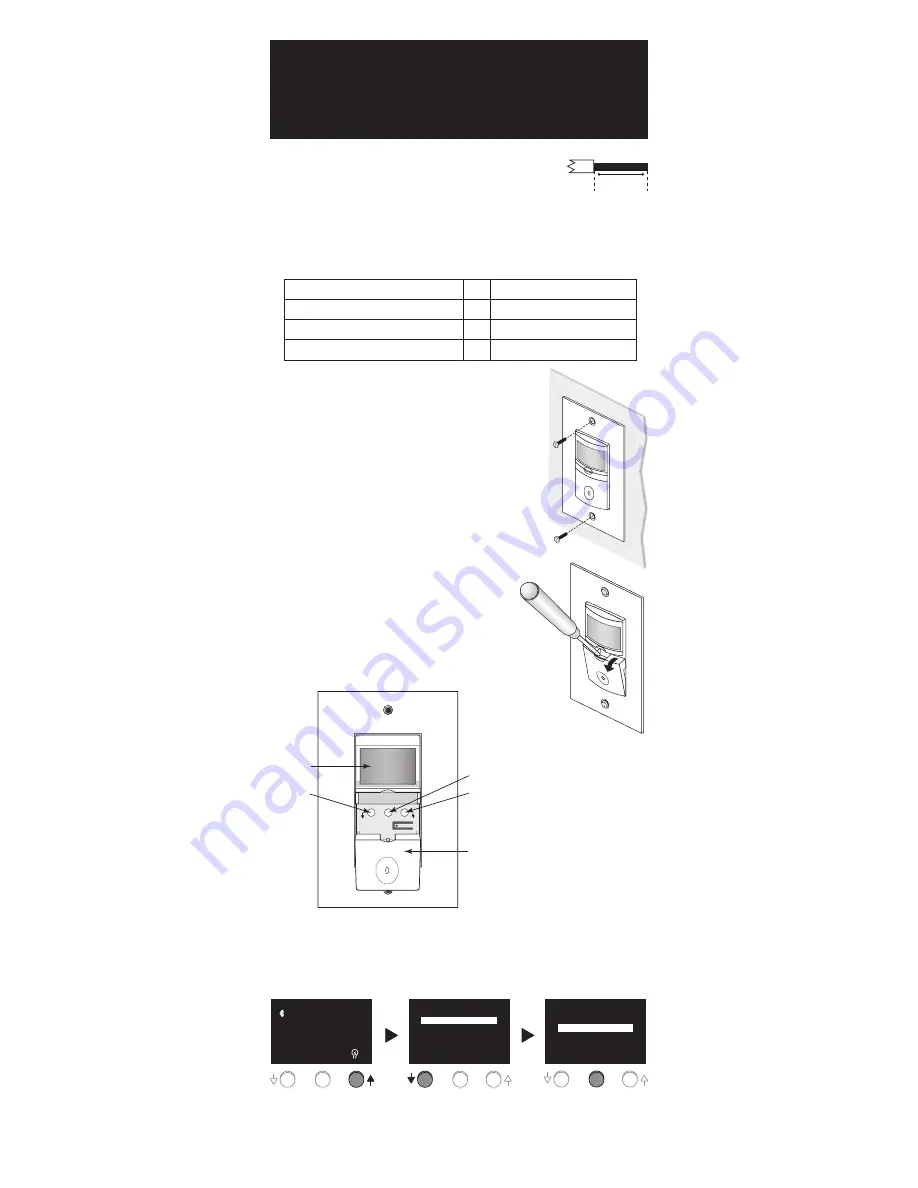
To access the programming buttons, place your finger 

or screwdriver behind the lip at the top of the ON/

OFF button and pull it toward you. Slide the ON/OFF 

button down over the wallplate.  

Buttons

The three programming buttons are used to set up 

the astronomic time switch according to the user’s 

preferences and location.

RT-200 Menu Options

From the standard display, 

known as the “MAIN PAGE” 

press and release the ↑ 

button to enter SETUP menu.  

Press the ↓ button to 

move to desired SETUP 

menu option.


When the option that 

you want to program is 

highlighted, press the 

CENTER button.

SETUP

SET TIME AND DATE

LOCATION

PREFERENCES

SCHEDULING

MAIN PAGE

DST

PM

Tue 03/31/2009

12:04

PROG

SETUP

SET TIME AND DATE

LOCATION

PREFERENCES

SCHEDULING

MAIN PAGE

Once in the SETUP menu if there is no activity for 10 minutes, the unit 

automatically exits out to the MAIN PAGE. 

Call 800.879.8585 for Technical Support

Strip Gage

1/2"

12.7 mm

Menu/Raise 

Center Button
Select/Save

Slide Down
ON/OFF 
Button

Display

   Lower

Button


Save/

Select

Summary of Contents for RT-200

Page 1: ...er is turned OFF at the circuit breaker box remove the existing wall plate and mounting screws Pull the old switch from the wall box 2 Identify the type of circuit In a single pole circuit two single wires connect to two screws on the existing switch A ground wire may also be present and connected to a ground terminal on the old switch A neutral wire should also be present in the wall box SPECIFIC...

Page 2: ...all box with the screws provided 6 Install cover plates Install industry standard decorator wall switch cover plate not included 7 Restore power to the circuit Turn on the breaker or replace the fuse SETUP To access the programming buttons place your finger or screwdriver behind the lip at the top of the ON OFF button and pull it toward you Slide the ON OFF button down over the wallplate Buttons T...

Page 3: ... highlighted cursor to year Year Follow step 2 above Press the CENTER button to save year setting DAYLIGHT SAVINGS TIME DST Factory Default Setting DST ENABLED The unit will automatically adjust for Daylight Savings Time Press the button to highlight DST DST When enabled DST appears in the upper right corner of the MAIN PAGE 1 Press the CENTER button to highlight ENABLED 2 Press the button to swit...

Page 4: ...flash Time format choose between a 12 hour or 24 hour format Date format choose between MM DD YY or DD MM YY Sound When SOUND is enabled the RT 200 will beep every 5 seconds when the load is going to be turned OFF in less than a minute It will also beep each time the user presses the the CENTER or the button A small ear icon will appear on the MAIN PAGE when sound is enabled Flash When FLASH is en...

Page 5: ... DAWN program up to 99 minutes before or after dawn for the load to turn ON Press the CENTER button to save setting OFF Program the time the connected load turns OFF Press the button to highlight OFF Press the CENTER button to select what time the load will turn off Follow Step 2 above to set the OFF time choices are the same as for the ON time Press the CENTER button to save setting Follow the sa...

Page 6: ...tStopper RT wall switches fit behind industry standard decorator style switch cover plates Reset Button Save Select CITY STATE GMT LA T LONG CITY STATE GMT LA T LONG Albuquerque NM 7 35 107 Memphis TN 6 35 90 Arlington TX 6 32 97 Mesa AZ 7 33 111 Atlanta GA 5 34 84 Miami FL 5 26 80 Austin TX 6 30 98 Milwaukee WI 6 43 88 Baltimore MD 5 39 77 Minneapolis MN 6 45 94 Boston MA 5 42 71 Nashville TN 6 3...

Page 7: ...ED 1st Sun Mar 1st Sun Nov SET TIME AND DATE PREVIOUS MENU TIME DATE DST START END 01 00 am 03 30 09 ENABLED 1st Sun Mar 1st Sun Nov SET TIME AND DATE PREVIOUS MENU TIME DATE DST START END 05 00 am 03 30 09 ENABLED 1st Sun Mar 1st Sun Nov Once the hour is set press the CENTER button to highlight minutes Press the or the button to decrease or increase the minutes Once the minutes are set press the ...

Page 8: ...ME AND DATE PREVIOUS MENU TIME DATE DST START END 05 30 am 04 30 09 DISABLED 1st Sun Mar 1st Sun Nov Once DST is enabled or disabled press the CENTER button to save the setting SET TIME AND DATE PREVIOUS MENU TIME DATE DST START END 05 30 am 03 30 09 ENABLED 1st Sun Mar 1st Sun Nov Setting the DST START DATE Press the button to move to highlight START Press the CENTER button to move to Week in the...

Page 9: ...CATION PREVIOUS MENU TIME ZONE 08 LONGITUDE 121º LATITUDE 37º LOCATION PREVIOUS MENU TIME ZONE 08 LONGITUDE 121º LATITUDE 37º LOCATION PREVIOUS MENU TIME ZONE 08 LONGITUDE 155º LATITUDE 37º Once Longitude is set press the CENTER button to save the setting LOCATION PREVIOUS MENU TIME ZONE 08 LONGITUDE 121º LATITUDE 37º Setting the LATITUDE Press the button to highlight LATITUDE Press the CENTER but...

Page 10: ...Press the or the button to choose the month setting PREFERENCES PREVIOUS MENU TIME FMT 12 HOURS DATE FMT MM DD YY SOUND ENABLED FLASH DISABLED PREFERENCES PREVIOUS MENU TIME FMT 12 HOURS DATE FMT MM DD YY SOUND ENABLED FLASH DISABLED PREFERENCES PREVIOUS MENU TIME FMT 24 HOURS DATE FMT MM DD YY SOUND ENABLED FLASH DISABLED Once month format is set press the CENTER button to save the setting PREFER...

Page 11: ... 1 DAY s None ON DUSK OFF DUSK 00 Min 00 Min PROGRAM 1 DAY s None ON DUSK OFF DUSK 00 Min 00 Min Press the or the button to decrease or increase program Once the program is set press the CENTER button to save the setting SCHEDULING PREVIOUS MENU PROGRAM 2 DAY s None ON DUSK OFF DUSK 00 Min 00 Min SCHEDULING PREVIOUS MENU PROGRAM 2 DAY s None ON DUSK OFF DUSK 00 Min 00 Min There are 8 different pro...

Page 12: ...HEDULING PREVIOUS MENU SCHEDULING PREVIOUS MENU PROGRAM 2 DAY s Mon Fri ON TIME OFF TIME 2 00 PM 12 00 AM PROGRAM 2 DAY s Mon Fri ON TIME OFF TIME 2 00 PM 12 00 AM SCHEDULING PREVIOUS MENU PROGRAM 2 DAY s Mon Fri ON TIME OFF TIME 2 00 PM 12 00 AM Press the or the button to decrease or increase the minutes Once the time is set press the CENTER button to save the setting Press the button to move to ...

Reviews: