background image

Page 

12

 of 

14


Step by Step Password Example

Step by Step Password Example

Step by Step Password Example

Step by Step Password Example    

Now assume this setup is to be used for a password entry for your email account. You would, of course, have to 
set up your email account to use the password sent by your reader. To do this simply follow the email account’s 
steps for changing your password and when it is time to enter your new password, simply let the reader enter it 
by reading your access card. Since the reader acts as a keyboard, it will insert your information where your 
cursor is currently blinking.   

Here is an example, and step by step instructions. Let’s say the facility code on your access card is 5 and the 
badge ID on your card is 12 (you can discover this with the Analyze Cards button described earlier in this 
document). You can customize this facility/badge information to create a password.  For example, if your 
company name is XYZ Corporation, you could build a password using your card’s information and the company 
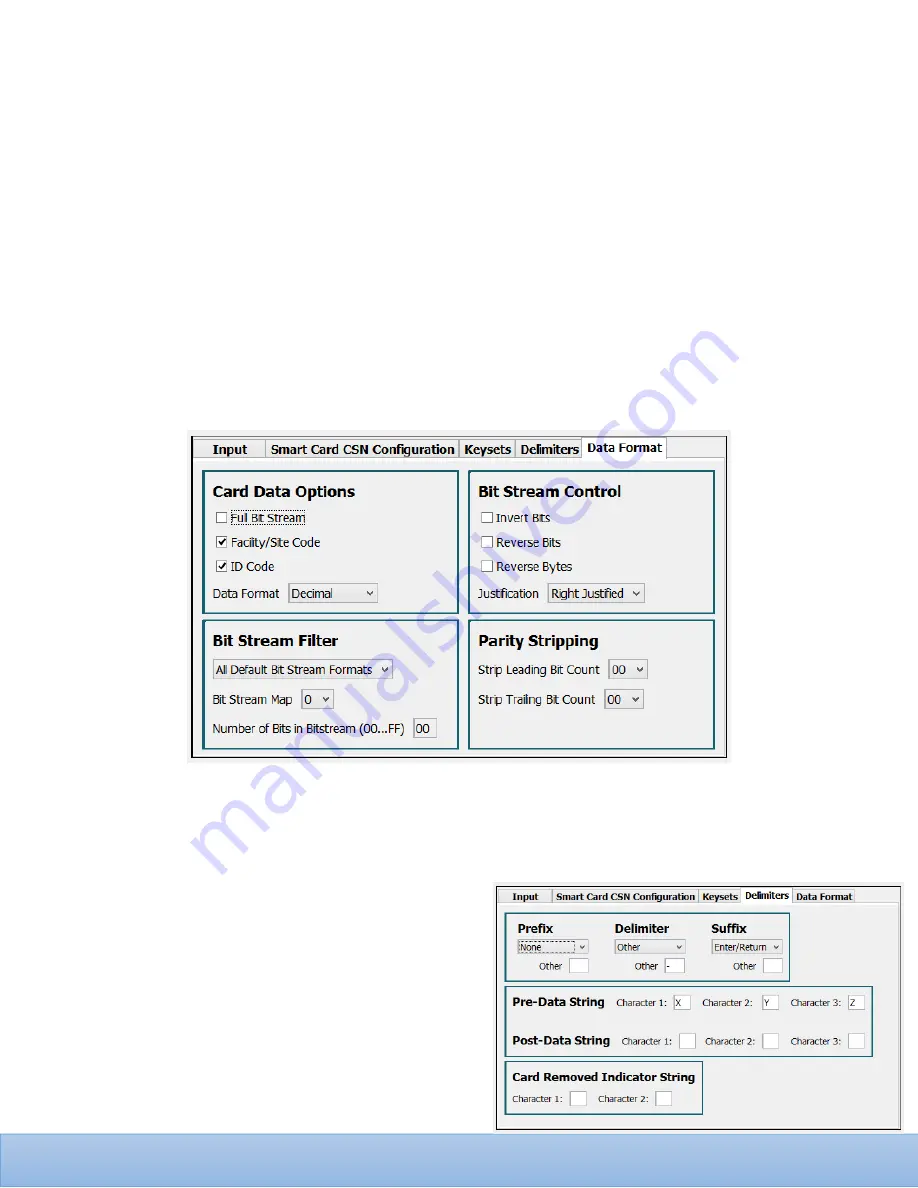
name (e.g. XYZ5-12). To configure your reader for this specific password you would need to make sure your 
Data F

Data F

Data F

Data Format

ormat

ormat

ormat was set to put out the facility code and badge ID in decimal format, as shown below.  


Next you would change your delimiters in the Delimiters

Delimiters

Delimiters

Delimiters tab. Change your Delimiter

Delimiter

Delimiter

Delimiter to “other” and enter “-“ in 

the box below the drop down options. Next change your S

SS

Suffix

uffix

uffix

uffix to “Enter/Return” so it will automatically hit 

enter after you swipe your card. (Note: some password entry procedures need a Tab instead of a return). Then 
you will add “X, Y, Z” into each of the respective boxes in the Pre

Pre

Pre

Pre----Data String

Data String

Data String

Data String section. All of these are shown in 

the picture below.  And as always, after making any of 
these changes make sure to press Set Reader Configuration 

Set Reader Configuration 

Set Reader Configuration 

Set Reader Configuration 

by pushing the button in the top right hand corner, as 
seen on page 6.  

So at this point we have set the reader to read the data 
from the card, append and insert the configured 
characters and delimiters and output the data string 
(XYZ5-12) out the reader’s keyboard endpoint.  You could 
test this yourself by returning to the    Input 

Input 

Input 

Input tab, pressing 

the Read Card Data button, and then presenting the card 

Summary of Contents for Ethos U Series

Page 1: ...Page 1 of 14 303 327 1477 www WaveLynxTech com Ethos Multi technology USB Logical Access Reader User Manual ...

Page 2: ...p by Step Software Installation Step by Step Software Installation Step by Step Software Installation Step by Step Software Installation 6 6 6 6 10 10 10 10 Software Basics Software Basics Software Basics Software Basics 6 6 6 6 7 7 7 7 Software Basics Software Basics Software Basics Software Basics The Buttons The Buttons The Buttons The Buttons 8 8 8 8 10 10 10 10 Software Basics Software Basics...

Page 3: ...t their particular needs clam shells smart phones key fobs etc CSN CSN CSN CSN Card Serial Number sometimes called UID CST CST CST CST Configuration Software Tool Data Data Data Data The data on access cards are a string of binary numbers set with a fixed configuration and length FAC FAC FAC FAC Facility Access Code Frequencies Frequencies Frequencies Frequencies Low frequency 125 kHz band and or ...

Page 4: ...m Requirements System Requirements In order to successfully install and use your logical access reader software your computer must meet the following requirements Windows 7 or newer 64 bit Operating System 2 GB RAM 5 MB of available memory Java 7 or newer Installer will direct you to download Java if a compatible version is not found on your system USB Interface USB Interface USB Interface USB Int...

Page 5: ... all This will unzip the installation directory and place the extracted folder in your current location Step 2 Step 2 Step 2 Step 2 Open the installation directory to view its contents Double click on WaveLynxReader_Setup exe WaveLynxReader_Setup exe WaveLynxReader_Setup exe WaveLynxReader_Setup exe to begin the installation process If a popup appears requesting permission for the application to m...

Page 6: ... endpoint not the keyboard endpoint Reset Default Configur Reset Default Configur Reset Default Configur Reset Default Configuration ation ation ation This button can be used to return the reader to its original factory default settings Note this button does not reset any custom key information entered into the reader by the user see description for Keysets tab Set Reader Configuration Set Reader ...

Page 7: ...tion may include things like card manufacturer protocol type card serial number etc Note You will need to leave the card next to the reader longer for this mode as it takes longer to analyze all available data from the card Below is an example Get Reader Info Get Reader Info Get Reader Info Get Reader Info This button is used to acquire information about your reader The information will include th...

Page 8: ...uration This tab navigates you to the screen that lets you change your settings for reading smart card serial numbers often called the CSN or UID When setting your Smart Card CSN configuration be sure to click on the Set CSN Configuration Set CSN Configuration Set CSN Configuration Set CSN Configuration button in the lower right hand corner This will save any changes that you make To view the read...

Page 9: ...limiter include enter tab and option where you can add a character of your choice You can also add 1 3 characters before or after the data by using the Pre Pre Pre Pre Data String Data String Data String Data String or the Post Post Post Post Data String Data String Data String Data String Each of these has the option of adding 1 3 characters of your choice The last option on the Delimiter screen ...

Page 10: ...er Filter lets you choose if you want to process all available bits of data from the card or just a subset of all available bits The Parity Stripping Parity Stripping Parity Stripping Parity Stripping option lets you strip parity bits ...

Page 11: ...o each box as shown below Then just make sure to click the Set Set Set Set Configuration Configuration Configuration Configuration button This sends the setup down to the reader over USB for storage in the reader s memory These same steps would apply if you want 1 3 characters at the end of your data just in the Post Post Post Post Data String Data String Data String Data String section below Anot...

Page 12: ... to make sure your Data F Data F Data F Data Format ormat ormat ormat was set to put out the facility code and badge ID in decimal format as shown below Next you would change your delimiters in the Delimiters Delimiters Delimiters Delimiters tab Change your Delimiter Delimiter Delimiter Delimiter to other and enter in the box below the drop down options Next change your S S S Suffix uffix uffix uf...

Page 13: ...g in device without the need for any other software When you are content with the data output and it matches your desired email password you can use the reader and your access card to change your password and log in using your card For example to log in to your email account simply go to your email login page type in your email address click on the password section so the blinking cursor is in tha...

Page 14: ...ful interference to radio or television reception which can be determined by turning the equipment off and on the user is encouraged to try to correct the interference by one or more of the following measures Reorient or relocate the receiving antenna Increase the separation between the equipment and receiver Connect the equipment into an outlet on a circuit different from that to which the receiv...

Reviews: